By: Team T10-1 Since: Aug 2019 Licence: MIT
1. Preface
This is the Developer Guide to Jarvis, a productivity manager tool designed for NUS students who want to consolidate their schedule, tasks, finances and modules in one place. The link to the GitHub repository can be found here.
2. Setting up
Refer to the guide here.
3. Design
3.1. Architecture: High-Level View
The architecture diagram below explains the high-level design of Jarvis.
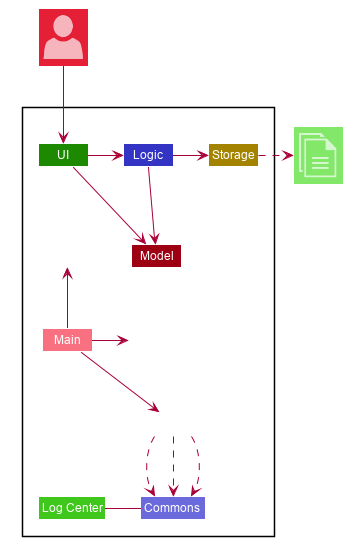
Main has three classes called
Main,
MainApp, and
AppParameters
They are responsible for:
-
On launch of Jarvis
Initialises all components (
Ui,Logic,Storage, etc) in the correct sequence and establishes the relevant links between each component. -
On exit of Jarvis
Shuts down all components and invokes any clean-up methods where necessary.
The rest of Jarvis consists of another four components:
| Component | Remarks |
|---|---|
Handles all UI logic in the application |
|
Handles all parsing and execution of commands
' that operates on |
|
Handles all reading and updating of runtime data within Jarvis. |
|
Handles all reading and writing of Jarvis' data, from and to the hard-disk. |
Each of the four components
-
Defines its API in an
interfacewith the same name as its corresponding component. -
Exposes its functionality using a
{ComponentName}Managerconcrete class.
For example, the Logic component defines its API using an interface Logic.
Logic is then implemented by the LogicManager concrete class, which
exposes its functionality to the rest of the application.
3.1.1. Architecture: Interactions between Components
The sequence diagram below shows how the components interact with each
other for the scenario where the user issues the command delete-cca 1.
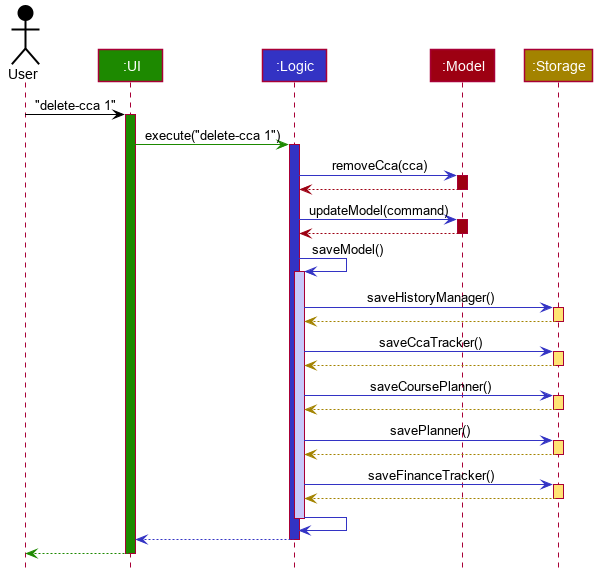
delete-cca 1 commandThe sections below give more details of each component.
3.2. UI component
The UI component defines the user-viewable part of the application. It consists
of a MainWindow made up of parts, such as the StatusBarFooter, CommandBox
and HelpWindow. Each individual feature of Jarvis inherits from the View class, which in turn inherits from the
abstract class UiPart. Every other non-feature related part inherits from the abstract class UiPart. Shown
below is the structure of the UI component.
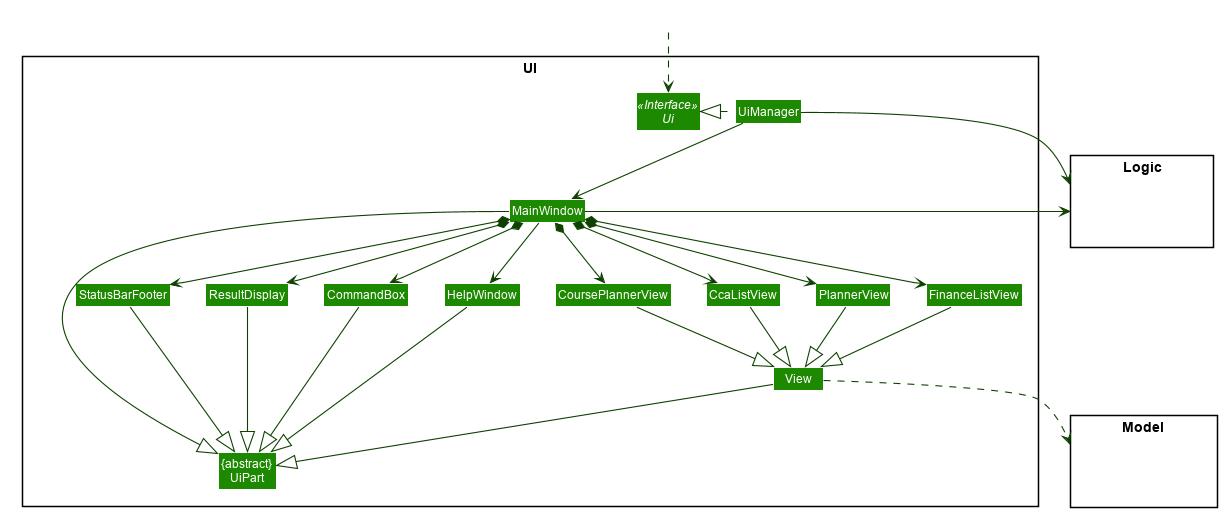
The Ui component uses the JavaFX UI framework. The layout of every part
is defined in matching .fxml files found in /src/main/resources/view.
For example, the layout of
MainWindow
is specified in
MainWindow.fxml.
The UI has the following functionality:
-
Takes in user input from the GUI, and using it in tandem with
Logicto create the relevant commands. -
Executes the constructed commands using
Logic. -
Listens for changes to
Modelso that the UI can be updated with the modified data.
3.3. Logic component
The Logic component is the "brains" of Jarvis. While the Ui defines
the GUI and Model defines in-memory data, the Logic component does most
of the heavy-lifting in terms of deciding what to change within the Model
and what to return to the Ui. The diagram below shows the structure of the
Logic component.
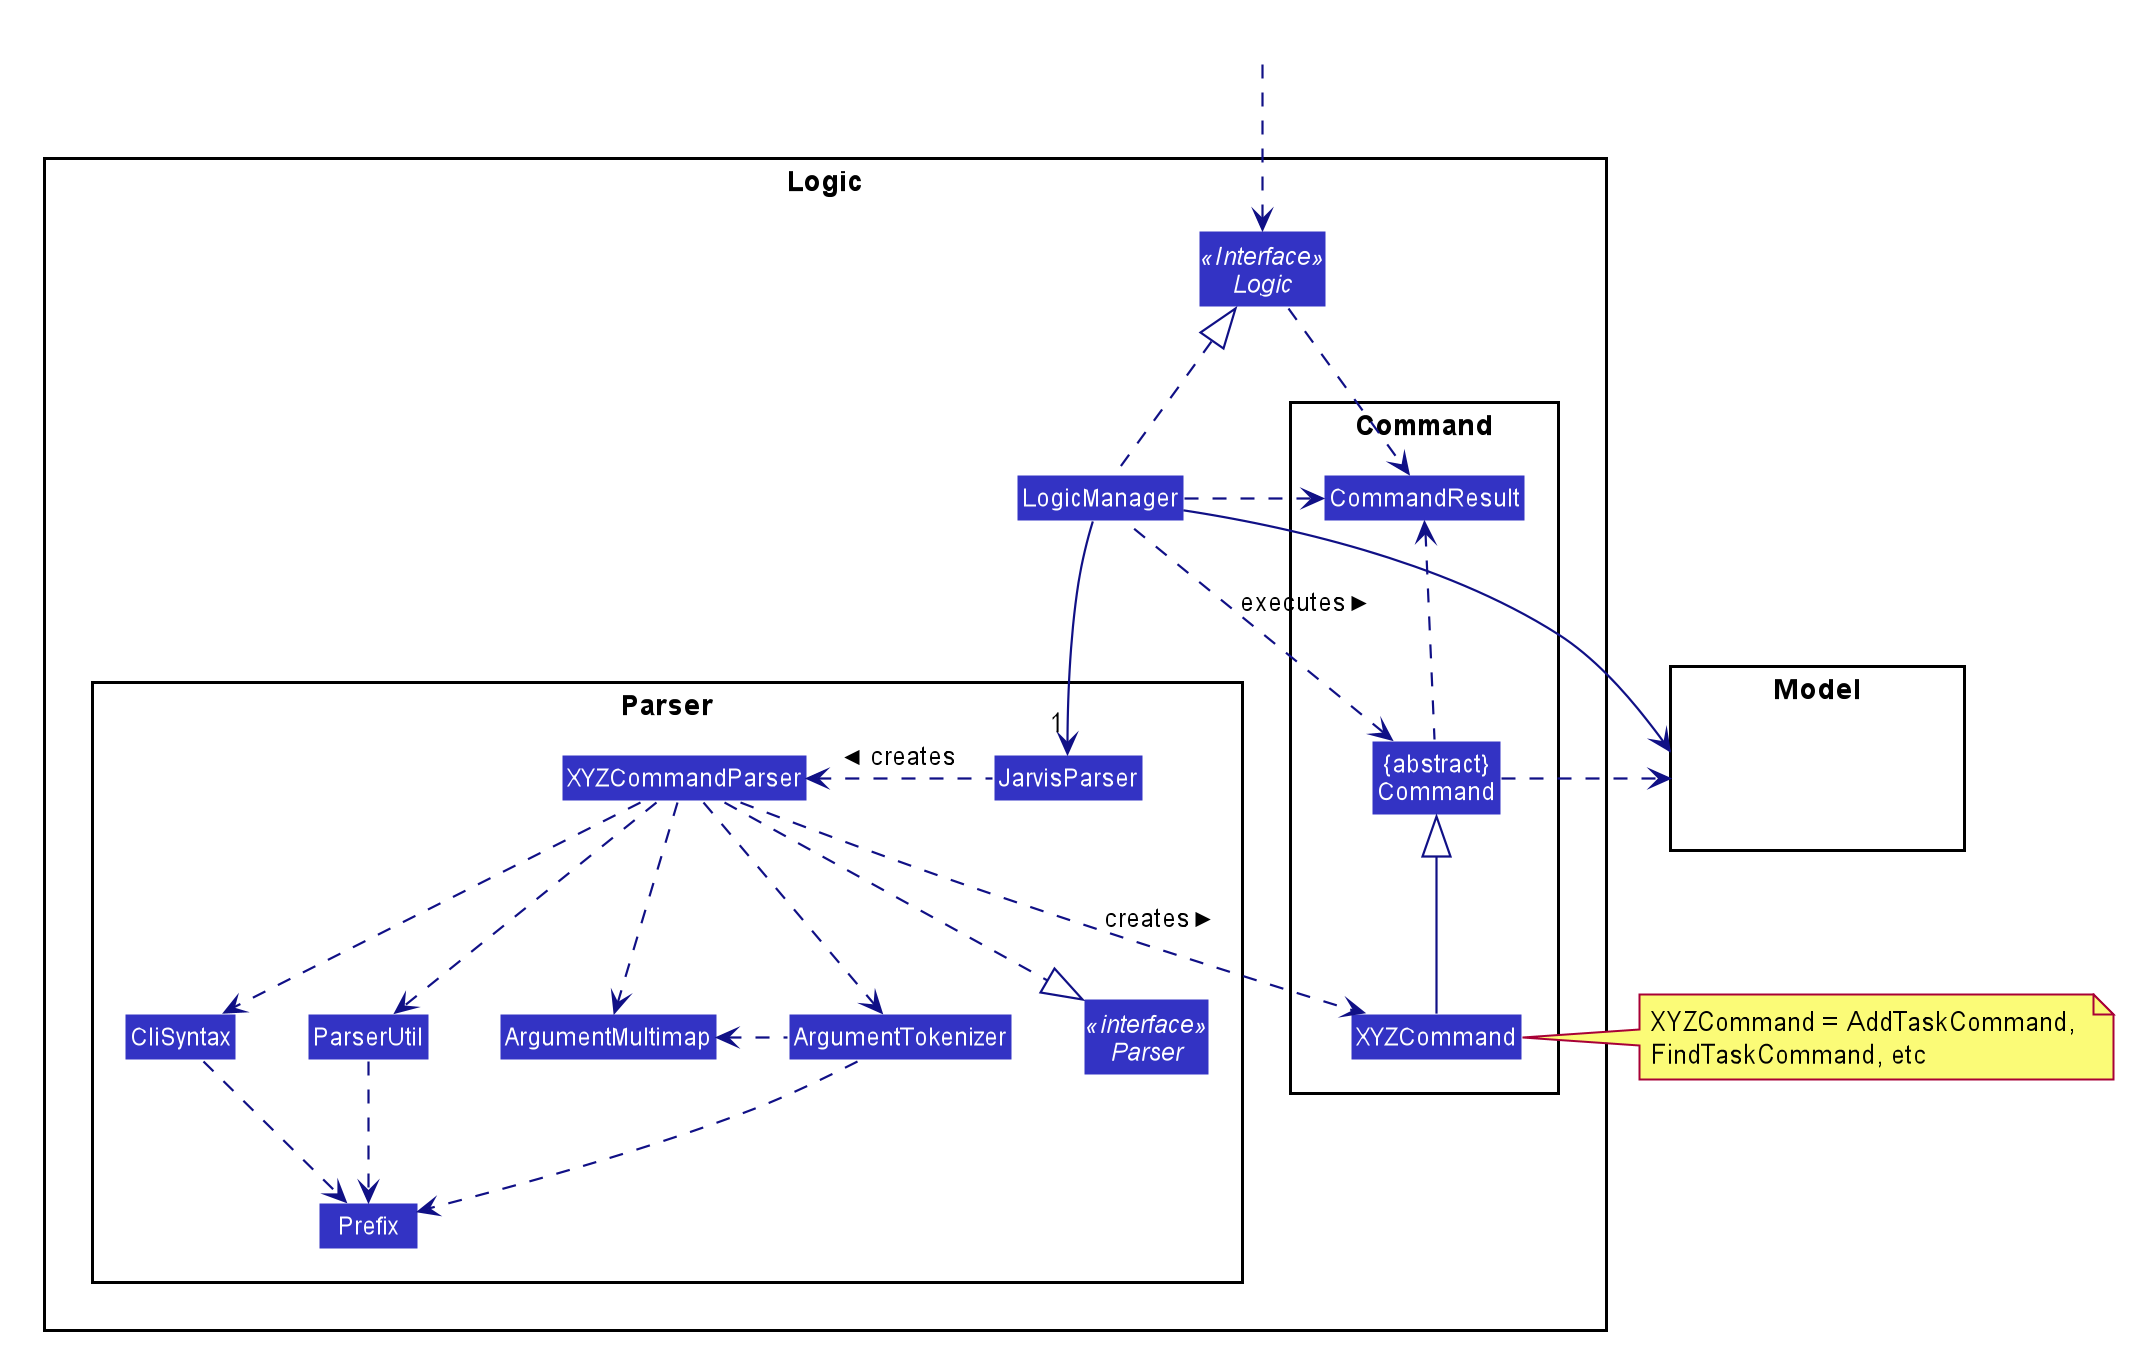
The diagram above shows how the Logic component interacts with its internal
parts.
-
Once a user input is obtained from the GUI,
LogicusesJarvisParserto parse to command to return aCommandobject. -
The
Commandis executed byLogicManager. -
Depending on the command created, it may mutate the
Model, such as adding a new task or course. -
The result of the command execution is encapsulated as a
CommandResultthat is returned toUi. -
These
CommandResultscan instruct theUito perform certain actions, such as switching tabs between the various views, and displaying help or error messages to the user.
Shown below is the Sequence Diagram within the Logic component for the API
call: execute("add-course c/CS1010").
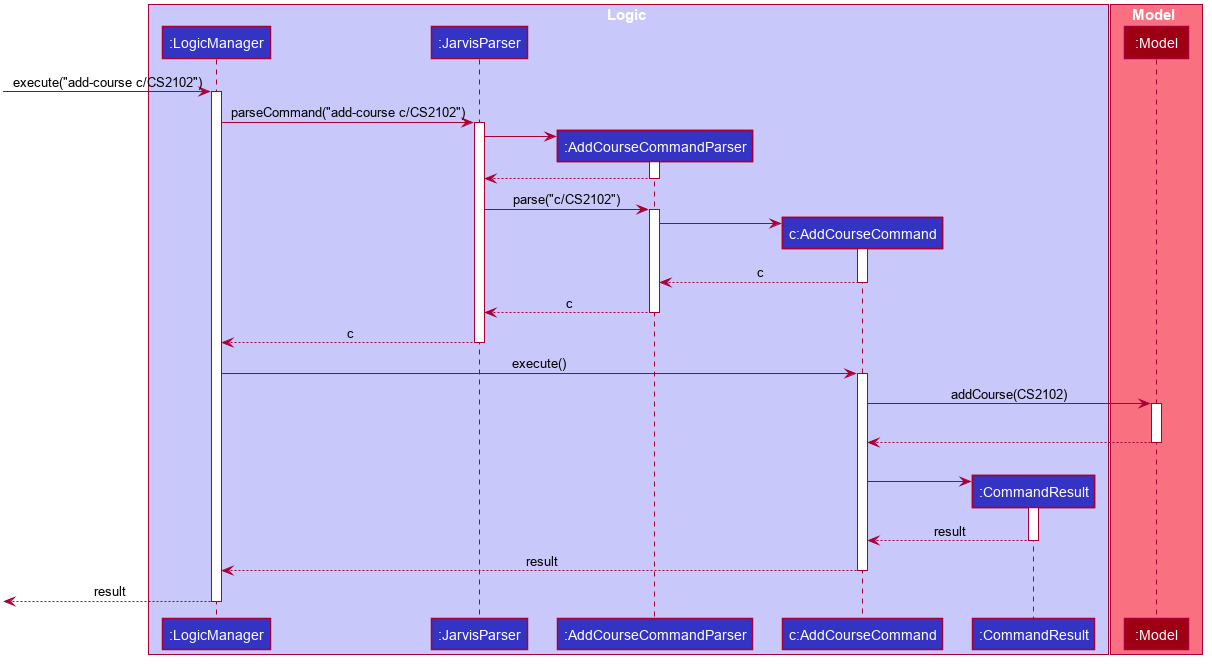
add-course c/CS1010 CommandThe original caller to LogicManager, in the context of Jarvis, is the Ui
component.
3.4. Model component
The Model API is responsible for interacting with the data in Jarvis
including the various aspects such as user’s preferences, command history,
finance management, cca information, courses and schedule information. The
Model API also acts as a facade that handles interaction with the data of
Jarvis.
Below is a class diagram involving the Model interface, which inherits
from the feature specific model interfaces.
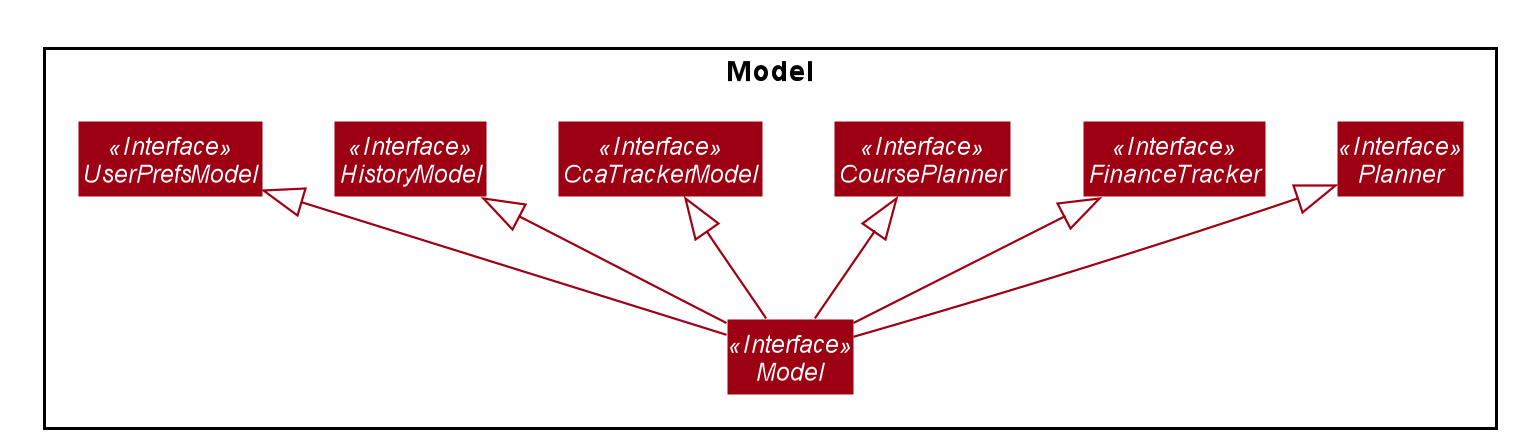
The Model component,
-
Stores a
UserPrefobject that represents the user’s preferences -
Stores the
HistoryManagerdata -
Stores the
FinanceTrackerdata -
Stores the
CcaTrackerData -
Stores the
CoursePlannerData -
Stores the
Plannerdata
The concrete class ModelManager implements Model and manages the data
for Jarvis. ModelManager contains UserPrefs, HistoryManager, CcaTracker,
CoursePlanner, FinanceTracker and Planner. These classes manages the
data related to their specific features.
Below is a class diagram for ModelManager.
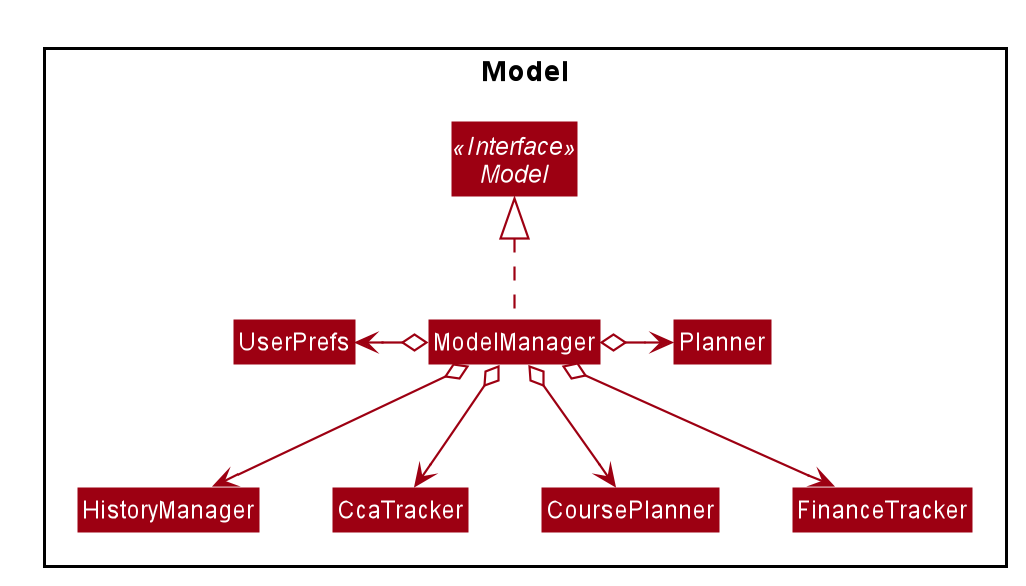
ModelManager classEach feature has a class managing the data related to that feature as mentioned earlier.
Below are the class diagrams of these classes.

UserPrefs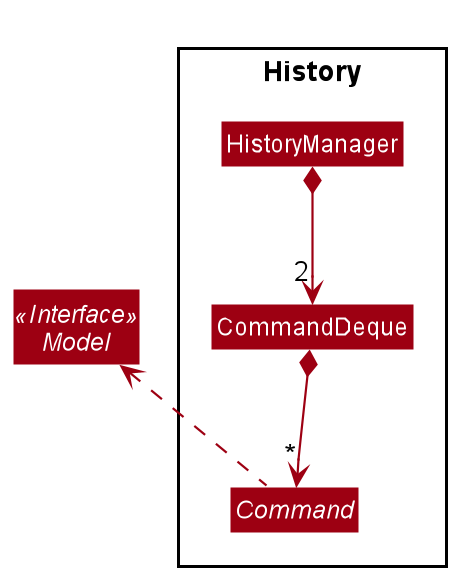
HistoryManagerCcaTracker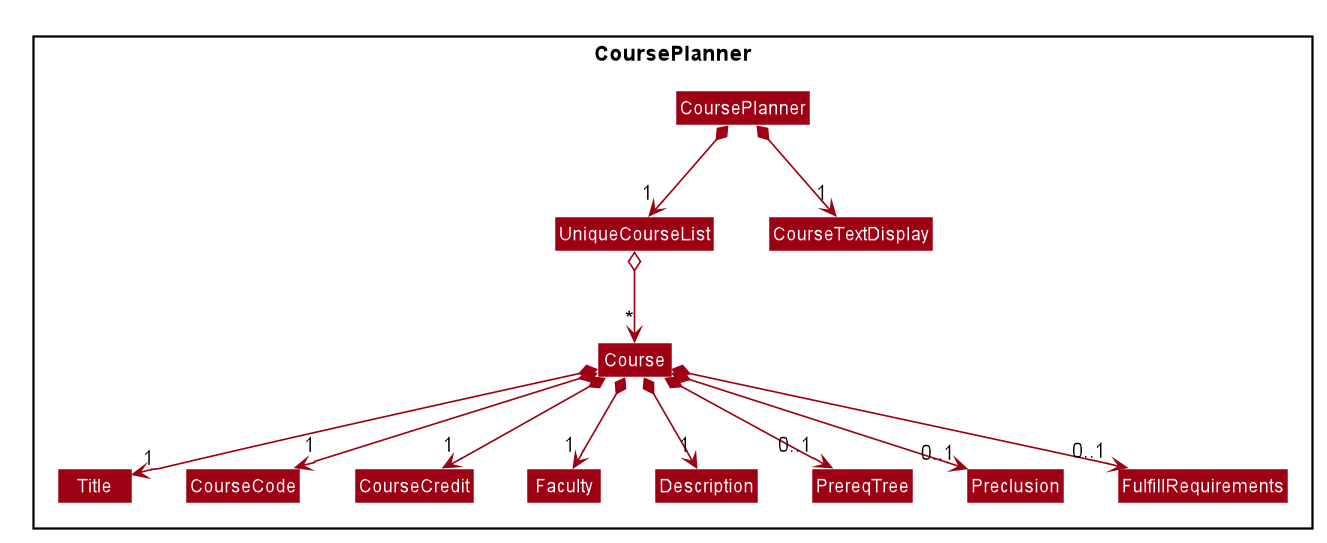
CoursePlannerFinanceTracker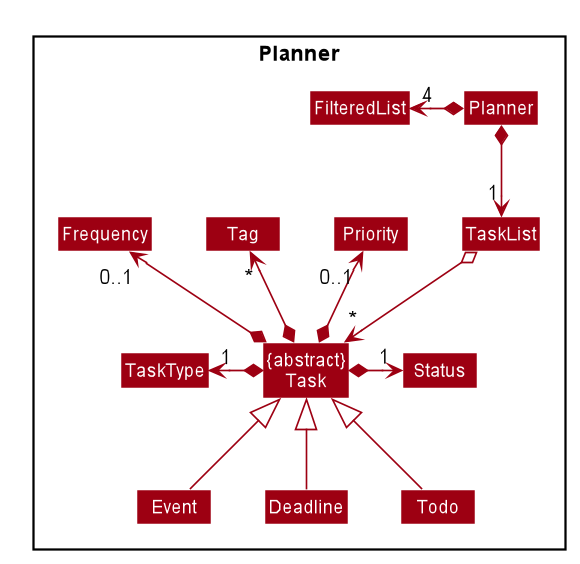
Planner3.5. Storage component
The Storage API is responsible for reading and writing data in json format.
This allows the application is remember information in json format when the
user closes the application. The Storage API acts as a facade that handles
interaction regarding storage related components.
Below is a class diagram involving the Storage interface, which
inherits from feature specific storage interfaces.

The Storage component,
-
can save
UserPrefobjects in json format and read it back. -
can save
HistoryManager,FinanceTracker,CcaTracker,CoursePlannerandPlannerdata in json format and read it back.
The concrete class StorageManager implements Storage and manages
the storage for UserPrefs, FinanceTracker, CcaTracker,
CoursePlanner, Planner and HistoryManager.
Below is a class diagram of StorageManager.
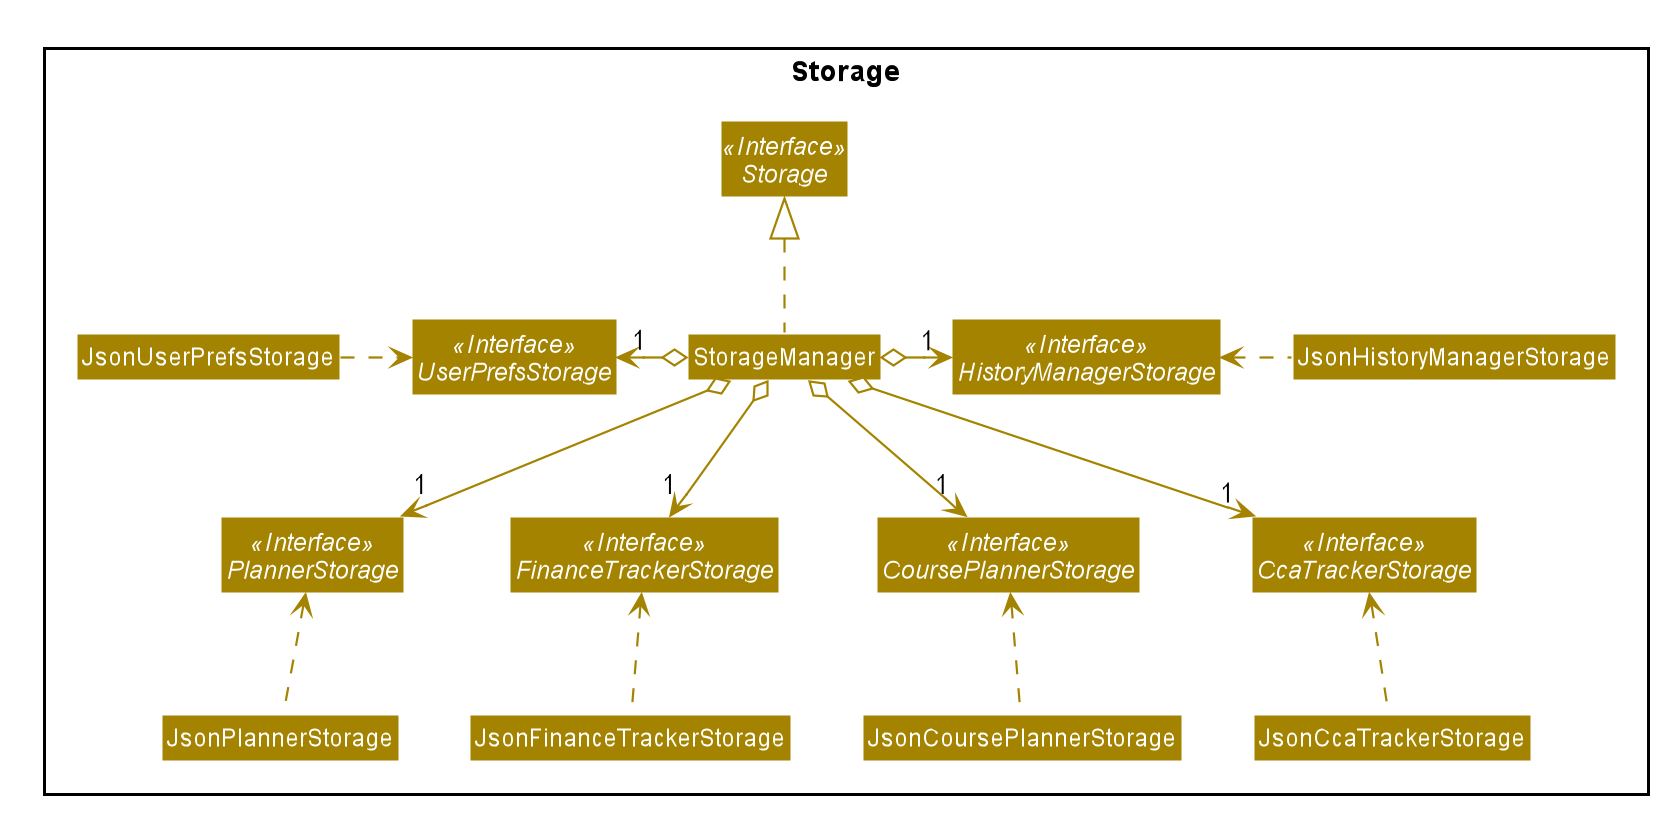
StorageManager classEach feature of Jarvis is able to save its information to local storage
in JSON format, by adapting each feature component into
JsonSerializable{Component Name} class.
Below are the class diagrams for these adapted classes.
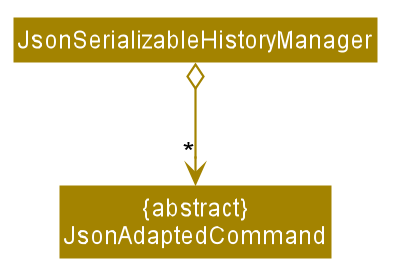
JsonSerializableHistoryManagerJsonSerializableCcaTracker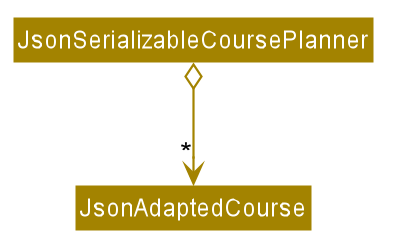
JsonSerializableCoursePlannerJsonSerializableFinanceTracker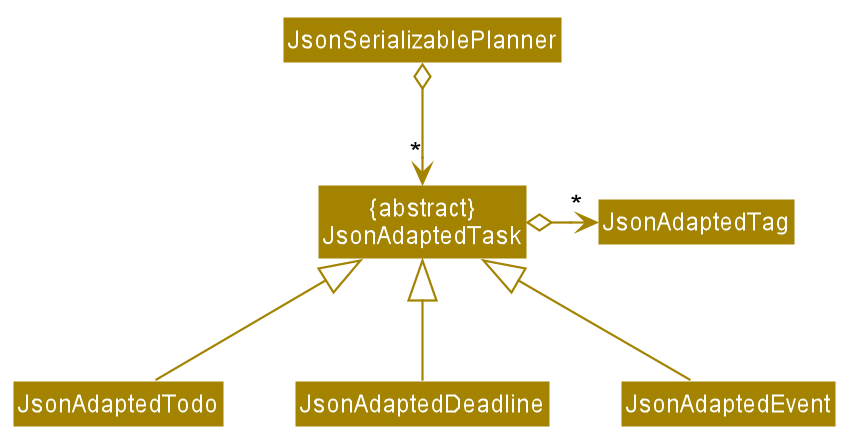
JsonSerializablePlanner3.6. Commons Component
The commons package represents a set of common classes and utilities used by
the multiple components throughout Jarvis.
Some examples are:
-
A class for formatting, reading and writing of
.jsonfiles, heavily used by theStoragecomponent. -
A class that stores generic messages (i.e not specific to a particular feature) to be displayed to the user throughout the application.
-
A class used by many classes for writing and displaying log messages in Jarvis log file.
Links : [Package]
4. Implementation
This section describes some noteworthy details on how certain features are implemented.
4.1. Planner Feature
4.1.1. Overview
The planner feature in Jarvis enables users to easily organise and manage their different tasks in school. Users will be able to keep track of tasks they have done, tasks they have yet to do, and sort these tasks by different attributes like task type and priority levels.
There are three types of tasks in the planner:
-
Todo: Tasks with a description only -
Event: Tasks with a start and end date -
Deadline: Tasks with a due date
Users can Tag these tasks to sort them into different categories, as well
as add Priority and Frequency levels to them.
4.1.2. Implementation
The Planner contains a TaskList, which in turn, contains a number of tasks
a user has. Each task has a TaskType and Status and may also have a Priority level,
Frequency level and any number of Tag objects.
A simple outline of the Planner can be seen below, in Figure 26.
The Model in Jarvis extends PlannerModel which facilitates all operations
necessary to carry out commands by the user.
-
Model#getPlanner()— Returns an instance of aPlanner. -
Model#addTask(int zeroBasedIndex, Task task— Adds aTaskto the planner at the specifiedIndex. -
Model#addTask(Task t)— Adds aTaskto thePlanner. Since noIndexis specified, theTaskis appended to the end of theTaskList. -
Model#deleteTask(Index index)— Deletes theTaskat the specifiedIndexfrom thePlanner. -
Model#deleteTask(Task t)— Deletes the specifiedTaskfrom thePlanner. -
Model#size()— Returns the total number ofTaskobjects in thePlanner. -
Model#hasTask(Task t)— Checks if a givenTaskis already in thePlanner. -
Model#markTaskAsDone(Index i)- Changes theStatusof aTaskat the givenIndexfromDONEtoNOT_DONE -
Model#getTasks()— Returns theTaskListin thePlanner. -
Model#getTask(Index index)- Retrieves theTaskat the specifiedIndexof theTaskList -
Model#updateFilteredTaskList(Predicate<Task> predicate)- Updates theFilteredListin thePlanneraccording to the givenPredicate. -
Model#updateSchedule()- Updates theFilteredListofTaskobjects whose dates coincide with the current date. -
Model#getUnfilteredTaskList()- Returns anObservableList<Task>of all theTaskobjects in thePlanner. -
Model#getFilteredTaskList()- Returns anObservableList<Task>of all theTaskobjects in theFilteredList. -
Model#getTasksToday()- Returns an unmodifiable view of the list ofTaskobjects that coincide with the current day, backed by theFilteredListofPlanner -
Model#getTasksThisWeek()- Returns an unmodifiable view of the list ofTaskobjects that coincide with the current week, backed by theFilteredListofPlanner.
One example of the interaction between the Model and commands for the Planner can be seen when the user
executes a pull-task command.
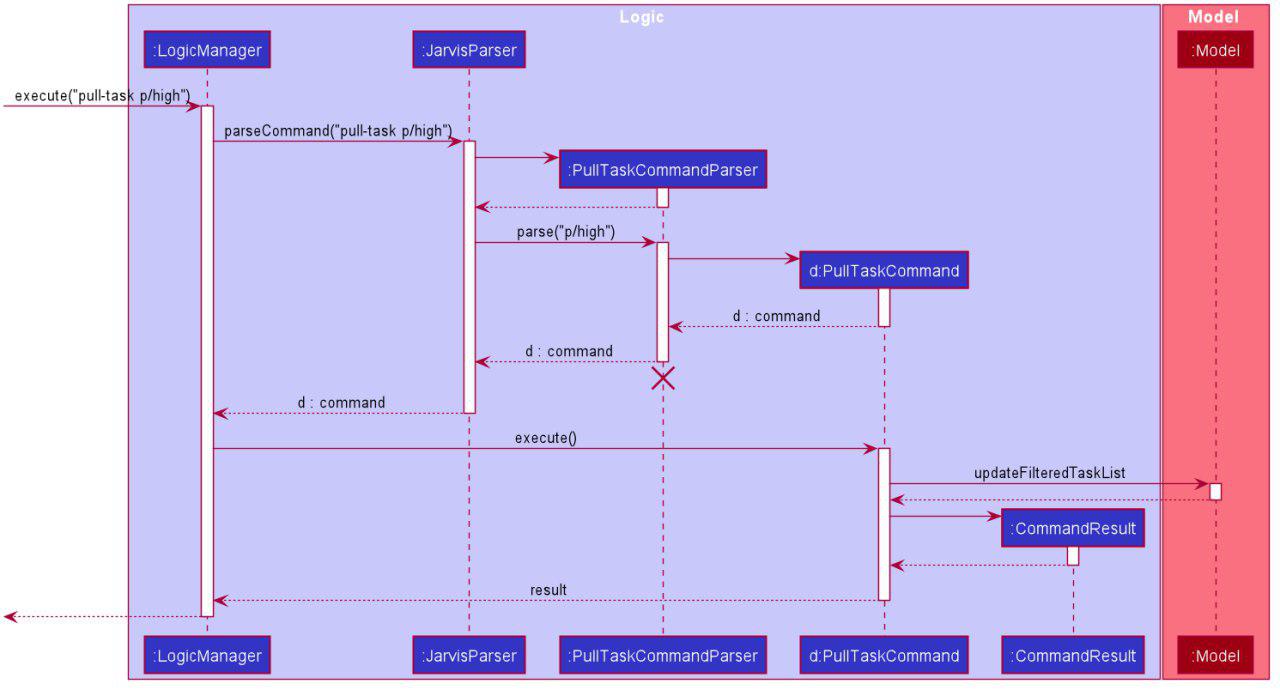
In the figure above, pull-task will result in the filtered lists in the Planner to be updated according to
the appropriate predicates. In this case, the predicate called will be TaskPredicateMatchesPredicate as the
user had specified a pull-task according to the Priority levels of the Task objects.
4.1.3. Design Considerations
Aspect: Task Descriptions in a Task
-
Option 1: As a string attribute in
Task-
Pros: Intuitive, easy to implement, less code required
-
Cons: Provides a lower level of abstraction, especially if an
edit-taskcommand is implemented
-
-
Option 2: Building a separate
TaskDescriptionclass-
Pros: Higher level of abstraction
-
Cons: More code, will take time to replace current methods that deal with String
TaskDesdirectly
-
Ultimately, we decided on Option 1 as there are no limitations on what a description of
a Task should be (other than not null). Further more, there is no manipulation of the
Task Description at the current stage of Jarvis, hence there is no real need to provide an
additional layer of abstraction for it. If we do intend to continue developing Jarvis in
the future, however, Option 2 might be a viable choice.
4.2. Finance Tracker Feature
4.2.1. Overview
The Finance Tracker feature allows the user to track their
-
Purchases
-
Monthly subscriptions (aka Installments)
-
Total & remaining spending
The feature offers the user to view his purchases and installments in two separate lists, as well as be able to add, delete, find, edit these items. Furthermore, the feature keeps track of the overall spending by the user for the month, and if the user has set a limit, the feature tracks their remaining available spending.
4.2.2. The Finance Tracker Model
The FinanceTracker class within the model provides an interface between the
components of the feature and the updating of the overall model. Like other
features, Model is associated with the finance tracker feature by
implementing FinanceTrackerModel, from which Model implements.
Some of the more significant methods within the FinanceTracker are shown
below:
-
Model#addPurchase(Purchase)- Adds a single use payment to the top of the list -
Model#deletePurchase(Index)- Deletes single use payment at that index -
Model#addInstallment(Installment)- Adds an installment -
Model#deleteInstallment(Index)- Deletes installment at that index -
Model#hasSimilarInstallment(Installment)- Checks for the existence of an installment with the same description in the finance tracker -
Model#setInstallment(Installment, Installment)- Replaces an existing installment with a new installment -
Model#calculateTotalSpending()- Calculates the total expenditure by the user for this month -
Model#calculateRemainingAmount()- Calculates the remaining spending amount available to user
The Finance Tracker feature closely follows the extendable OOP solution already
implemented within AB3. In the Finance Tracker, the Installment objects and
the Purchase objects manage most aspects related to this feature. These
objects are stored in their respective ObservableList - InstallmentList
and PurchaseList, which provide an abstraction with add, delete, and
set operations that are called by FinanceTracker and its model.
Shown below is the class diagram for the Finance Tracker.
4.2.3. Finance Tracker Components
As mentioned above, the Finance Tracker contains Installment and Purchase
objects.
Installments
Installments are monthly subscriptions added by the user to the Finance
Tracker and are stored in an InstallmentList. The current codebase requires
that all installments must have the following non-nullable attributes:
-
InstallmentDescription -
InstallmentMoneyPaid
Purchases
Purchases are single use payments added by the user to the Finance Tracker
and are stored in a PurchaseList. The current codebase requires that all
purchases must have the following non-nullable attributes:
-
PurchaseDescription -
PurchaseMoneySpent
4.2.4. Feature Details
The application should be able to add and delete both types of objects.
Furthermore, it should be able to find specific purchases and allow editing of
installments by their index in the InstallmentList.
We will be focusing on the editing of installments.
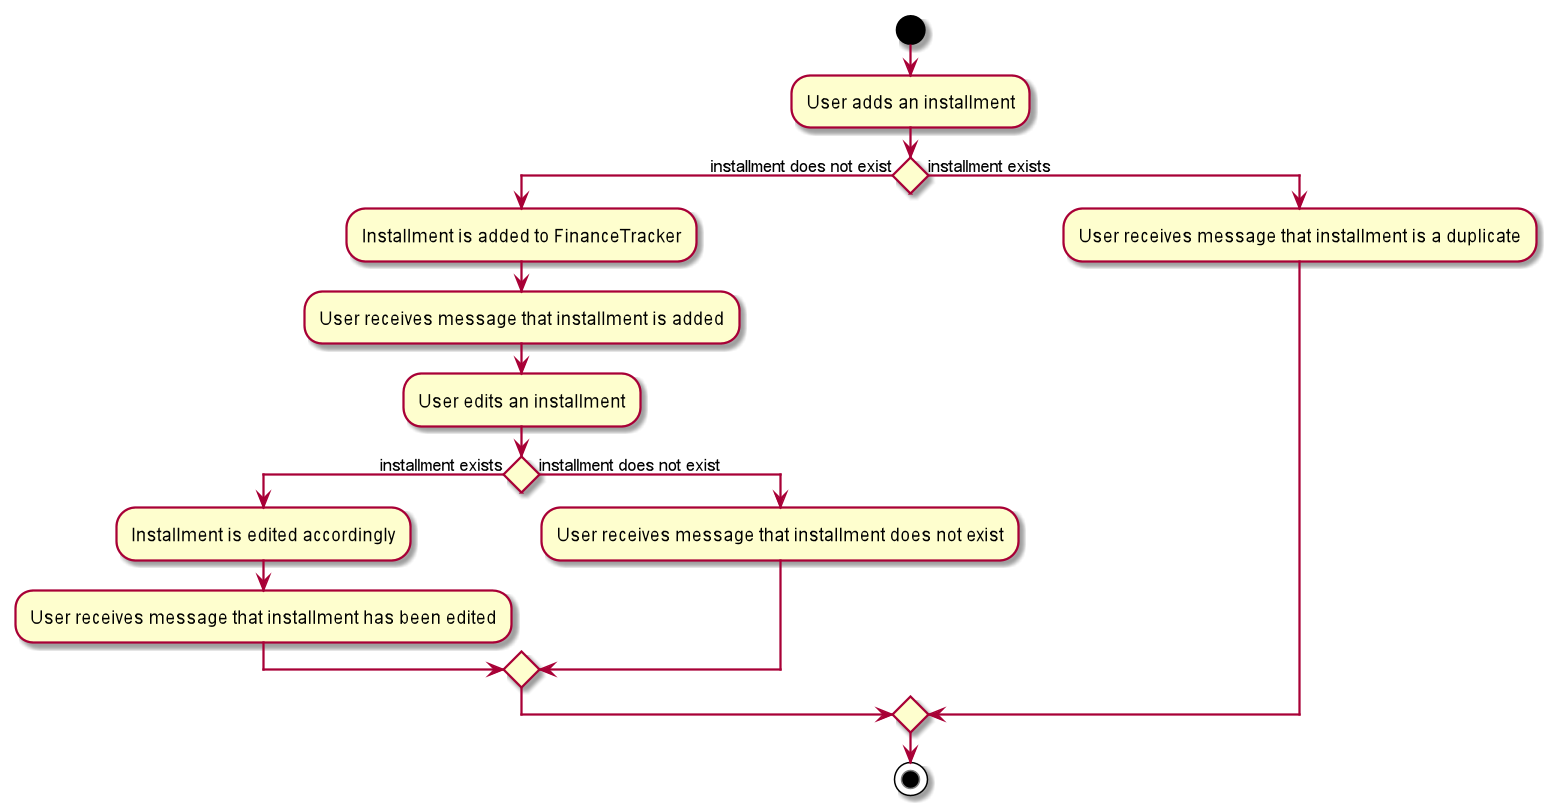
Editing an installment
The user has to specify the index of the installment he wishes to edit, as well as any of the fields he wishes to change. If the index does not exist, the system will inform the user of the error. As long as the fields provided by the user to be edited are valid (prefixed with "d/" and "a/"), the correct installment will be accurately edited. This is reflected in the Activity Diagram below.
An index is considered invalid if the numerical value provided is less
than or equal to zero, or greater than the largest index in InstallmentList.
|
4.2.5. Command Execution
For brevity’s sake, we will illustrate only 2 specific commands and its
executions on model. These two commands are the edit-install and the
delete-paid commands.
Command edit-install
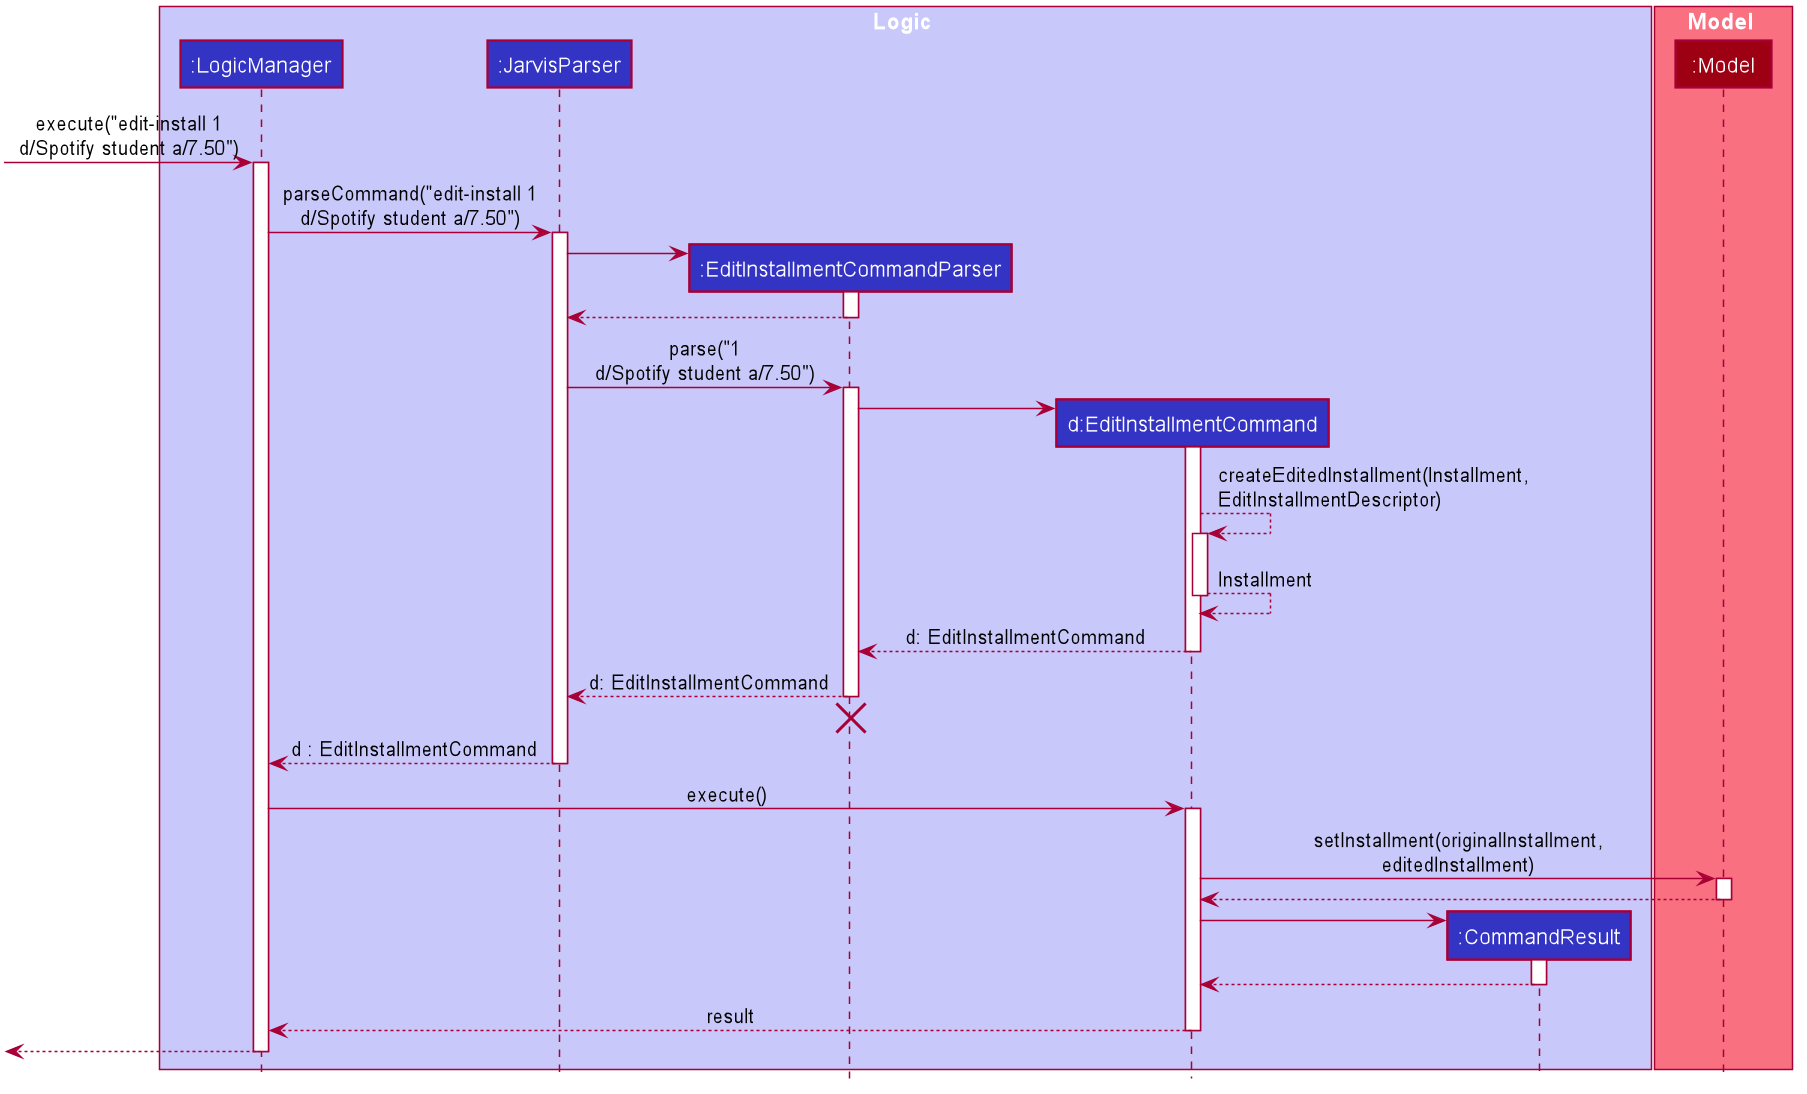
The following sequence diagram illustrates how an
Installment is edited when a user types in a edit-install command:
Step 1. The user launches the application for the first time. The
FinanceTracker is initialized. Assume that a valid Installment has already
been added to the InstallmentList in FinanceTracker.
Step 2. The user executes
edit-install 1 d/student-price Spotify subscription a/7.50
command to edit both the description and money spent on the existing
Installment in the FinanceTracker. An EditInstallmentCommandParser object is
created and its #parse method is called. The parse method returns a new
EditInstallmentCommand object.
Step 3. The EditInstallmentCommand object is executed on the model. The
EditInstallmentCommand#execute method is called, and this will create a new
Installment object from the existing installment but with all the edited
fields changed. In this method,
Model#setInstallment(Installment, Installment) method is called.
The EditInstallmentCommand#execute method first checks for whether the
index is within the size of InstallmentList.
|
Step 4. As mentioned in section 2, the methods in Model merely mirrors the
methods in the FinanceTracker class. As such, the
FinanceTracker#setInstallment(Installment, Installment) method is called.
This in turns calls the
#InstallmentList#setInstallment(Installment, Installment) method.
Step 5. This InstallmentList#setInstallment(Installment, Installment)
method first finds the Installment based on its corresponding index. Then,
it sets the edited installment at the index found earlier.
TLDR: The calling of the #setInstallment method at the Model
level triggers a cascading series of #setInstallment method which culminates
in target installment being edited with the corresponding fields.
|
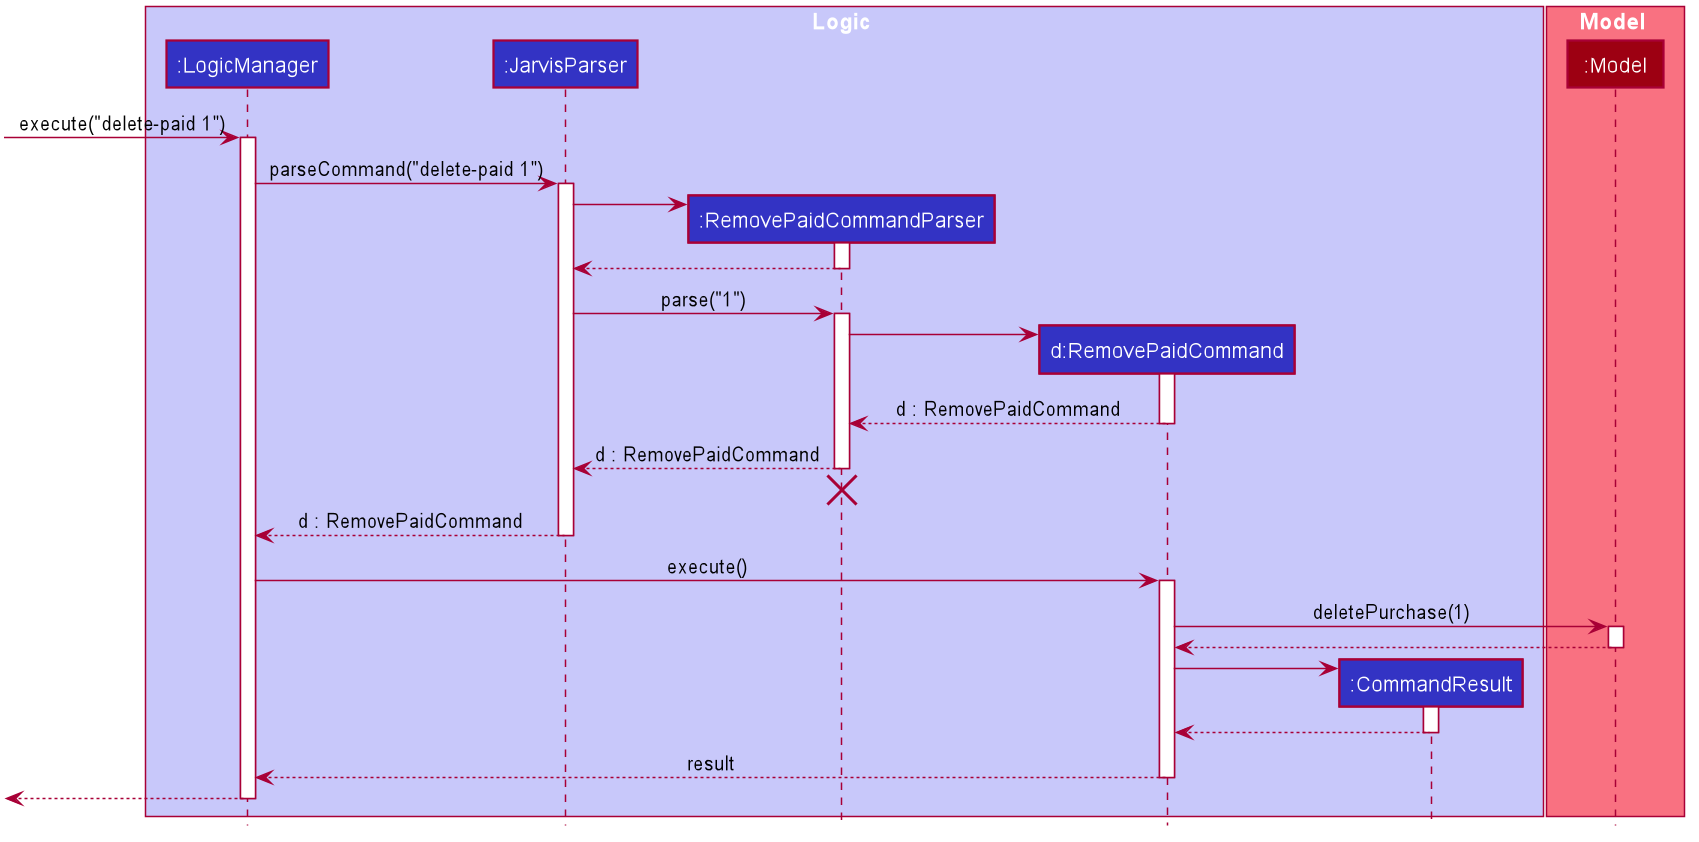
Command delete-paid
The following sequence diagram illustrates how a
Purchase is deleted when a user types in a delete-paid command:
Step 1. The user launches the application for the first time. The
FinanceTracker is initialized. Assume that a valid Purchase has already
been added to the PurchaseList in FinanceTracker.
Step 2. The user executes delete-paid 1 command to delete an existing
Purchase in the FinanceTracker. An RemovePaidCommandParser object is
created and its #parse method is called. The parse method returns a new
RemovePaidCommand object.
Step 3. The RemovePaidCommand object is executed on the model. The
RemovePaidCommand#execute method is called. In this method,
Model#deletePurchase(Index) method is called.
The RemovePaidCommand#execute method first checks for whether the
index is within the size of PurchaseList.
|
Step 4. As mentioned in section 2, the methods in Model merely mirrors the
methods in the FinanceTracker class. As such, the
FinanceTracker#deletePurchase(Index) method is called.
This in turns calls the`#PurchaseList#deletePurchase(Index)` method.
Step 5. This PurchaseList#deletePurchase(Index) method will then delete
the corresponding purchase at the given index.
4.2.6. Design Considerations
There were several design choices that we had to consider for the implementation of the Finance Tracker feature.
Encapsulation of fields for Installment and Purchase objects.
Given that the Installment objects and the Purchase objects manage most
aspects related to the Finance Tracker feature, we had to consider how to
properly build the objects and the fields within them. This was a decision
that was made after much thinking as we had already begun implementing the
skeleton of the feature.
Below are our considerations in refactoring the implementation at that point in time:
-
Option 1: Encapsulate constituent objects in their own wrapper classes
As mentioned above,
Installmentwould containInstallmentDescriptionandInstallmentMoneyPaidobjects whilePurchasewould containPurchaseDescriptionandPurchaseMoneySpentobjects.This would increase OOP, which would provide a clearer modular structure to hide implementation details. Furthermore, this would also allow the objects to be re-used as they are more extensible, which is something we had to consider for subsequent features.
In further development of our application, increasing OOP would also allow developers to maintain the application more easily and hopefully aid in quicker development since the code is easier to read and maintain.
However, as we had already begun implementing some basic methods, making this decision resulted in a steep increase in code as everything had to abstracted into separate classes.
-
Option 2: Using primitive data types
On one hand, our team thought that since the
InstallmentandPurchaseobjects were not extremely complex, we could go without further encapsulation. Furthermore, this would have been the easier alternative at the time as it was the original implementation.However, we decided that in the long-term vision of the application to continue to be developed, we should increase OOP as much as possible.
Our Thoughts
In general, our decision was based primarily on following good software engineering principles and providing the ability to allow for better understanding and maintenance of our code base in the future. Thus, we went with the first option.
4.3. CcaTracker Feature
4.3.1. Overview
The application is able to track Ccas. Each user can have multiple Ccas and each Cca can have multiple equipments needed. In addition, the application is able to track the progress of each person in their Ccas. Hence, there is a need to represent the CcaTracker as a list of Ccas on which the application can perform create, read, update and delete operations on each Cca.
4.3.2. The CcaTracker Model
The CcaTracker class within the model provides an interface between the
components of the feature and the updating of the overall model. Like other
features, Model is associated with the cca tracker feature by
implementing CcaTrackerModel, from which Model implements.
Some of the more significant methods within the CcaTracker are shown
below:
-
Model#containsCca(Cca cca)— Checks if theCcaTrackercontains the given cca. -
Model#addCca(Cca cca)— Adds aCcato theCcaTracker. -
Model#removeCca(Cca cca)— Removes aCcafrom theCcaTracker. -
Model#updateCca(Cca toBeUpdatedCca, Cca updatedCca)— Updates aCcain theCcaTracker. -
Model#getCcaTracker()— Gets theCcaTrackerinstance. -
Model#getNumberOfCcas()— Returns the number ofCcascurrently in theCcaTracker. -
Model#getCca(Index index)— Gets theCcainstance by its index in theCcaTracker. -
Model#updateFilteredCcaList(Predicate<Cca> predicate)— Updates theFilteredCcaListby passing it a predicate. -
Model#getFilteredCcaList()— Returns an instance of theFilteredCcaList -
Model#addProgress(Cca targetCca, CcaProgressList toAddCcaProgressList)- AddsCcaProgressListto the targetCca. -
Model#increaseProgress(Index index)— Increases the progress of theCca
4.3.3. Cca Tracker components
The class diagram for CcaTrackerModel is shown below:
As seen in the diagram above, The CcaTracker consists primarily of a single CcaList object. This CcaList object is
essentially a wrapper around an ObservableList of Cca objects. Do note that the CcaList object can contain any
number of Cca objects (including none).
More interestingly, each Cca is made up of the following components, all of which are non-nullable attributes:
CcaName
Each CcaName is essentially just a wrapper class around a string that is the Cca 's name.
CcaType
Each CcaType is also just a wrapper class around a string that is the Cca 's type. Note that each CcaType is
restricted to 1 of the 4 enum types:
-
sport
-
performingArt
-
uniformedGroup
-
club
EquipmentList
Each EquipmentList is implemented as an ObservableList of Equipment objects. Note that each EquipmentList can
contain any number of Equipment objects (including none).
CcaProgress
The CcaProgress is a little more noteworthy. Each CcaProgress object contains a CcaMilestoneList object and a
CcaCurrentProgress object. As with all the lists in the CcaTracker feature, the CcaMilestoneList object is
implemented using an ObservableList as well. The CcaCurrentProgress class is merely a wrapper around an integer that
tracks the exact CcaMilestone that the user is currently at.
Now that we have an understanding of the underlying implementation of CcaTracker, lets take a closer look at the
feature details.
4.3.4. Feature details
CcaTracker has 7 specific commands that support the given operations to mutate
the state of the Model. Each command is represented as seperate class:
-
AddCcaCommand— Adds aCcato theCcaTracker. -
DeleteCcaCommand— Deletes aCcafrom theCcaTracker. -
EditCcaCommand— Edits the selectedCcain theCcaTracker. -
FindCcaCommand— Finds aCcafrom theCcaTrackerbased on the keywords specified . -
ListCcaCommand— Lists all theCcafrom theCcaTracker. -
AddProgressCommand— Adds a progress tracker to a cca. -
IncreaseProgressCommand— Increments the progress level of a cca.
For brevity’s sake, we will illustrate only 1 specific command and its execution on model.
The following activity diagram illustrates how a Cca 's
progress is incremented when a user types in an increase-progress command:
Increasing a cca’s progress
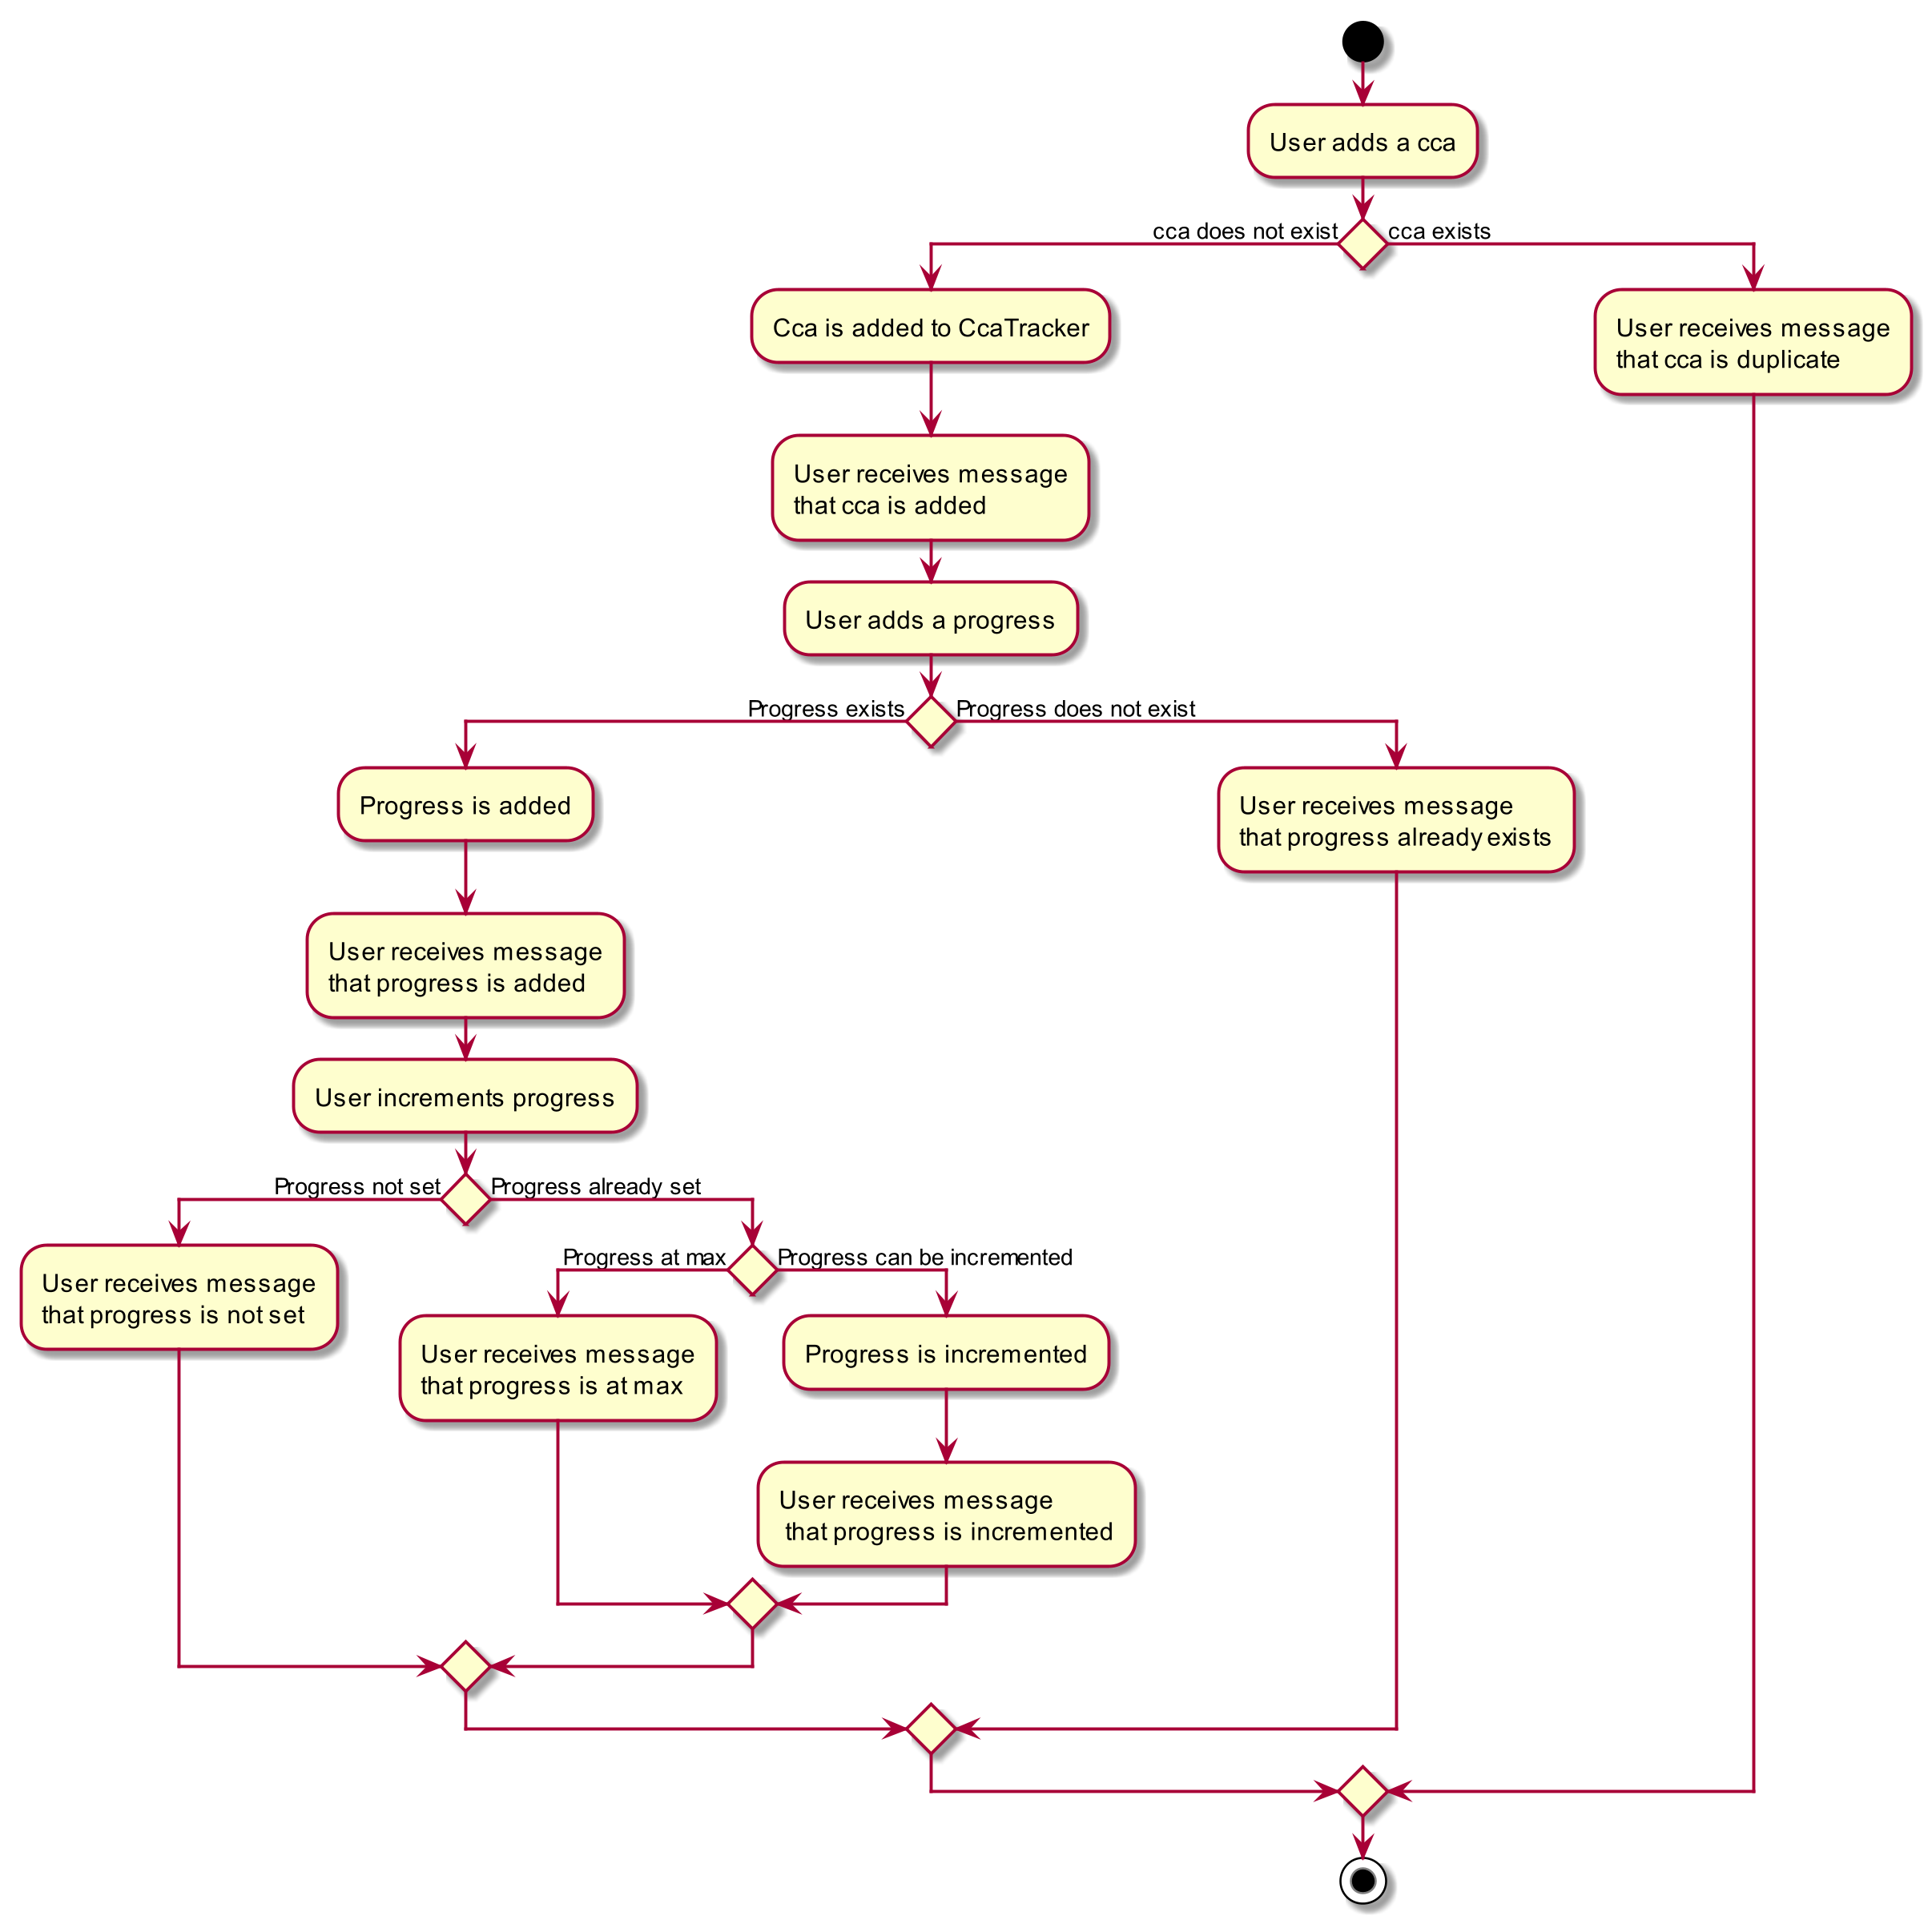
Firstly, before any increasing of progress can take place, the user has to add a Cca to the CcaTracker through the
add-cca command. The user then has to add a CcaMilestoneList to the CcaTracker through the add-progress command.
| Note that the execution of each command as stated above branches off into different scenarios, all of which present themselves to the user in form of prompts in the user interface. |
4.3.5. Command Execution
The diagram below shows the sequence diagram of the increase-progress mechanism. Note that some classnames and methods had to be split into multiple lines due to image size constraints.
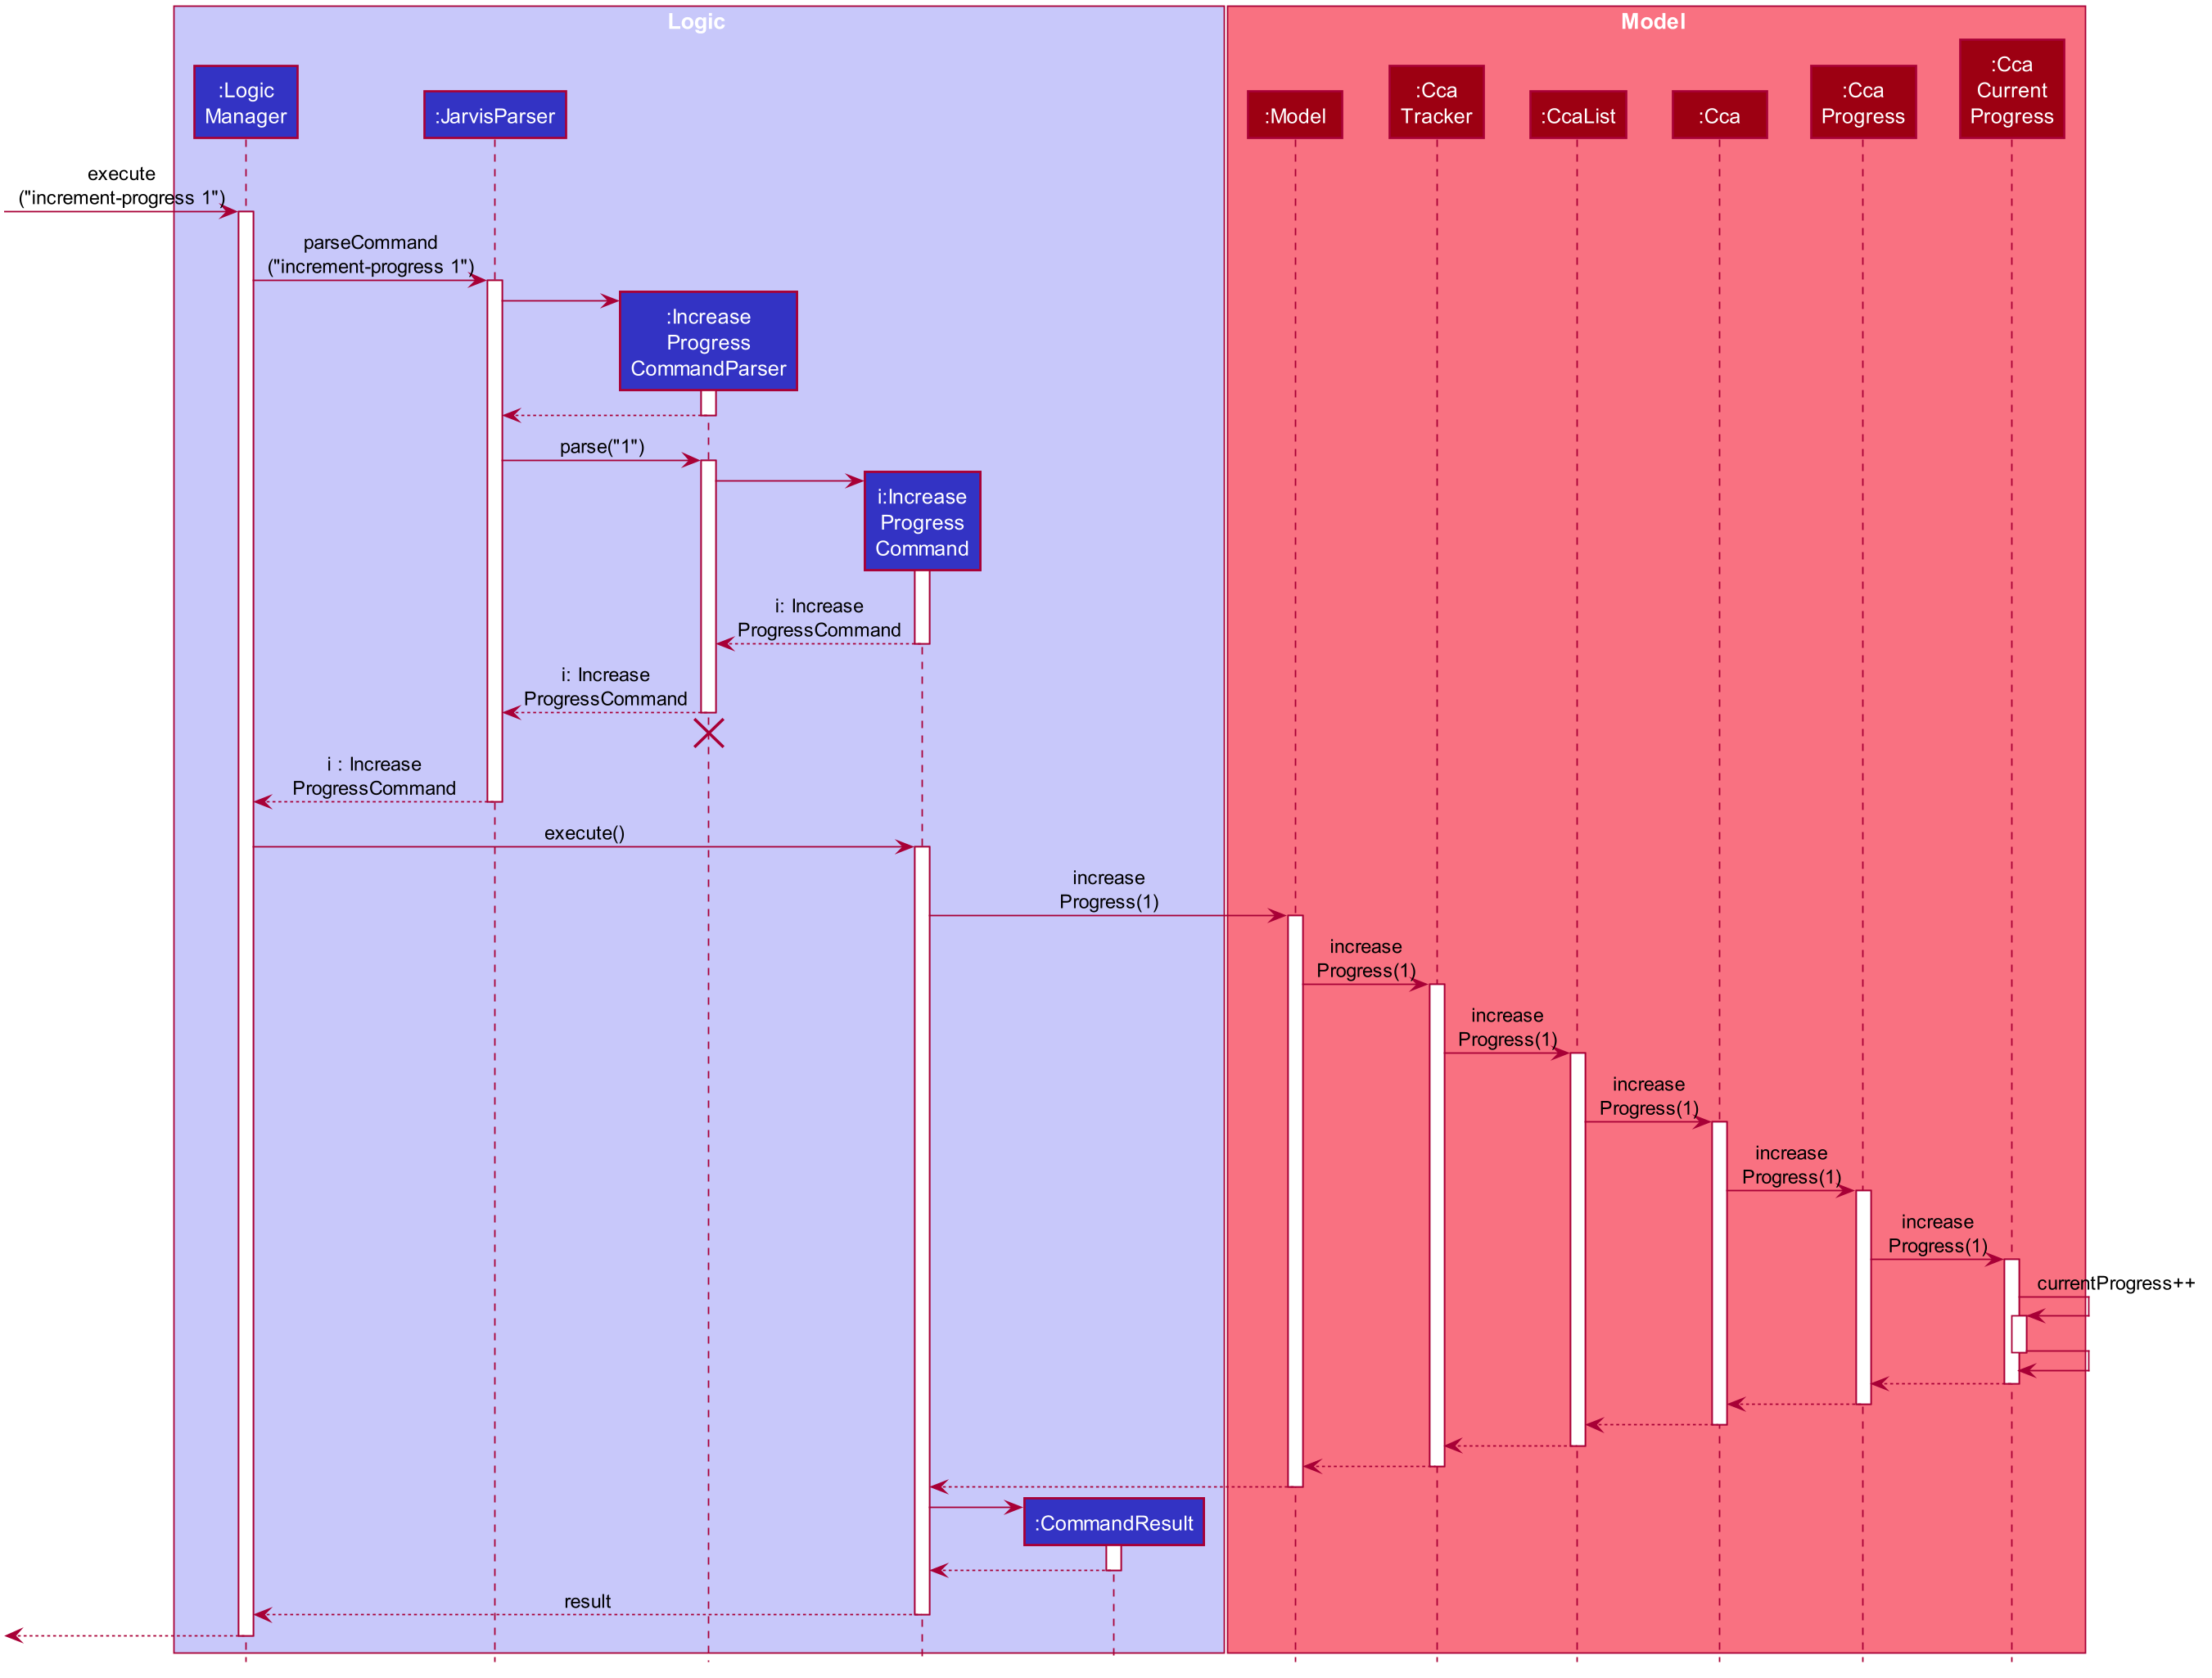
Given below is an example usage scenario of how the increase-progress mechanism behaves.
Step 1. The user launches the application for the first time. The CcaTracker
is initialized. Assume that a Cca has already been added to the Cca and that
a progress tracker has already been set for that Cca.
Step 2. The user executes increase-progress 1 command to increment the
progress of the 1st Cca in the CcaTracker. A IncreaseProgressCommandParser
object is created and its #parse method is called. The parse method returns
a new IncreaseProgressCommand object.
Step 3. The IncreaseProgressCommand object is then executed on model. The
IncreaseProgressCommand#execute method is called and in this method, the
Model#increaseProgress method is called.
The IncreaseProgressCommand#execute method first checks for whether the
index is within the size of CcaList.
|
Step 4. As mentioned in section 2, the methods in Model merely mirrors the
methods in the CcaTracker class. As such, the CcaTracker#increaseProgress
method is called. This in turn calls the CcaList#increaseProgress method.
This method first finds the Cca based on its corresponding index. Then, it
calls the Cca#increaseProgress method.
Step 5. This in turn calls the CcaProgress#increaseProgress method that
calls CcaCurrentProgress#increaseProgress method. At long last, the final
#increaseProgress method in the CcaCurrentProgress instance is called and
the currentProgress counter is incremented by 1.
In short, the calling of the #increaseProgress method at the CcaTracker level
triggers a cascading series of #increaseProgress methods which culminates in
the currentProgress variable being incremented by 1.
|
4.3.6. Design Considerations
Aspect: Whether to have subclasses for each type of cca.
-
Option 1: Instantiate a
CcaProgressobject for eachCcaThis entails implementingCcaProgessclass as consisting of aCcaMilestoneListand aCcaCurrentProgess. The-
Pros: Less code needed.
-
Cons: Less extensible as CcaProgress is now limited to what is essentially a list of strings.
-
-
Option 2: Implement
CcaProgressas a parent class. This entails creating classes such as SportProgress/PerformingArtsProgress that extend from CcaProgress for each type ofCca.-
Pros: Easier to extend functionality for each type of cca.
-
Cons: Does not significantly extend functionality for this version of Jarvis.
Such an implementation can be represented using the class diagram below
-
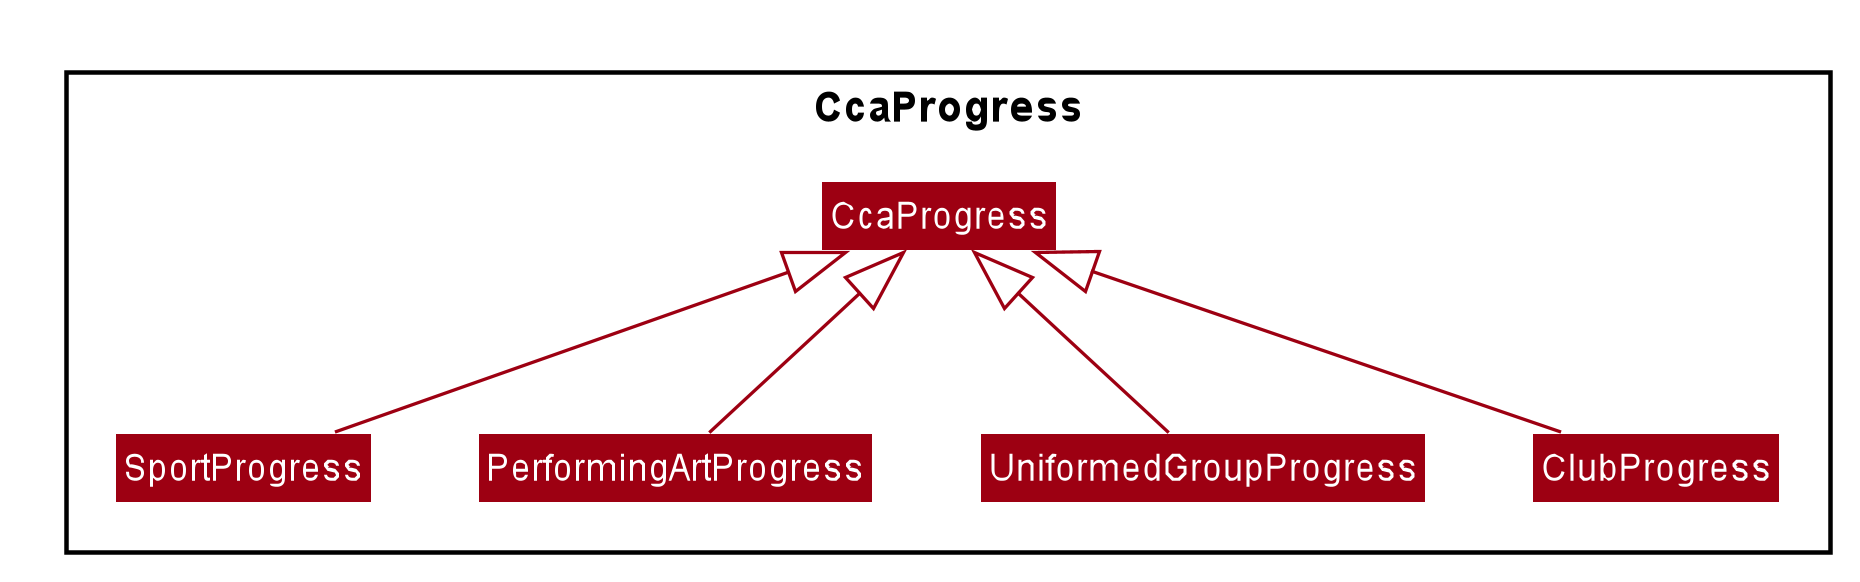
Our Thoughts
After much consideration, we have decided to implement CcaProgress as per option 1. This is because we wish to afford
the user the flexibility to set whichever milestones they wish to in their Cca.
Option 2 would entail hardcoding a certain type of CcaMilestone for each type of CcaProgress. For example,
each UniformedGroupProgress might have included a series of CcaMilestoneRanks, where the user can set each
CcaMilestoneRanks to be ranks such as Private, Lance Corporal, Corporal, Sergeant etc. Then, the
UniformedGroupProgress could have individualised attributes such as types of awards etc.
However, in light of the fact that Jarvis is a CLI application, it would have been extremely cumbersome for the user to type the myriad number of options.
Aspect: Whether to use observable list for CcaProgressList
-
Option 1 : Implement CcaProgressList as an
ObservableList-
Pros: Easier to manipulate for JavaFx.
-
Cons: Potentially complicated nesting when passing arguments to it as CcaProgressList is nested several classes within
Cca.
-
-
Option 2: Implement CcaProgressList as a normal
Liste.g.ArrayList.-
Pros: Does not require predicates to be passed in.
-
Cons: Might be more complicated when rendering in Javafx.
-
Our Thoughts
Implementing the CcaProgressList as an ArrayList would have been an easier option. However, the implementation of
the CcaProgressList as an ObservableList proved to be a wiser choice as Javafx fully supports the manipulation and
rendering of an ObservableList. Using an ArrayList would have made the building of the ui thoroughly cumbersome.
4.4. Course Planner Feature
4.4.1. Overview
The Course Planner feature allows the user to track what courses they
-
Have taken
-
Are taking, and
-
Want to take
The feature offers updated information on courses offered by NUS, along with convenient add, delete and check operations on the user’s course list.
4.4.2. The Course Planner Model
The CoursePlanner class within the model provides an interface between the
components of the feature and the updating of the overall model. Like other
features, Model is associated with the course planner feature via
implementing CoursePlannerModel, from which Model implements.
Some of the more interesting methods (i.e not simple accessor and mutator
methods) within CoursePlanner are shown below:
-
Model#addCourse(Course)- Adds a course to the user’s list -
Model#deleteCourse(Course)- Deletes the course from the user’s list -
Model#lookUpCourse(Course)- Looks up information about the given course -
Model#checkCourse(Course)- Checks if the user can take this course -
Model#hasCourse(Course)- Checks if the given course exists in the user’s list
The list of courses of the user is stored internally using a UniqueCourseList
object, providing an abstraction with add and delete operations that
are called by CoursePlanner and its model.
The text that is displayed to the user within the UI showing information about
the Course Planner is abstracted within the course text display. This is a
simple class that uses Observable to track changes to it as the program runs.
The class abstracts some operations on this string such as setting, getting,
printing to a displayable form, etc.
Shown below is the Class diagram for the Course Planner.
Every Course has a few non-nullable attributes - Title, CourseCode,
CourseCredit, Faculty and Description. The other three (PrereqTree,
Preclusion and FulfillRequirements) are not required to exist as it
depends on the course’s data.
4.4.3. Design Considerations
As explained above, the CoursePlanner is implemented by Model and follows
much of the extendable OOP solution implemented within Jarvis that is common
to the other features.
This section will discuss about the individual components that were created for this feature, the alternative Software Engineering design choices for each one, and our thought process of the eventual choices made for each component.
Course Datasets
Course datasets are taken directly from the NUSMods API. These
datasets are stored using the .json file format on NUSMod’s API. Since
Jarvis already heavily uses the Jackson JSON API, we have opted to store all
course data within Jarvis in their original form. Therefore, all data is read
directly from .json files.
| NUSMods is a popular website officially affiliated with NUS, where students are able to look up information about courses and plan their school timetable. This makes its dataset a reliable source of course information. |
Each course, and their data, are given its own file. These files are laid out
in /modinfo within /resources to be easily accessible by the program.
A sample, valid AB1234.json is given below for a fictional course AB1234.
{
    "courseCode": "AB1234",
    "courseCredit": "4",
    "description": "Course description for AB1234.",
    "faculty": "A Faculty in NUS",
    "fulfillRequirements": [ "AB2234" ],
    "preclusion": "AB1231, AB1232",
    "prereqTree": {
        "and": [
            {
                "or": [
                    "CD1111",
                    "XY2222"
                ]
            },
            "EF3333"
        ]
    },
    "title": "Course AB1234's title"
}
As explained above, certain attributes of a Course are non-nullable. This
choice was made due to the actual course datasets -
This also means that every semester, all datasets must be pre-processed before being deployed into the application. It is quite simple to create a script to do the pre-processing, and is such a good trade-off as opposed to manually checking every field when pulling data from a course file.
Storing of Course Datasets
A decision we had to make concerned the way we would store the data to be referenced on runtime. Considering the multiple options, two stood out as being the most feasible within Jarvis.
-
Option 1: Storing every course in a single, large JSON file
This makes file handling easier to manage. Every course can be found in single file and the code need not deal with many
FileNotFoundExceptionorIOExceptionupon lookup, as the file is guaranteed to exist.The trade-off is that a large file will be difficult to view for a developer. It will also have slow performance as the entire file would have to be processed to look up one course.
The developer may also:
-
Store the whole file in a buffer for faster lookup, but this may be time-consuming and troublesome to implement, especially due to the memory consumption, or:
-
Process the whole file and create all
Courseobjects upon start-up. However, due to the large number of course files (11000+), this may also have significant memory overhead.
-
-
Option 2: Storing each course as its own file
This allows for fast lookup as the contents of all 11000+ course files of data do not need to be scanned directly. Fast string concatenation of file paths directly to the relevant
.jsonfile can be used instead.Unfortunately, this also makes the data-set difficult to manage. If we want to modify the data-set in any way, a script will have to be written to process every file in the data-set. Additionally, every lookup must deal with file-related exceptions.
Our Thoughts
We decided to go with Option 2, as once the files were downloaded and processed, there was no need to modify them any further. Processing, or loading inside a buffer, of very large text files are likely to significantly hamper performance for little benefit. Manual lookup information about a specific course during development is also much easier with such a method.
And-Or Tree
The AndOrTree<R> is a tree data structure served by the util/andor package
that provides an abstraction for processing the prerequisite tree. The
prerequisite tree (henceforth referred to as prereqTree) is an attribute of a
Course that is available in the NUSMod’s course data-set, the data comes in
the form of a String and will be covered shortly.
Before covering the tree itself, it would be helpful to cover its building blocks.
The AndOrNode Class
Each node in the tree of type R is represented by an AndOrNode<R>. Every
node has a List<AndOrNode<R>>, to be used in checking the truth condition
of the tree, and every node is either an AndNode, OrNode or DataNode
node. This determines the conditional used to check the truth condition of a
node.
The truth condition of a node is determined using the method:
boolean fulfills(Collection<R>). This checks the truth condition of the node
based on the following predicates:
-
The node is an
AndNodeAny subset of elements in
Collection<R>must match all children of this node. -
The node is an
OrNodeAny element in
Collection<R>must match at least one of the children of this node. -
The node is a
DataNodeAny element in
Collection<R>must match the data stored in this node.
So, an AndNode<String> with children {"1", "2", "3"} will match true
against a collection of {"1", "2", "3", "4"} and false against a collection
of {"2", "3"}.
Node Creation
The following class diagram demonstrates the structure of the abstract class
AndOrNode and its sub-classes.
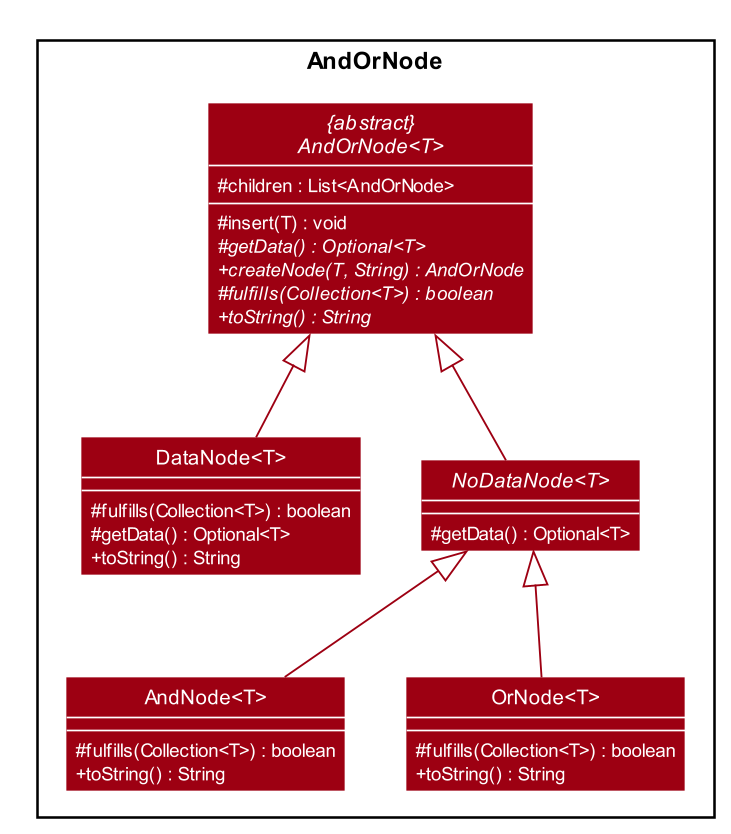
Using this format, a static method of the form AndOrNode#createNode(T,String)
is able to construct all instances of its sub-class, thus the caller will not
need to know of the different type of nodes.
The AndOrTree Class
The following are public methods in AndOrTree.
-
buildTree(String, Function<String, ? extends R>)Builds a tree from the given jsonString.
Functionis a mapper that processes aStringand returns a value of typeR, whereRis the type of data stored by each node in the tree. -
fulfills(Collection<R>)Checks if the given
Collectionof typeRfulfills the condition specified by this tree.AndOrNodehas its own correspondingfulfillthat checks its children or data againstCollection.
Due to the arbitrary ordering of the tree, insert() and delete() operations
commonly found in implementations of ordered trees are difficult to implement.
Instead, the tree is fully created upon the call to buildTree() and is then
enforced to be immutable once built. This is reflected in the class' lack of
mutator methods.
Building of the AndOrTree
As mentioned above, we use the prereqTree attribute in order to build the
tree. An example of a processable json string is as such:
"prereqTree": {
    "and": [
        {
            "or": [
                "CD1111",
                "XY2222"
            ]
        },
        "EF3333"
    ]
}
This can be read as:
To take AB1234, you require...
 |
 └ all of
   ├── one of
   |   ├─ "CD1111"
   |   └─ "XY2222"
   └─ "EF3333"
This means that to take the fictional course AB1234, a user would have to
complete EF3333, and either CD1111 or XY2222.
The buildTree() method takes in the json string as an input. The Jackson
API uses this string to create a root JsonNode object, and the tree is built
recursively from the root. The sequence diagram of the tree building process is
shown below:
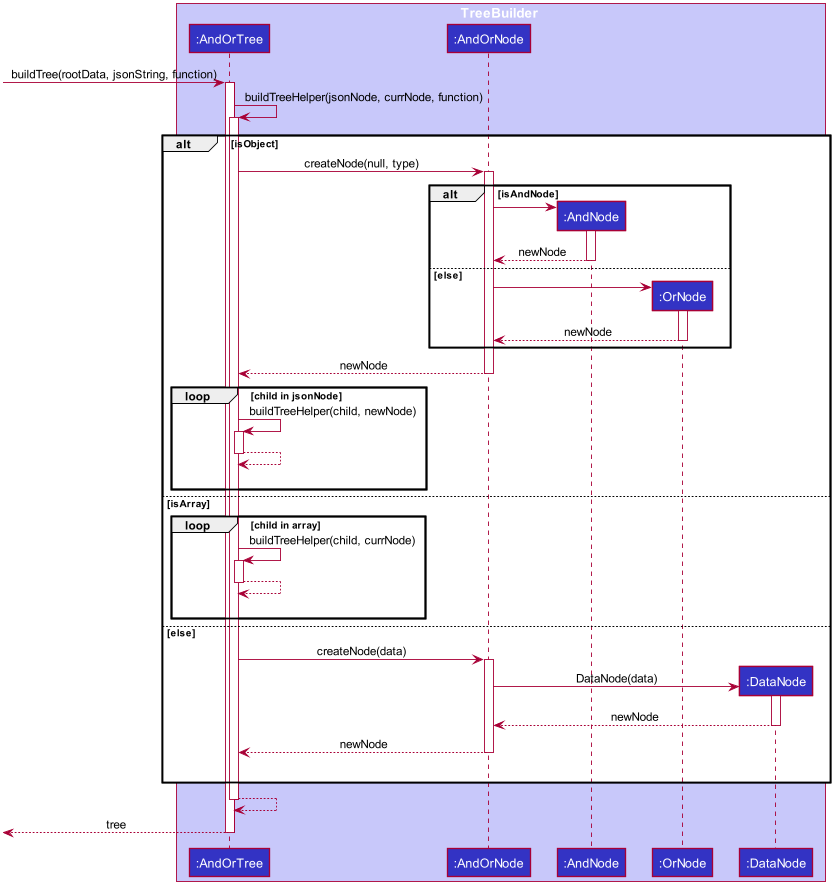
The class looks at each node - checks if its is an Object, Array or a
String, and does the appropriate actions and function calls.
Other ways of building the tree can be easily extended by overloading the
buildTree method. However, this will not override the immutable properties of
the tree.
Dependency on Course
AndOrTree posed some difficulty for us, in the decision to couple the
implementation of AndOrTree with Course. This is because the tree will
only ever be used by the Course Planner within the program, and thus it is
not required to implement the tree using generics. However, this would increase
coupling between AndOrTree and Course, which is unfavourable for testing.
Below are our considerations in implementing this data structure:
-
Option 1: Couple
AndOrTreetoCourseThis means that there is no need to pass any mapper function into the
buildTree()method as the class does not need to know how to map fromStringtoR. This also makes handling mapping exceptions easier as they can be handled directly byCourseinstead of byAndOrTree.However, this increases coupling between the tree and
Course, resulting in the correctness of theAndOrTreeclass being dependent onCourseas there is no way to stub it. The tree will also only be locked toCourseand is non-extendable. -
Option 2: Using Generics
This makes the tree reusable in the future. The tree will also be able to store any data-type which allows for easier unit testing, since it won’t be dependent on the correctness of
Course. Instead well-tested libraries such as Java’sStringAPI can be used to test the class instead.However, due to how the tree is built (i.e from a json string), a mapper function must be passed into the
buildTree()method to process the string in each node to the generic type of the tree. The function is of the typeFunction<String, ? extends R>, for a tree of typeR.
Our Thoughts
Due to its benefits far outweighing its disadvantages, we picked the second
choice of using generics. While extendability and re-usability of the class is
a nice bonus, the decrease in coupling and increase in testability was the
deciding factor in choosing between these two approaches. Furthermore, behavior
of the building of the tree can be easily extended by either inheritance, or
overloading of the buildTree() method.
4.4.4. Implementation
With the significant individual components covered, the process of the
Course Planner can be discussed. We will be covering the check command
since the rest of the commands are either simple insert and delete operations
on a list, or retrieving data from a file. This command allows us to see the
full extent of back-end to front-end operations on the Course Planner.
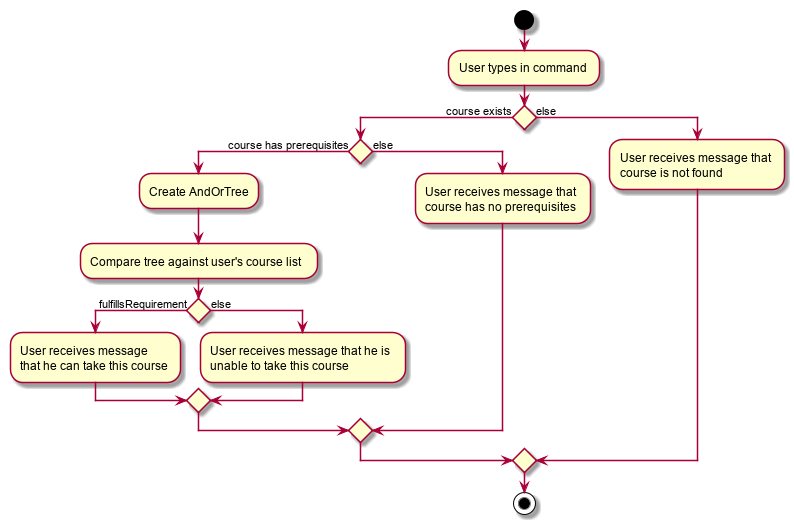
The check operation allows users to check if they are able to take a certain
course. Whether the user can take the course depends on the courses in their
list. The following is the activity diagram of general overview of the process
when the user types a check command.
Additionally, the following below shows the sequence diagram of how the program checks if the user satisfies the course’s prerequisites.

The implementation in the back-end is quite similar to the other features, as seen in the similarities between the above sequence diagram and the one under the Architecture section.
4.5. Undo / Redo Feature
This section covers in detail the undo/redo feature of Jarvis.
We will cover these main points:
-
Design Considerations
-
Feature Details
-
Implementations
-
User Scenario demonstrating undo/redo
Let’s explore how we decided to implement the undo/redo feature in the Design Considerations section below.
4.5.1. Design Considerations
There were several available behavioral design patterns that we were considering to adopt to implement our undo/redo feature in the application.
-
Command Pattern
-
Memento Pattern
These patterns are common useful patterns to enable undo/redo functions. These are also viable options as our application design allows both of these approaches to be integrated easily.
Let’s see how these adopting each of these approaches will span out in the development of the application.
Command Pattern Approach
The application already makes use of the command pattern to decouple the internal state of the application and the user action. Therefore implementing undo/redo function with the command pattern would require us to achieve the following things:
-
Implement a class,
HistoryManagerto manage and store commands that have been done/undone in chronological sequence to facilitate undo and redo functions. This should be facilitated with the use of twoDeque/Stacklike structures. One will be fore storing the commands that have been done, while the other will be storing the commands that have been undone. -
Implement ways to discern amongst commands that should be added to
HistoryManager, whereby undoable commands should be added, while non-undoable commands should not be added. -
Implement the inverse operation of commands that can be undone.
-
Integrate
HistoryManagerintoModelby Implementing undo and redo operations inHistoryManagerto execute on theModelit is associated with and expose these operations to theModel. An undo operation will remove the latest done command and execute its inverse operation onto theModelbefore it is added as the latest undone command. A redo operation will remove the latest undone command and execute its normal execution on theModelbefore it is added as the latest done command. -
Implement commands,
UndoCommandandRedoCommand, along with their respective parsers,UndoCommandParserandRedoCommandParser. -
Integrate commands and parsers into
JarvisParser. -
Integrate logic in
LogicManagerto add undoable commands toHistoryManager. -
Implement storage for
HistoryManagerby implementing aJSONserializableHistoryManageralong with theJSONadapted commands it stores so it can be written to aJSONfile in local storage. -
Integrate the logic to save
HistoryManagerto local storage inLogicManagerafter the successful execution of commands.
Characteristics
-
Space efficient due to storing commands instead of states of the entire application. Efficient usage of RAM and local storage for the application.
-
Commands logic will be more complex as they must know how to undo its execution. Commands contain more data to retain information needed to undo its execution.
-
Complex inverse executions may be unnecessarily convoluted compared other approaches (such as the memento pattern). This involves more planning and support on the classes that commands execute on.
-
Requires implementation and testing of each command (and future commands) to enable undo/redo function with respect to that command. Development of the application will involve more overhead when integrating new commands to the application as there are more behaviour to test.
-
Development of
HistoryManagerscales along with commands that are added to the application. Even afterHistoryManageris developed and integrated into the application, additional work is required with each command, such as supporting inverse execution and serializing the command (for local storage). This can affect development schedule and add time constraints when working with tight deadlines.
Memento Pattern Approach
The application follows a structural facade pattern, storing the data in
ModelManager which implements the Model, which is an interface for
commands to interact with. ModelManager manages classes that wrap their
respective data. Therefore implementing undo/redo function with the command
pattern would require us to achieve the following things:
-
Implement a
Versionclass. This class wraps the state of another class as an immutable “snapshot”. -
Define the interface
VersionedModelthat extendsModelwith additional methods to save its current state and to change its state.VersionedModelcould be viewed as a originator class that can produce “snapshots” of its own state and update its state from “snapshots”. These “snapshots” are in wrapped in the aboveVersionclass. -
Let
ModelManagerimplementVersionedModelalong with its methods to allowModelManagerto produceVersionobjects containing its current state and to updateModelManagerto a state provided by a givenVersion. -
Implement a
HistoryManagerclass to facilitate as a caretaker class.HistoryManagerwill store a series ofVersionobjects containing states of theVersionedModelin twoDeque/Stacklike structures. One will be to store the previous versions, while the other is to store the future versions that were undone from. -
Implement commands,
UndoCommandandRedoCommand, along with their respective parsers,UndoCommandParserandRedoCommandParser. -
Update commands to take in both
VersionedModelandHistoryManageras arguments in their execute methods so that undo/redo commands can getVersionobjects containing previous or subsequent states ofVersionedModelfromHistoryManagerforVersionedModelto update to. -
Integrate commands and parsers into
JarvisParser. -
Implement storage for
HistoryManagerby implementing aJSONserializableHistoryManageralong with theJSONadaptedVersionso that it can be written to aJSONfile in local storage. -
Integrate the logic to save
HistoryManagerto local storage inLogicManagerafter the successful executions of commands.
Characteristics
-
Expensive on space due to storing multiple copies of the application state. This increases the usage of RAM and local storage for the application.
-
Simple robust implementation that can be developed quickly, which can be useful for tight schedules in the development process.
-
Protects the encapsulation of private data of the application state (provided local storage data is also encrypted). This prevents violation of encapsulation of classes.
-
Development of
HistoryManagerscales with how the information to be remembered changes. Whenever the nature of the information to be remembered changes, the memento classVersionneeds to be updated along with howVersionedModelupdates and saves its state. Adding new commands also do not require any changed toHistoryManagerunless there are changes to the data fields to be saved inModel.
Our Thoughts
These are the following questions we asked ourselves when deciding between these two approaches
-
RAM and storage
-
Development process
-
Software design principles
RAM and storage
Since storing commands is more space efficient than storing states of the
Model, the command pattern will occupy less space than the memento pattern.
Being space efficient will allow us to increase the range of undo/redo function of the application.
Considering the target user group being students, we also want to develop an application that would not consume too much RAM or local storage given students budgets and varying tiers of laptops.
Therefore regarding this aspect, we favor command pattern over the memento pattern.
Development process
The memento pattern will require us to update HistoryManager whenever the
Model changes, while the command pattern will require us to implement
inverse executions for each additional command.
Therefore the memento pattern would require more overhead when changing the
Model of the application while the command pattern require more overhead
when adding undoable commands.
Our application are subject to both of these changes such as changes to the
Model and adding new commands. Therefore both patterns are similar in
overhead and depends on the frequency of changes made to Model or adding
new commands. We feel that both options are viable and would be feasible for
our team in the development of this application.
Software Design Principles
Both patterns would involve introducing dependency between Model and
HistoryManager.
The memento pattern would involve HistoryManager having a unidirectional
dependency to VersionedModel while introducing HistoryManager as a
dependency to Command.
The command pattern would involve HistoryManager having dependency with
Model. We can choose to nest HistoryManager into Model which would
increase coupling between the two classes by introducing bidirectional
dependency. We may choose to introduce this coupling to prevent increasing
the dependency between Command as command will just be associated with
Model.
Both patterns involve HistoryManager with the responsibility of keeping
track of commands/states. Single Responsibility Principle is not violated
in both approaches.
Design Choice
We determined that going along with the command pattern. We want to cater this application to students whose laptops may not have generous amounts of RAM. On top of the fact that students typically use their browsers extensively, we felt that we should be mindful of RAM usage.
Comparisons between command pattern and memento pattern with respect to the
development process were trivial since the Model and command sets are
already planned, and future changes to Model and commands would not have
any serious drawback regardless of the approach.
The section below will discuss feature details and characteristics we have considered that would influence the logic of how we implement undo/redo.
4.5.2. Feature Details
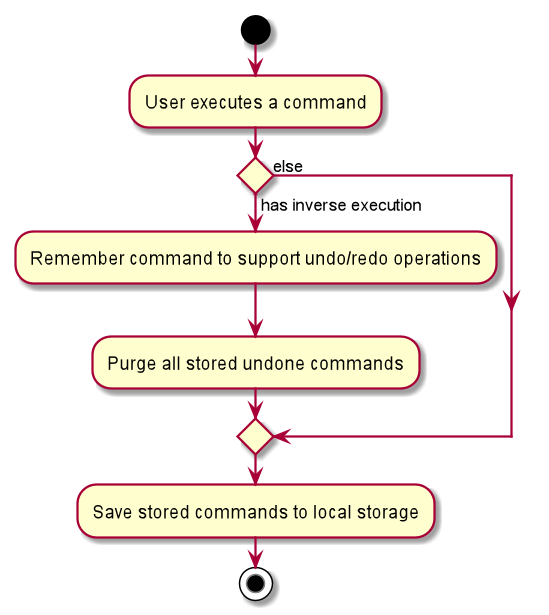
The application should be able to undo and redo changes made by commands to give the user more flexibility in their inputs. Undo and redo operations should also be undo or redo multiple commands in a command. In the event that a undo/redo command that comprises of multiple undo/redo operations fails at any point, all changes made by the command should be rolled back. This is reflected in the Activity Diagrams below.


Therefore there is a need to remember commands that change the state of the
Model. Commands that just render a view without actually changing the
application should not be stored as it does not make sense to undo or redo
them. We will distinguish these types of commands into two categories,
invertible commands and non-invertible commands.
-
Invertible commands — commands that mutate the state of the
Modeland should be stored forundo/redofunctions. -
Non-invertible commands — commands that do not mutate the state of the
Modeland should not be stored forundo/redofunctions.
Undo and redo commands will be considered non-invertible commands even though
they technically change the state of the Model. The reason is that they are
commands facilitating the undo and redo operation, thus they should not be
stored.
|
The following activity diagram illustrates how commands are remembered when a user types in a command:
The section below will discuss in more detail how undo/redo is implemented.
4.5.3. Implementation
The undo/redo feature mechanism is facilitated by HistoryManager.
HistoryManager remembers invertible commands. These commands are stored
internally in two CommandDeque objects, executedCommands and
inverselyExecutedCommands. CommandDeque serve as custom Deque data
structure, which stores the latest added command to the top.
An undo operation would comprise of taking the latest executed command from
executedCommands, inversely executing it, and adding it to
inverselyExecutedCommands. A redo operation would comprise of a taking the
latest inversely executed command from inverselyExecutedCommands, executing
it, and adding it to executedCommands.
Model supports operations to facilitate undo and redo capabilities by
extending the HistoryModel which has the following operations:
-
Model#getHistoryManager()— Gets theHistoryManagerinstance. -
Model#setHistoryManager(HistoryManager)— Resets theHistoryManagerdata to the givenHistoryManagerin the argument. -
Model#getAvailableNumberOfExecutedCommands()— Gets the maximum available number of commands that can be undone. -
Model#getAvailableNumberOfInverselyExecutedCommands()— Gets the maximum available number of commands that can be redone. -
Model#canRollback()— Checks if it is possible to undo a command at the given state. -
Model#canCommit()— Checks if it is possible to redo a command at the given state. -
Model#rememberExecutedCommand(Command)— Remembers the givenCommandand stores it inexecutedCommandsto facilitate undo capability for this command. -
Model#rememberInverselyExecutedCommand(Command)— Remembers the givenCommandand stores it ininverselyExecutedCommandsto facilitate redo capability for this command. -
Model#rollback()— Inversely executes the latest command stored inexecutedCommandsto revert the changes of the latest executed command made ontoModel. -
Model#commit()— Executes the latest undone command stored ininverselyExecutedCommandsto reapply the changes that were made ontoModelby the latest undone command.
Commands support the given operations to mutate the state of the Model and
to check if they should be stored for undo/redo function:
-
Command#hasInverseExecution()— Checks if the command’s execution mutates the state of theModel, which is used to determine if the command should be remembered byHistoryManager. -
Command#execute(Model)— Executes the command on the givenModel. -
Command#executeInverse(Model)— Executes on the givenModelsuch that it will undo whatever changes were made whenCommand#execute(Model)was called.
Below is a class diagram between Model, ModelManager, HistoryManager,
CommandDeque and Command.
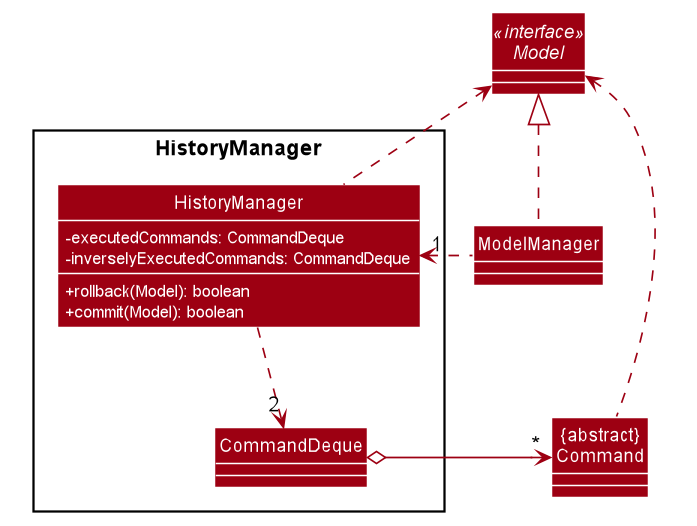
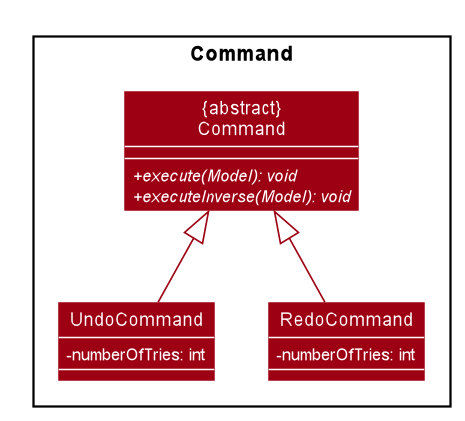
Model, ModelManager, HistoryManager, CommandDeque and CommandUndo and redo operations are executed with UndoCommand and RedoCommand
These commands store an integer value referencing the number of commands to
undo or redo, represented by UndoCommand#numberOfTimes and
RedoCommand#numberOfTimes. The Class Diagram below shows details about
UndoCommand and RedoCommand.
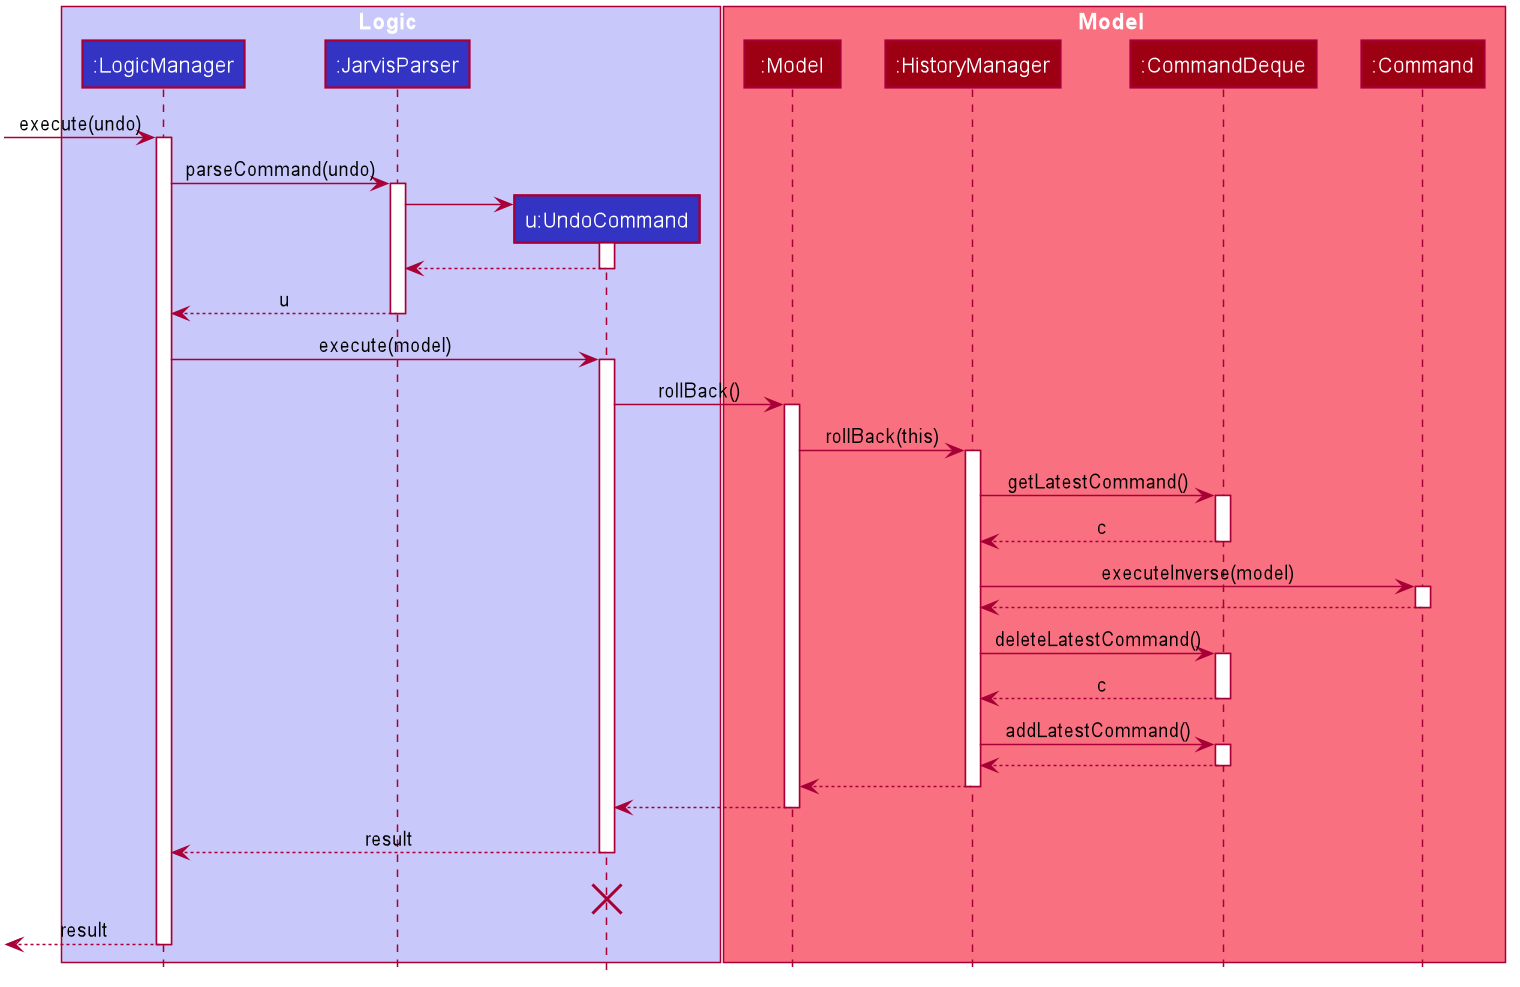
UndoCommand, RedoCommand and CommandBelow are two sequence diagrams of how a UndoCommand and RedoCommand
executes in the program. The sequence diagrams below show the process of undo
and redo of a single command for simplicity and clarity.
Below is a sequence diagram of how an UndoCommand to undo a single command
executes in the program.
UndoCommand (undo a single command)Below is a sequence diagram of how a RedoCommand to redo a single command
executes in the program.
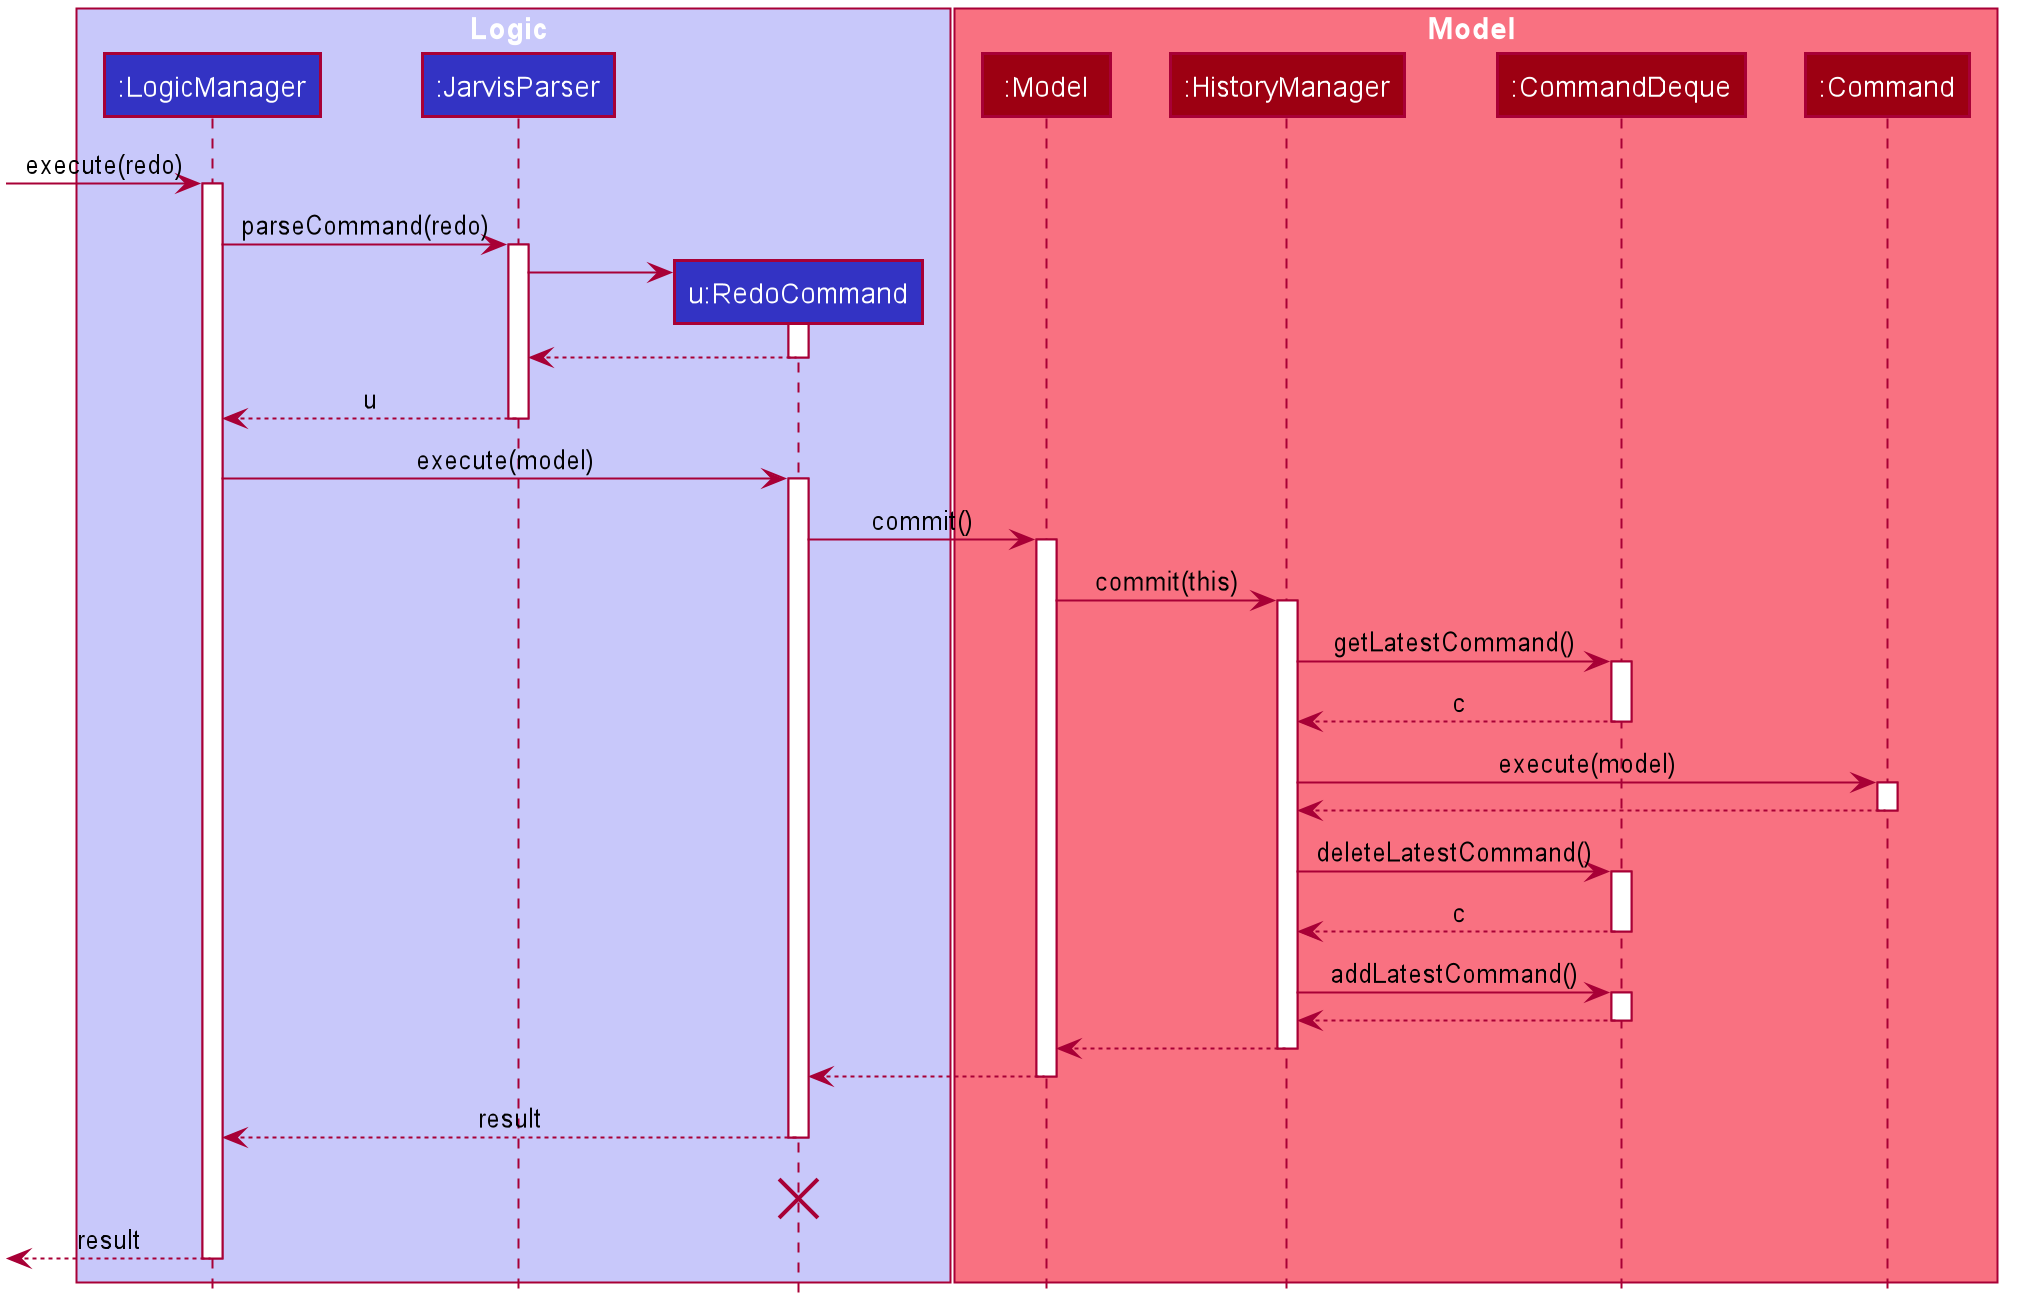
RedoCommand (redo a single command)Given below is an example usage scenario of how undo/redo mechanism behaves.
4.5.4. User Scenario demonstrating undo/redo
Step 1. The user launches the application for the first time. The
HistoryManager is initialized. HistoryManager#executedCommands and
HistoryManager#inverselyExecutedCommands are empty.
Step 2. The user executes delete-cca 1 command to delete the 1st person
in Jarvis. A DeleteCcaCommand is created and executed in
LogicManager#execute(String). Since DeleteCcaCommand is an
invertible command, HistoryManager stores the command, adding it
to HistoryManager#executedCommands.
HistoryManager stores invertible commands, not non-invertible commands.
|
Step 3. The user executes add-task t/todo des/Revise CS2103T to add a new
todo. A AddTaskCommand is created and executed in LogicManager#execute(String).
Since AddTaskCommand is an invertible command, HistoryManager stores the
command, adding it to HistoryManager#executedCommands.
If a invertible command execution fails, HistoryManager will not remember
it, therefore it will not be stored for undo/redo function. Therefore,
HistoryManager will be guaranteed to store only commands that have executed
or inversely executed on the Model successfully.
|
Step 4. The user now decides that the last two commands entered was a mistake,
and decides to undo those commands by executing the undo 2. A UndoCommand
is created and executed in LogicManager#execute(String), where
UndoCommand#numberOfTimes is 2. The command calls Model#rollback() twice.
Each time Model#rollback() is called, the Model will call HistoryManager
to take the latest command from HistoryManager#executedCommands and call
Command#executeInverse(Model) on the Model, undoing the changes made to
Model by the command when it was first executed before being stored in
HistoryManager#inverselyExecutedCommands. Then the command is added to
HistoryManager#inverselyExecutedCommands. After the undo 2 command execution
is complete, the Model state is reverted to what it was before the two undone
commands were first executed. Since UndoCommand is a non-invertible command,
it is not stored by HistoryManager after its execution.
undo/redo commands can undo/redo one or more commands. To undo/redo one
command, entering undo/redo is equivalent to entering undo 1/redo 1.
If an undo/redo command is given to undo/redo more commands than
available, the operation will fail and no undo/redo is applied at all.
This check is enforced by Model#getAvailableNumberOfExecutedCommands(),
Model#getAvailableNumberOfInverselyExecutedCommands(), Model#canRollback()
and Model#canCommit().
If an undo/redo command fails at any point in undoing/redoing one or more
commands, all changes made during the command will be reverted and Model
will be in the state that it was in before the undo/redo command was
executed.
|
Step 5. The user decides to execute the command list-history. A
ListHistoryCommand is created an executed in LogicManager#execute(String).
The command calls Model#getAvailableNumberOfExecutedCommands() and
Model#getAvailableNumberOfInverselyExecutedCommands(), and sends a message
to the user indicating the number of commands that can be undone and the
number of commands that can be redone. In this use case with reference to the
previous steps, there are zero commands that can be undone and two commands
that can be redone. Since ListHistoryCommand is a non-invertible command,
HistoryManager will not store it after its execution.
Step 6. The user decides to redo the last command that was undone by
executing a redo command by typing in the command redo. A RedoCommand
is created and executed in LogicManager#execute(String) to redo the latest
undo. The command will call Model#commit() once. Model will call
HistoryManager to take the latest command from
HistoryManager#inverselyExecutedCommands and call Command#execute(Model)
on the Model, re-applying the changes that were undone. Then the command
is added to HistoryManager#executedCommands. After the redo command
execution is complete, the Model state is changed to when the redone command
was executed. Since RedoCommand is a non-invertible command, it is not
stored by HistoryManager after its execution.
Step 7. The user executes add-course c/CS2103T to add a course. A
AddCourseCommand is created and executed in LogicManager#execute(String).
Since `AddCourseCommand is an invertible command, it is stored in
HistoryManager and the commands stored in
HistoryManager#inverselyExecutedCommands is cleared. Therefore
the user can still undo commands but the commands that can be redone
are all cleared and will not be able to be redone.
Commands stored in HistoryManager that were undone are not cleared
after executions of non-invertible commands. However, if a
invertible command is executed, commands that are undone and stored in
HistoryManager#inverselyExecutedCommands will be cleared. This is
similar to how navigation works between pages you visit in a browser tab.
|
4.6. Logging
We are using java.util.logging package for logging. The LogsCenter class
is used to manage the logging levels and logging destinations.
-
The logging level can be controlled using the
logLevelsetting in the configuration file (See Section 4.7, “Configuration”) -
The
Loggerfor a class can be obtained usingLogsCenter.getLogger(Class)which will log messages according to the specified logging level -
Currently log messages are output through:
Consoleand to a.logfile.
Logging Levels
-
SEVERE: Critical problem detected which may possibly cause the termination of the application -
WARNING: Can continue, but with caution -
INFO: Information showing the noteworthy actions by the App -
FINE: Details that is not usually noteworthy but may be useful in debugging e.g. print the actual list instead of just its size
4.7. Configuration
Certain properties of the application can be controlled (e.g user prefs file
location, logging level) through the configuration file (default:
config.json).
5. Documentation
Refer to the guide here.
6. Testing
Refer to the guide here.
7. Dev Ops
Refer to the guide here.
Appendix A: Product Scope
Target user profile:
-
NUS student
-
plans his own courses
-
prefers typing over mouse input
-
can type fast
-
is reasonably comfortable using CLI apps
-
has to manage a significant number of tasks
-
has a tight budget
Value proposition: optimised for NUS students who have busy schedules and a tight budget
Appendix B: User Stories
Priorities: High (must have) - * * *, Medium (nice to have) - * *, Low
(unlikely to have) - *
| Priority | As a(n) … | I want to … | So that I can… |
|---|---|---|---|
|
social student |
keep track of who owes me money & how much |
not have anyone owe me any money. |
|
busy student |
keep track of all the tasks I have done |
work on tasks that I have yet to do. |
|
indecisive student |
roll back and forth changes that I have done |
track my ever-changing schedule. |
|
NUS student |
view all the prerequisites for a specified module |
plan my academic roadmap accordingly. |
|
busy student |
be reminded when I am nearing a deadline |
be on top of all my assignments |
|
student |
calculate my CAP easily |
keep track of my progress in university. |
Appendix C: Use Cases
(For all use cases below, the System is the Jarvis and the Actor is the user, unless specified otherwise)
Use case: Set tabs in Finance Tracker
MSS
-
User inputs amount paid and the names of people who he paid for
-
Jarvis calculates equal tab for all names including user
-
Jarvis stores individual tabs for names input
-
Jarvis prompts user that tabs have been added
-
User requests to see list of debts owed to him
-
Jarvis shows list of debts
Use case ends.
Use case: Mark task in planner as done
MSS
-
User requests to list tasks in planner
-
Jarvis shows lists of tasks in planner
-
User requests to mark a certain task as done
-
Jarvis finds task and marks it as done
Use case ends.
Extensions
-
3a. The given index is invalid.
-
3a1. Jarvis shows an error message.
Use case resumes at step 2.
-
Use case: Undo previous command
MSS
-
User adds a project meeting into planner
-
Jarvis adds meeting into planner
-
User requests to undo project meeting
-
Jarvischecks if roll back can be successfully done -
Jarvisfinalizes the roll back changes.Use case ends.
Extensions
-
4a. The roll back cannot be successfully completed
-
4a1. Jarvis shows an error message.
Use case ends.
-
Use case: Check if the user can check a course
MSS
-
User requests whether they can take a certain course.
-
Jarvis shows whether they can take the course.
Use case ends.
Extensions
-
2a. The given course code is invalid
-
2a1. Jarvis shows an error message.
Use case resumes at step 1.
-
Appendix D: Non Functional Requirements
-
Jarvis should work on any mainstream OS as long as it has Java 11 or above installed.
-
A user with above average typing speed for regular English text (i.e. not code, not system admin commands) should be able to accomplish most of the tasks faster using commands than using the mouse.
-
Jarvis should respond within two seconds.
-
Jarvis should be usable by a novice who has never used a command line interface.
-
Jarvis should be able to work without any internet connection.
Appendix E: Glossary
- Mainstream OS
-
Windows, Linux, Unix, OS-X
- CLI
-
Command Line Interface
- Invertible Commands
-
commands that mutate the state of the Model and should be stored for
undo/redofunctions. - Non-invertible commands
-
Commands that do not mutate the state of the Model and should not be stored for
undo/redofunctions. - Dataset
-
A collection of related sets of information that is composed of separate elements but can be manipulated as a unit by a computer
- CcaMilestone
-
A significant goal in a Cca as defined by the user.
Appendix F: Instructions for Manual Testing
Given below are instructions to test the app manually.
| These instructions only provide a starting point for testers to work on; testers are expected to do more exploratory testing. |
F.1. Launch and Shutdown
-
Initial Launch
-
Download the jar file and copy into an empty folder
-
Double-click the jar file
Expected: Shows the GUI with a set of sample data in every feature. The window size may not be optimal
-
-
Saving Window Preferences
-
Resize the window to an optimum size. Move the window to a different location. Close the window.
-
Re-launch the app by double-clicking the jar file.
Expected: The most recent window size and location is retained.
-
-
Storage
-
Launch the application and make a change that changes the state of the program, such as
add-taskoradd-course. Close the window. -
Re-launch the app by double-clicking the jar file.
Expected: The app should re-launch into the same state as when it was closed.
-
F.2. Deleting Data from a list
-
Deleting a person while all persons are listed
-
Prerequisites: List all tasks using the
list-taskcommand. Multiple tasks in the list. -
Test case:
delete-task 1Expected: First task is deleted from the list. Details of the deleted contact shown in the status message.
-
Test case:
delete-task 0Expected: No task is deleted. Error details shown in the result display. Status bar remains the same.
-
Other incorrect delete commands to try:
-
delete-task -
delete-task x(wherexis larger than the list size) -
delete-task y(whereyis any alphanumeric character)Expected: Similar to previous.
-
-
F.3. Saving data
-
Missing data files
-
Run the app once and play around with the application. Once a change is made, the program will generate a data files in
./data/ -
In
./data/, deletecourseplanner.json. -
Re-launch the app.
Expected: Default Course data should now be present in the Courses tab.
-
-
Corrupted data files
-
Run the app once and play around with the application. Once a change is made, the program will generate a data files in
./data/ -
In
./data/, opencourseplanner.json. On line 2, delete the[:1 { 2 "courses" : [ { 3 ...should become
1 { 2 "courses" : { 3 ... -
Re-launch the app.
Expected: Go to the Courses tab and the tab should not have any data.
courseplanner.jsonstill exists.
-