By: Team T10-1 Since: Sep 2019 Licence: MIT
1. About Jarvis
Jarvis is a one-stop solution to juggling all aspects of your hectic school life by helping you manage your
schoolwork, finances and CCAs. Offering four main features to bolster your
productivity, you can now always be on top of your:
-
Tasks
-
Finances
-
Co-Curricular Activities (CCA)
-
NUS Courses
all in one handy, nifty application. Our aim is to build an intuitive, user-friendly student life organiser to, as far as possible, alleviate the stress of NUS life.
2. Let’s get started
Please ensure you have Java 11 or above installed on your PC.
-
You can download the latest version of
Jarvishere. -
Move
Jarvisto the directory you would like to use as the home folder for the application. -
Run
jarvis.jarto start the app. You should see something similar when starting the application up:
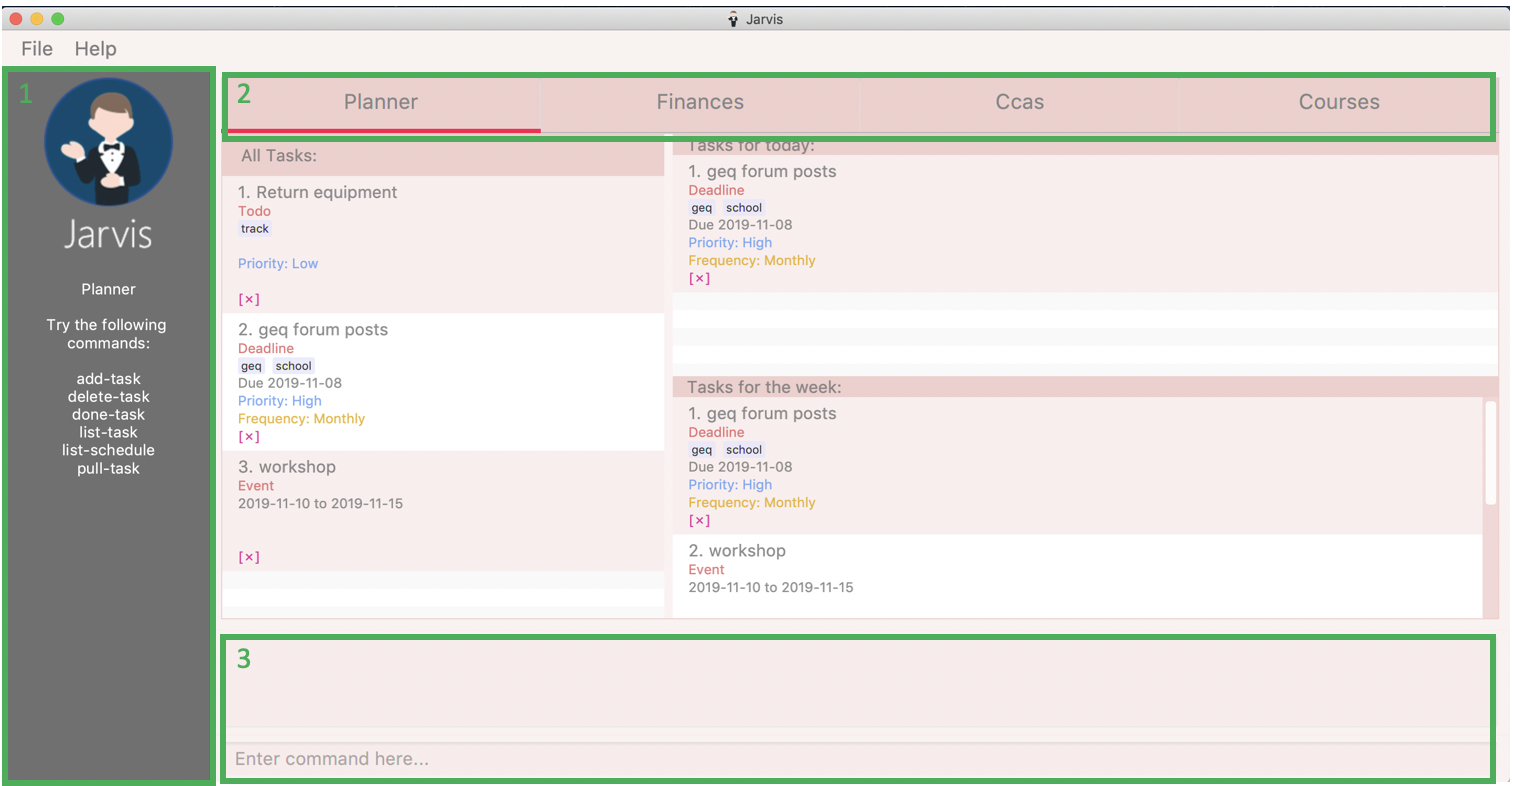
In Figure 1, there are three boxes labelled with numbers - these are the shared GUI sections across all the features:
-
HelpDesk- Unique to each feature’s tab, it will display a list of commands you can use so you do not need to remember them all! -
Feature Tabs - The four main features of
Jarvishave been split into distinct tabs. The tab that you are currently on would be underlined in red, as seen in Figure 1. You can also toggle between tabs by either clicking on the tabs themselves, pressing thetabkey or by using the features'listcommands. -
Command Result (top) & Command Entry (bottom) Boxes - Keying commands into the Command Entry Box will cause the respective Command Results to show in the Command Result Box. An invalid command will result in a red border around the Command Entry Box and an appropriate error message will be displayed in the Command Result Box, as shown in an example in Figure 2 below.
Additionally, you may press the
enterkey anywhere in the app and it will automatically focus on the Command Entry Box - no mouse required!
You can learn more about the each feature’s individual GUI and its respective commands in the coming sections.
3. Symbols and command format
Before delving straight into each feature, lets get familiarised with the conventions used in this user guide.
3.1. Symbols
| This symbol indicates important information. |
3.2. Command format
3.2.1. Lower case vs upper case
Words in lower case are commands used in Jarvis while those in UPPER CASE are parameters supplied by the user.
Take the following command as an example:
add-task t/TASK-TYPE des/TASK-DESCRIPTION
In the above example, add-task and the prefixes, t/ and des/ are parts of a command while TASK-TYPE and
TASK-DESCRIPTION are the parameters supplied by the user.
3.2.2. Square brackets
Items in square brackets [] are optional.
Take the following command as an example:
add-task t/TASK-TYPE des/TASK-DESCRIPTION [p/PRIORITY]
In the above example, the command can be used:
-
With a priority level:
add-task t/todo des/assignment p/highor
-
Without a priority level:
add-task t/todo des/assignment
3.2.3. Ellipses
Parameters with … can be used once or more.
For example:
[#TAG]… is an optional parameter that can be used either none, once or multiple times.
-
Without an optional parameter:
add-task t/todo des/assignmentor
-
With an optional parameter:
add-task t/todo des/assignment #cs2103t #urgent
3.2.4. Curly braces and pipes
Some commands can take in different parameters. These parameters are represented with a pipe, | ,
surrounded by curly braces, e.g {param1 | param2}.
For example, the command:
export {csv | txt | xlsx} f/FILENAME
can be used
-
With a csv parameter:
export csv f/MyFileor
-
With a txt parameter:
export txt f/MyFile
3.2.5. Date format
Dates follow the following format: d/m/yyyy.
For example:
add-task t/deadline des/assignment d/1/1/1970
3.2.6. Order of parameters
Jarvis can parse parameters to commands in any order.
For example, the command can be represented in this format:
-
With the des/ prefix before the d/prefix:
add-task t/deadline des/assignment d/1/1/1970or
-
With the d/ prefix before the des/prefix:
add-task t/deadline d/1/1/1970 des/assignment
4. Features
4.1. Task Planner
A digital planner to help you stay organized; Jarvis can help you cope with your interminable lists of deadlines,
events, errands and more. Tagging and prioritizing tasks are just two of the many ways Jarvis will
enable you to stay on top of everything you need to do!
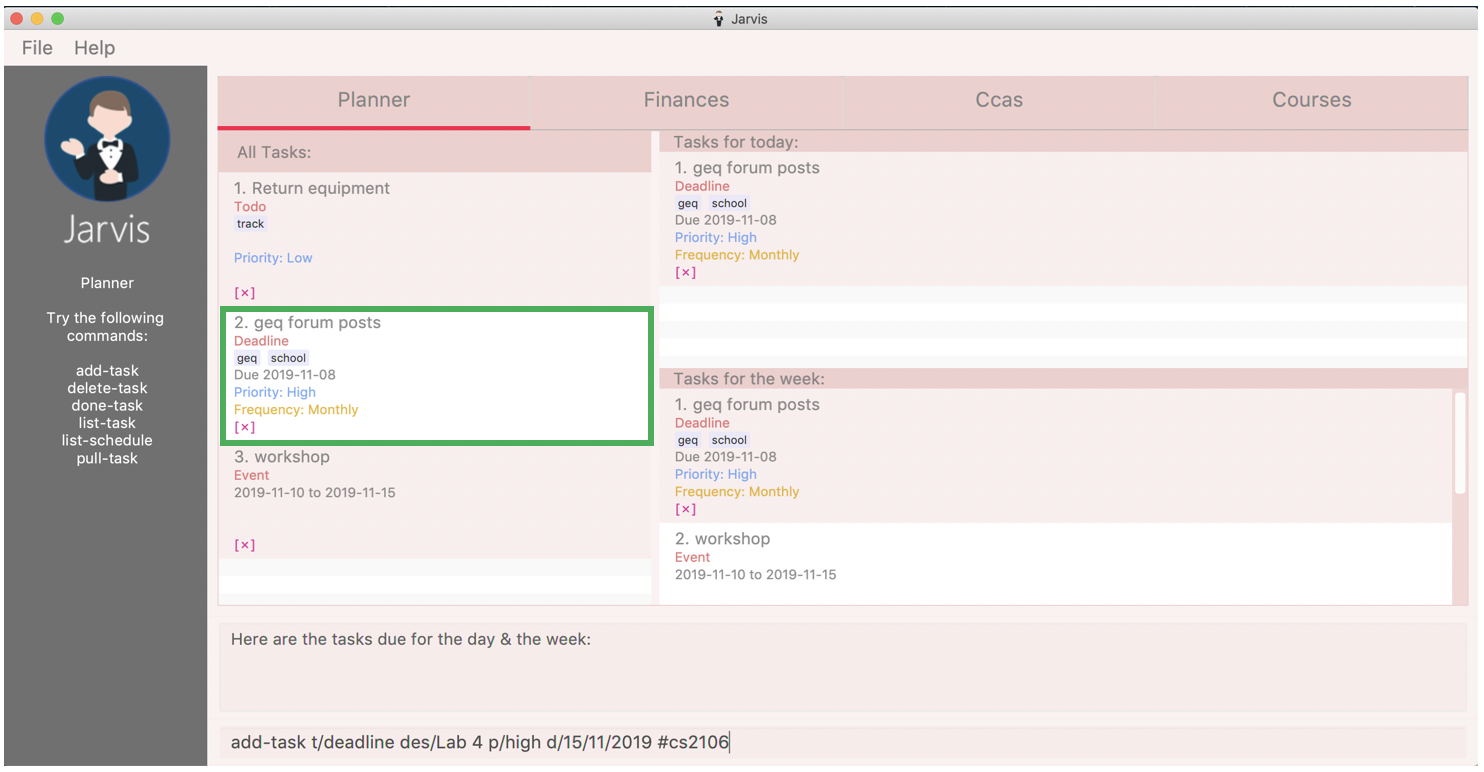
The Planner feature of Jarvis has a very intuitive user interface, with three main sections - as seen in Figure 3.
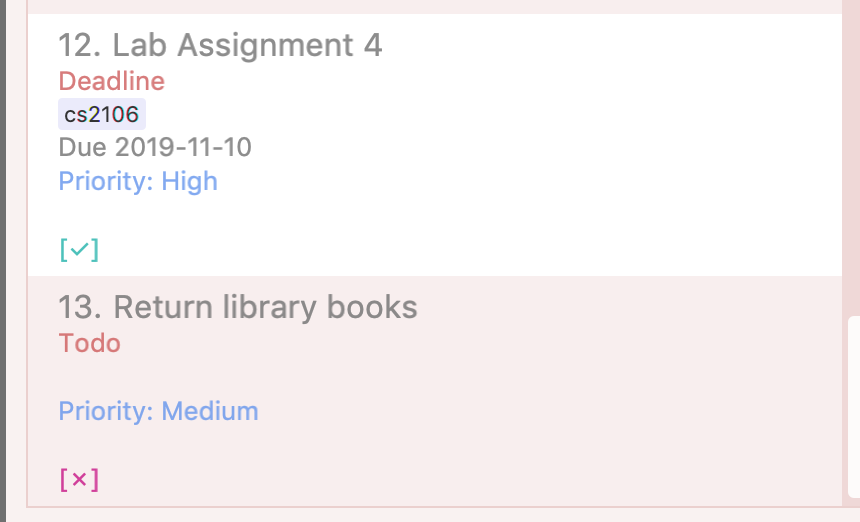
Each task is represented by a task card (an example of which is boxed in green in Figure 3). Each task card has the task description right at the top, followed by the task type, and the optional fields (if present). The icon at the bottom of each task card indicates whether a task has been done, or not - a red cross for tasks that have not been completed and a green tick for tasks that have.
The default display ia a column on the left for all the tasks in the planner, and a column on the right for your schedule. The schedule consists two lists stacked on top of each other - the top one showing tasks happening on that day and the bottom showing tasks happening that week.
4.1.1. Add a task: add-task
The most fundamental command for the Planner - add-task adds a task to the Planner.
A task must have a:
-
TASK-TYPE:todo,eventordeadline -
TASK-DESCRIPTION: a short description of the task -
DATE(forEventandDeadlinetasks only)
A task may have the following attributes:
-
TAG: any number of tags, such as#schoolor#cca -
PRIORITYlevel:high,mediumorlow -
FREQfrequency:daily,weekly,monthlyoryearly
You can refer to the table below for a brief overview of the different command formats for the different types of tasks.
| Task Type | Format |
|---|---|
|
|
|
|
|
|
| Duplicate tasks are not allowed in the Planner! |
Example
add-task t/event des/workshop f/weekly d/25/12/2019//26/12/2019
add-task t/deadline des/cs2101 assignment d/20/9/2019 p/high
And as simple as that, Jarvis can begin to keep track of
your tasks for you!
4.1.2. Delete a task: delete-task
If you want to keep your list of tasks updated and current, you can easily delete tasks from the planner.
Format: delete-task INDEX
where INDEX is the one-based index of the task list.
Example
delete-task 3
4.1.3. Find a task: find-task
Too many tasks to comb through? Ask Jarvis to find a task for you based on one or more keywords that match the
descriptions of your tasks.
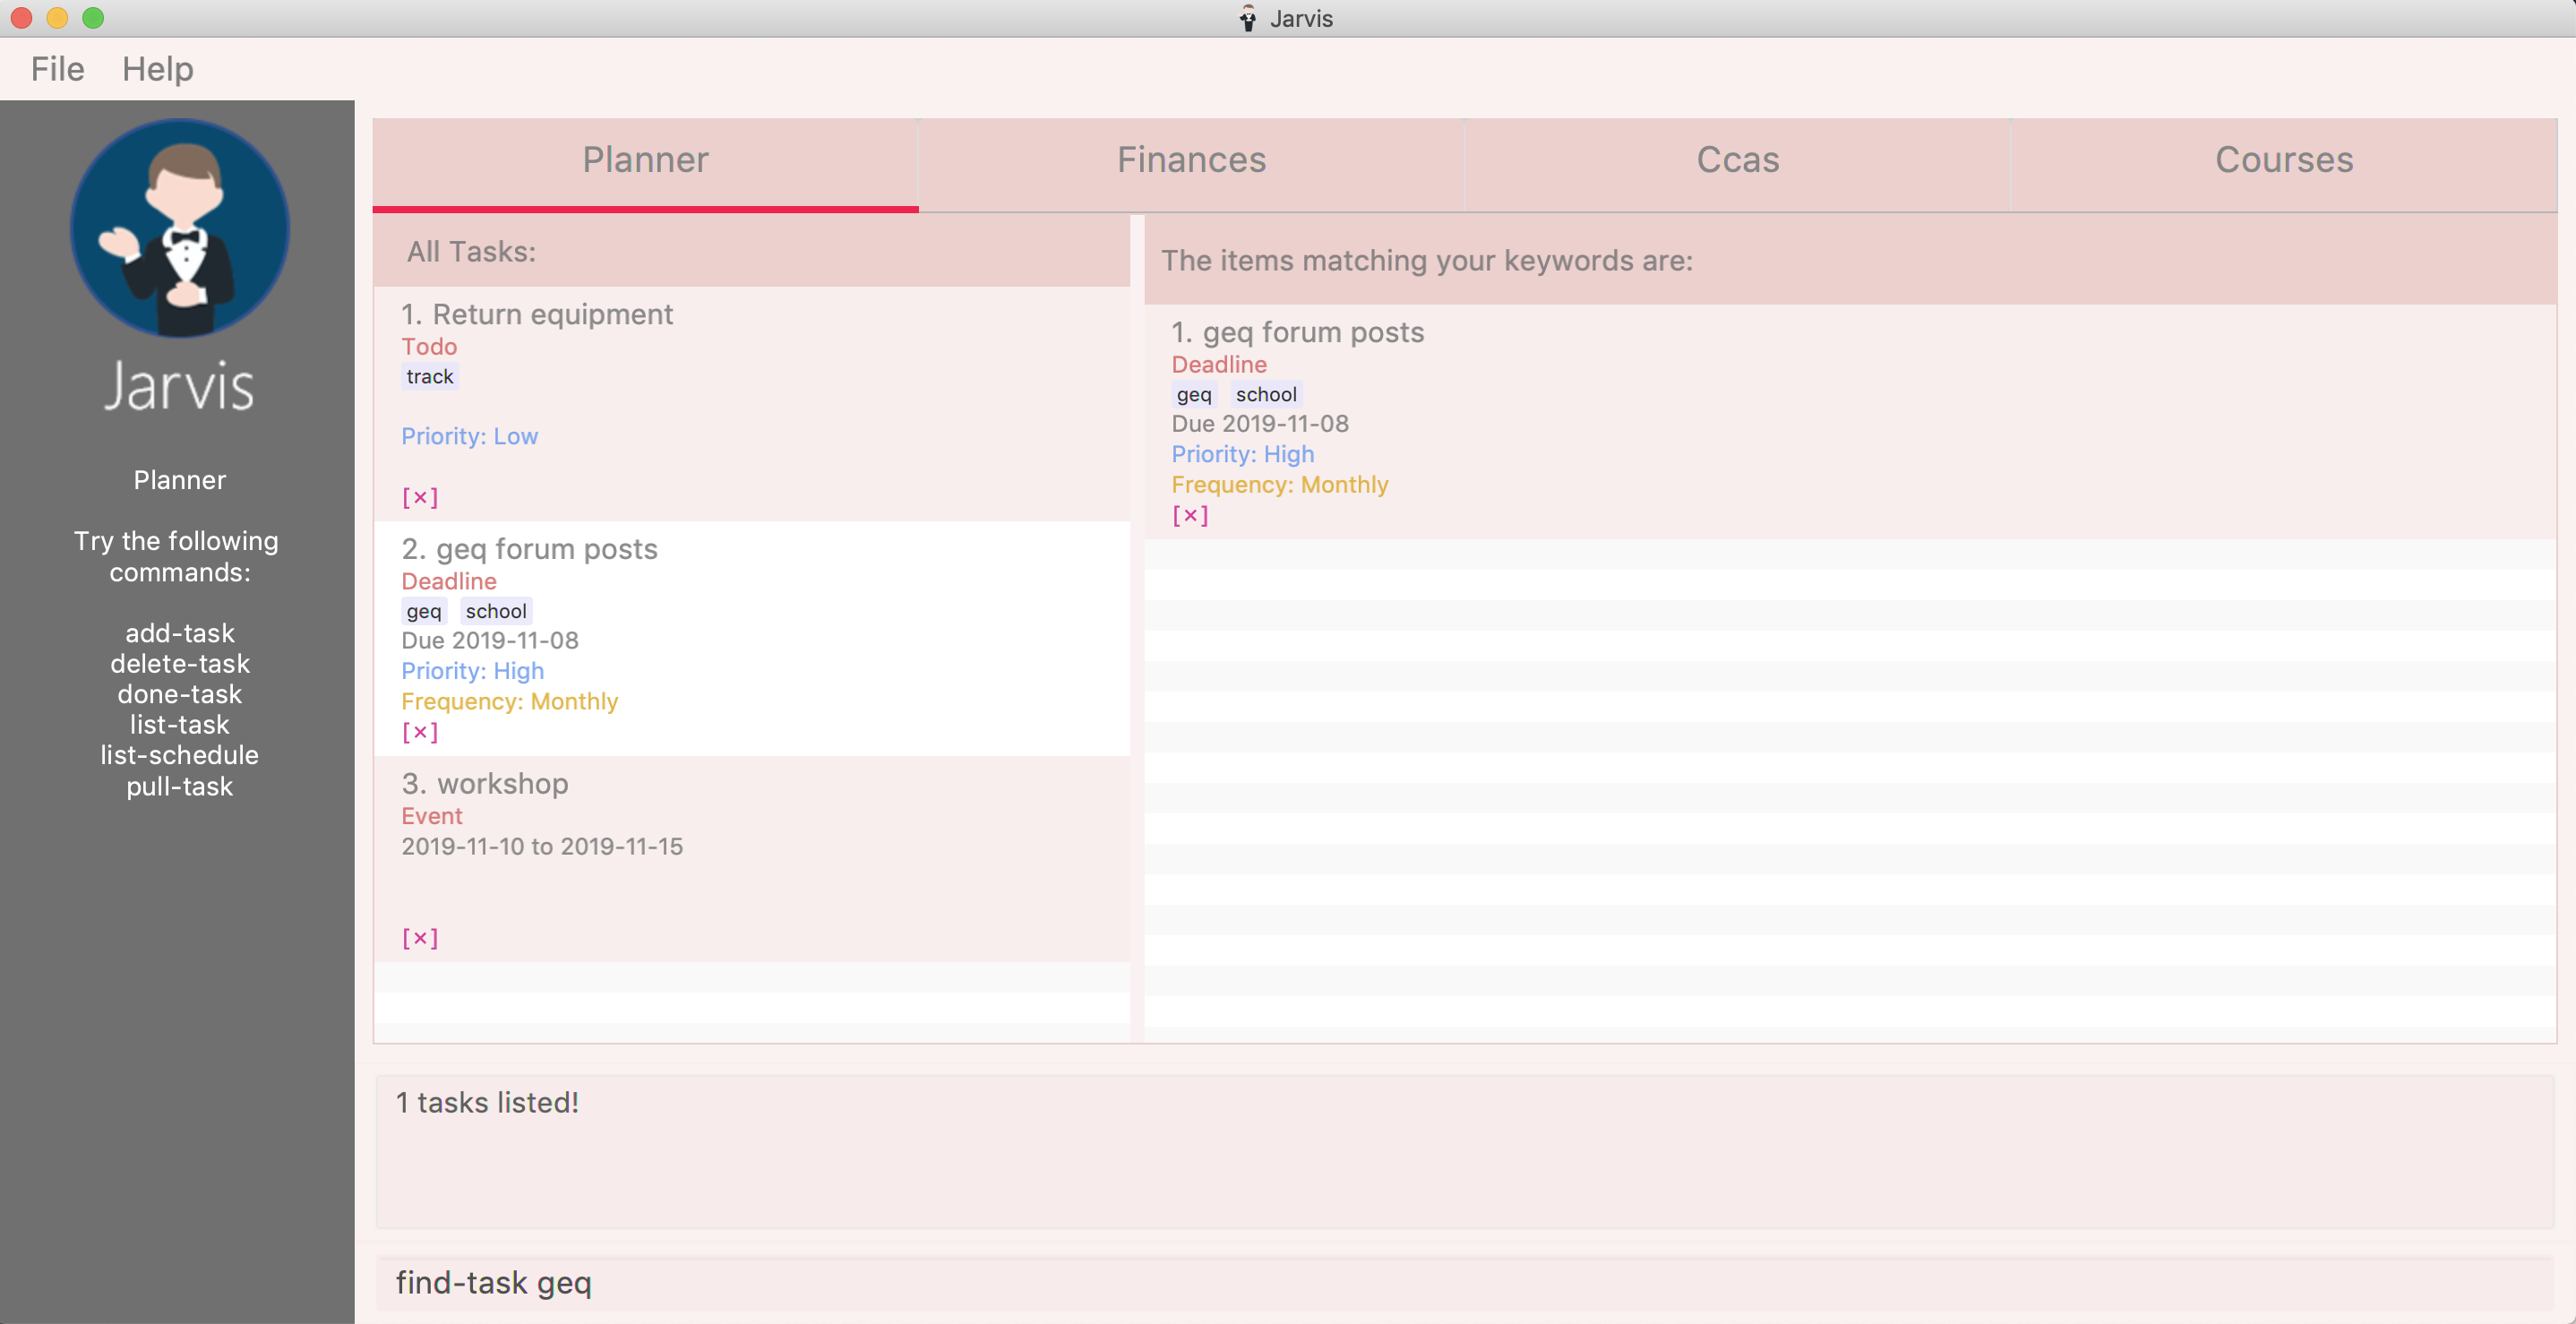
Format: find-task KEYWORD…
| There must be at least one keyword & this command is case-insensitive. |
Example
find-task assignment
find-task homework cs ma1101r
4.1.4. Update a task’s status: done-task
Once you have completed a task (hooray!), you can let Jarvis know. By default on
add-task, all tasks are marked as undone, represented by a [✗]. Upon marking the task as done, the task will be
represented with a [✓], as seen in Figure 5 below.
Format: done-task INDEX
where INDEX is the one-based index of the task list.
4.1.5. Sort tasks by attribute: pull-task
To get a quick glimpse of all the tasks you have in your Planner that match a certain attribute, simply pull all tasks relating to that attribute.
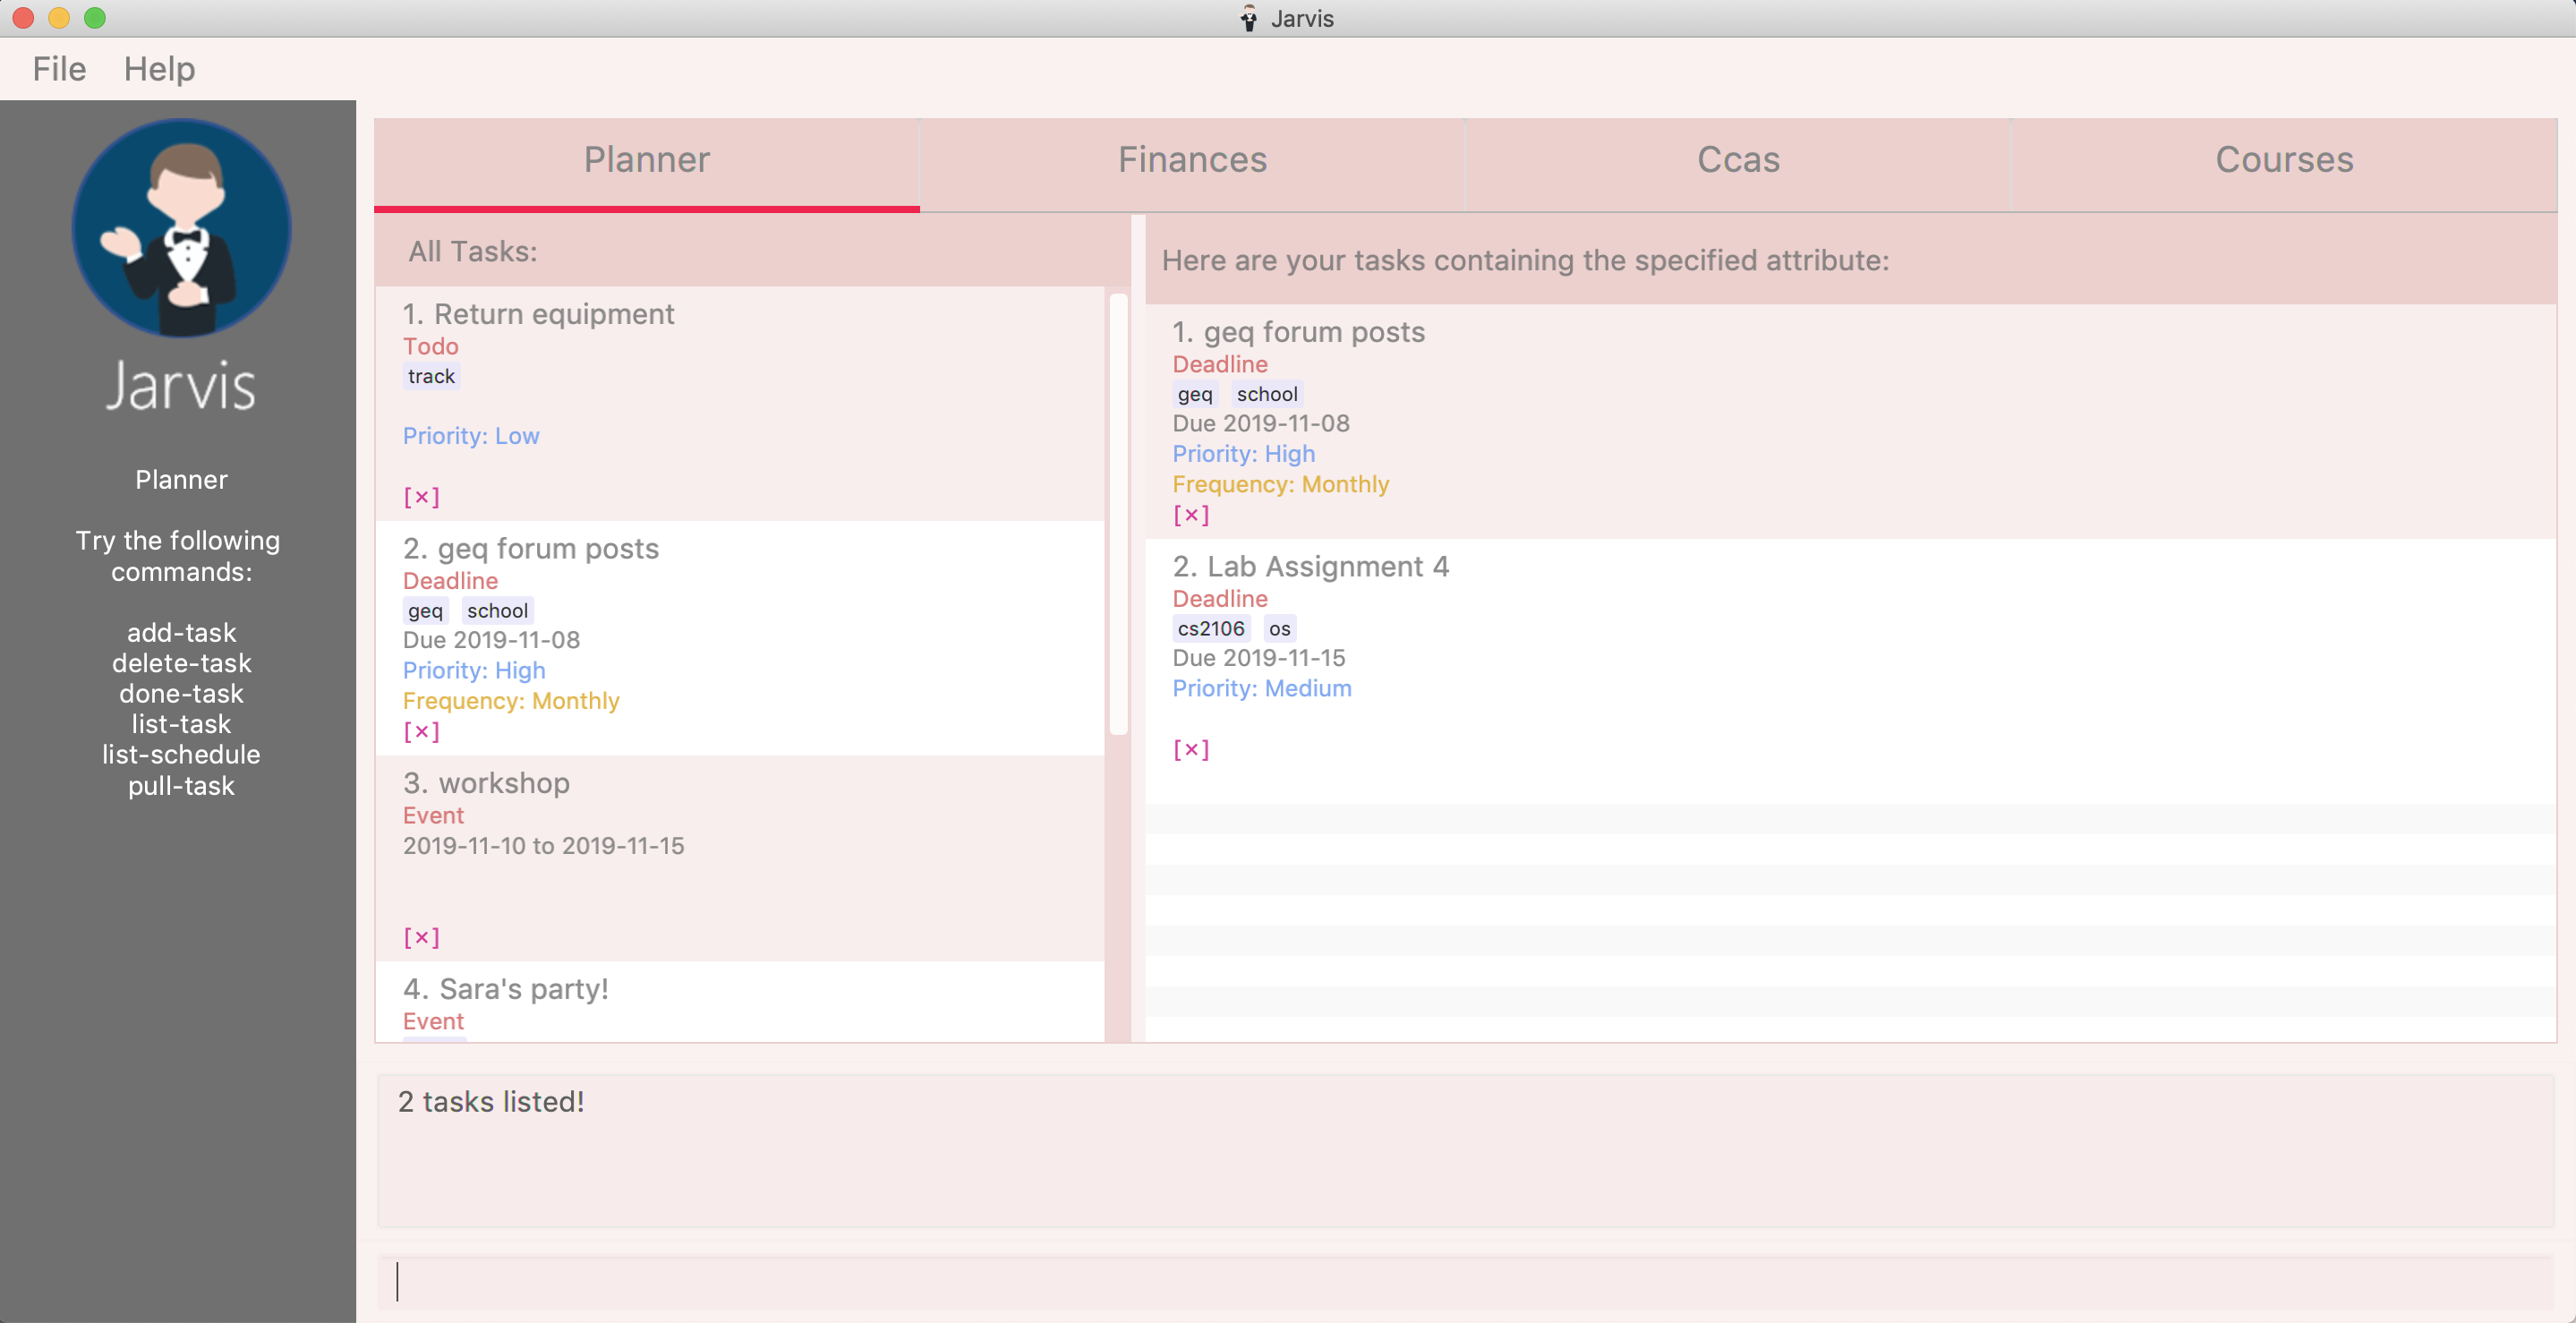
Format: pull-task { t/TYPE | #TAG | p/PRIORITY-LEVEL | f/FREQUENCY-LEVEL | d/DATE }
Example
pull-task t/todo
pull-task #cs2106
pull-task is different from find-task so as to make a clear distinction between looking for tasks
by task description only (find-task), and looking for tasks based on specific attributes (pull-task).
|
4.1.6. List all tasks: list-task
Lists all the tasks in the Planner. Using list-task while on another page of Jarvis will
pull up the Planner tab.
Format: list-task
4.1.7. Edit a task: edit-task [v2.0]
As you approach the deadlines for certain tasks, you might want to increase their priority levels. Soon, you will be able to edit existing tasks instead of deleting and adding them back in again.
Format: edit-task INDEX//NEW-DESCRIPTION…
NEW-DESCRIPTION can be a new task description or any of the other attributes
used to create a task. You can also edit any number of attributes at the same time, each separated with a space.
However, only one instance of each attribute is allowed per command.
NEW-DESCRIPTION must be tagged with the attribute prefix. For example, if you want to edit the task description
and priority level of a task: edit-task INDEX//des/NEW-TASK-DESCRIPTION p/NEW-PRIORITY-LEVEL.
|
Example
edit-task 1//des/project part 2
edit-task 2//des/project part 2 d/18/09/2019
edit-task 3//f/weekly
4.1.8. Clear entries: clear-task [v2.0]
Soon you will also be able to delete multiple entries at one go. Tasks can be cleared by #TAG or d/DATE - where
tasks with the specified tag or date will be cleared.
The command clear-task with no parameters succeeding it will result in all tasks
being cleared.
Format: clear-task [#TAG]… [d/DATE]
4.2. Finance Tracker
Introducing the Finance Tracker feature of Jarvis - responsible for keeping track of all your purchases, monthly subscriptions and monthly spending amount.
As students, we often fail to keep our spending habits in check. But do not worry, as with Jarvis, you will never
have to worry about not saving enough for that new laptop or yet another trip with your friends.

In Figure 7, you will be able to see a list of purchases on the left and a list of your monthly subscriptions on the right. On the bottom left, Jarvis will show the accumulative spending for that month, as well as how much you are left with (if you have set a spending limit).
4.2.1. Add a single-use purchase: add-paid
Bought another cup of GongCha at UTown? Let Jarvis know.
Don’t worry about remembering when you made your purchase, as each purchase entered will automatically be set to its date of entry! Jarvis will then update your monthly expenses accordingly, as well.
Format: add-paid d/PURCHASE-DESCRIPTION a/AMOUNT
| Jarvis will show the latest purchase at the top of the list so you can easily see your last purchase without scrolling! |
Example
add-paid d/GongCha a/2.8
add-paid d/GongCha a/2.89
4.2.2. Delete a single-use purchase: delete-paid
If you have just returned something that you had bought online, delete-paid will remove the purchase at the specified
one based index on the list of purchases shown on the Finance tab. Jarvis will update your monthly expenses accordingly - meaning you have more to spend for the
rest of the month without exceeding your budget!
Format: delete-paid INDEX
INDEX corresponds to one based index shown on the list What I bought this month… under the Finance tab.
This also means that the index must exist within this list!
|
4.2.3. Find a purchase: find-paid
To have a quick view to see what you have been eating for dinner over the last month, you can use find-paid
to pull up purchases with descriptions matching KEYWORD provided.

Format: find-paid KEYWORD
Example
find-paid Gongcha
4.2.4. Add a monthly subscription: add-install
Jarvis also supports installments so that you do not need to key in your Netflix subscription fees each month.
Purchases entered with add-install will automatically be deducted from your budget at the same time every month.
Format: add-install d/INSTALLMENT-DESCRIPTION a/AMOUNT
Example
add-install n/Phone bill a/43.0
add-install n/Spotify a/9.50
4.2.5. Delete a monthly subscription: delete-install
With finals approaching, you might have decided to remove all distractions to help you study better. Unfortunately, this would also include your Netflix account.
Format: delete-install INDEX
Removing installments will also result in your monthly expenses being updated accordingly.
INDEX corresponds to one based index shown on the list What I spend on monthly… under the Finance tab. This also
means that the index must exist within this list!
|
4.2.6. Edit an installment: edit-install
If you have just changed your contract for your phone, let Jarvis know! You can easily reflect any changes
to your installments on the Finance Tracker through edit-install.
Format: edit-install INDEX { d/INSTALLMENT-DESCRIPTION | a/AMOUNT | d/INSTALLMENT-DESCRIPTION a/AMOUNT }
Example
edit-install 1 a/10
edit-install 2 d/Spotify student plan
edit-install 2 d/Spotify student plan a/7.50
4.2.7. Set a monthly spending limit: set-limit
Taking control of your spending might mean asking Jarvis to set a cap on your monthly budget.
Format: set-limit a/AMOUNT
Example
set-limit a/300
set-limit a/500.90
4.2.8. List finances: list-finances
Lists all the purchases in the Finance Tracker. Using list-task while on another page of Jarvis will
pull up the Finance tab. If you have previously searched through your purchases for something, list-finances
will return the original list of purchases.
Format: list-finances
4.2.9. Export to File: export [v2.0]
Conveniently export your expenditures to either a txt, csv, or xlsx file..
Format: export {csv | txt | xlsx} f/FILENAME
Example
export csv f/expenditures
export txt f/MyFile
| Jarvis will export the file containing all expenditures to its current directory. |
4.3. CCA tracker
The CCA tracker is a feature unique to Jarvis. Entirely customizable based on individual interest,
Jarvis can support milestone tracking, equipment management and so much more! Never has being in multiple
CCAs been so easy.
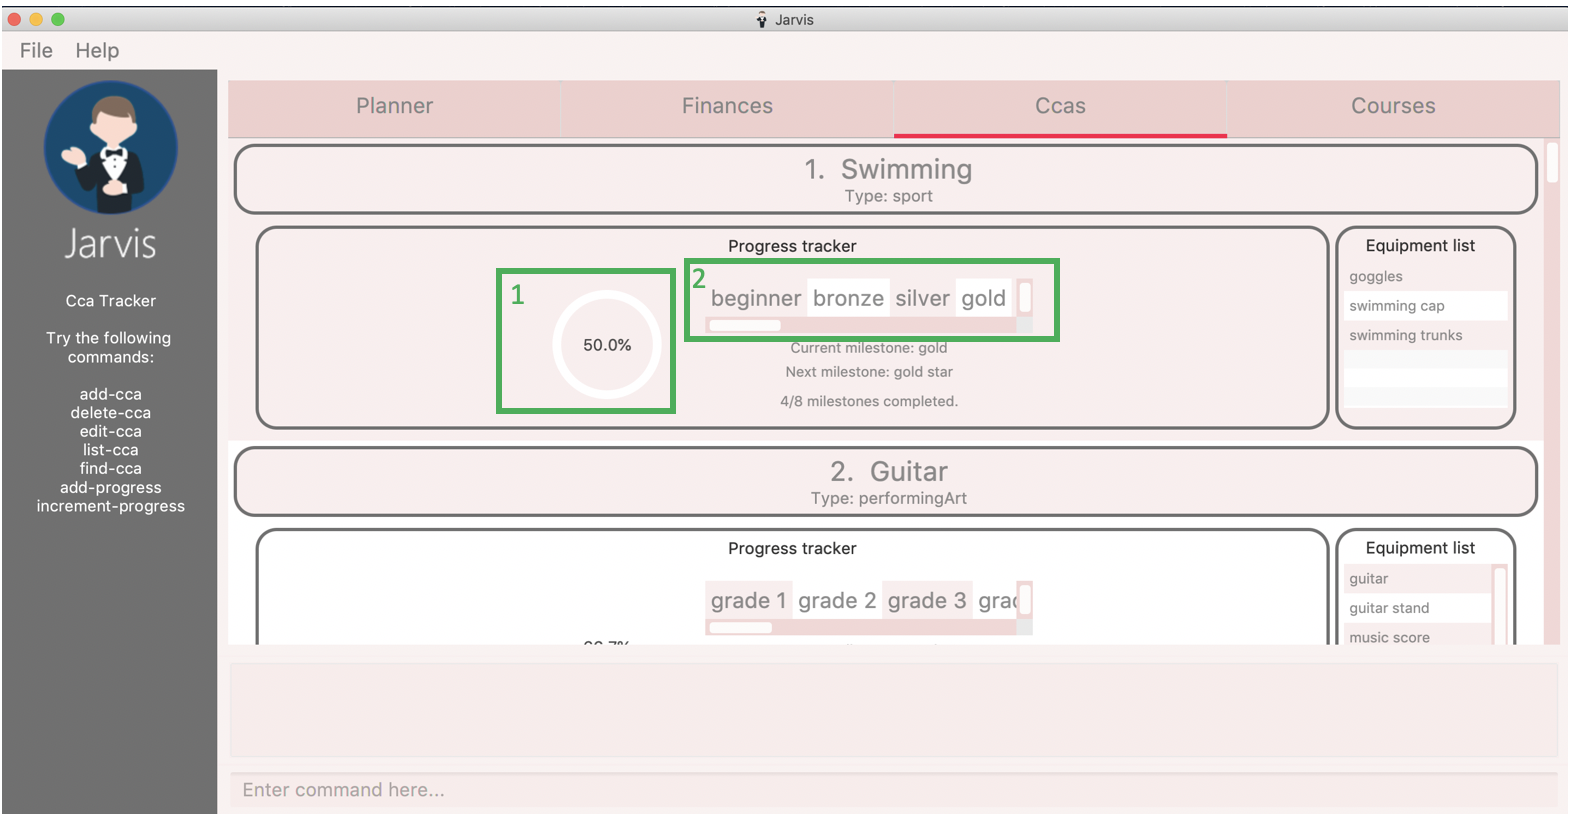
All CCAs are added to a main list, with each CCA having a Progress Tracker and an Equipment List, as seen in Figure 9. Within the Progress Tracker:
-
Box 1 displays the percentage of milestones of the CCA that have been completed.
-
Box 2 shows all the milestones assigned to that CCA.
-
The area below Box 2 displays the current milestone you are at, the next milestone succeeding the current one, and the fraction of milestones that have been completed.
4.3.1. Add a CCA: add-cca
To start, we can add some CCAs to the CCA Tracker. You will need to specify the name of the cca and the type of the CCA.
Format: add-cca n/NAME t/TYPE [e/EQUIPMENT]…
The types of the CCA are limited to the following:
-
performingArt -
sport -
club -
uniformedGroup
Example
add-cca n/Canoeing t/sport
add-cca n/Piano t/performingArt e/piano e/musical score e/metronome
add-cca n/Red cross t/uniformedGroup e/uniform e/first aid kit e/stretcher e/beret
4.3.2. Delete a CCA: delete-cca
New semester, new CCAs - deleting outdated ones is a breeze.
Format: delete-cca INDEX
Example
delete-cca 1
INDEX corresponds to the one based index shown on the list of Ccas under the Ccas tab. This also means that the
index must exist within this list!
|
4.3.3. Edit a CCA: edit-cca
If you have bought the latest tuner for your piano or some new running shoes, let Jarvis
know so that the changes to your CCAs can be updated!
Format: edit-cca INDEX { n/NAME | t/TYPE | e/EQUIPMENT… | p/MILESTONE… | l/PROGRESS-LEVEL }
Example
edit-cca 1 n/Piano t/performingArt e/piano e/musical score e/metronome e/tuner e/piano book
edit-cca 2 n/Running e/shoes e/water bottle e/snack bar
edit-cca 2 p/beginner p/intermediate p/advanced p/half-marathon p/full marathon p/ultramarathon l/5
Note that you will have to re-type each EQUIPMENT if you wish to add additional EQUIPMENT to the selected cca!
|
4.3.4. List a CCA: list-cca
Lists all your CCAs in the CCA Tracker. Using list-cca while on another page of Jarvis will
pull up the CCA Tracker tab.
Format: list-cca
4.3.5. Find a CCA: find-cca
For a quick view of CCAs matching one or more keywords, find-cca will come in useful.
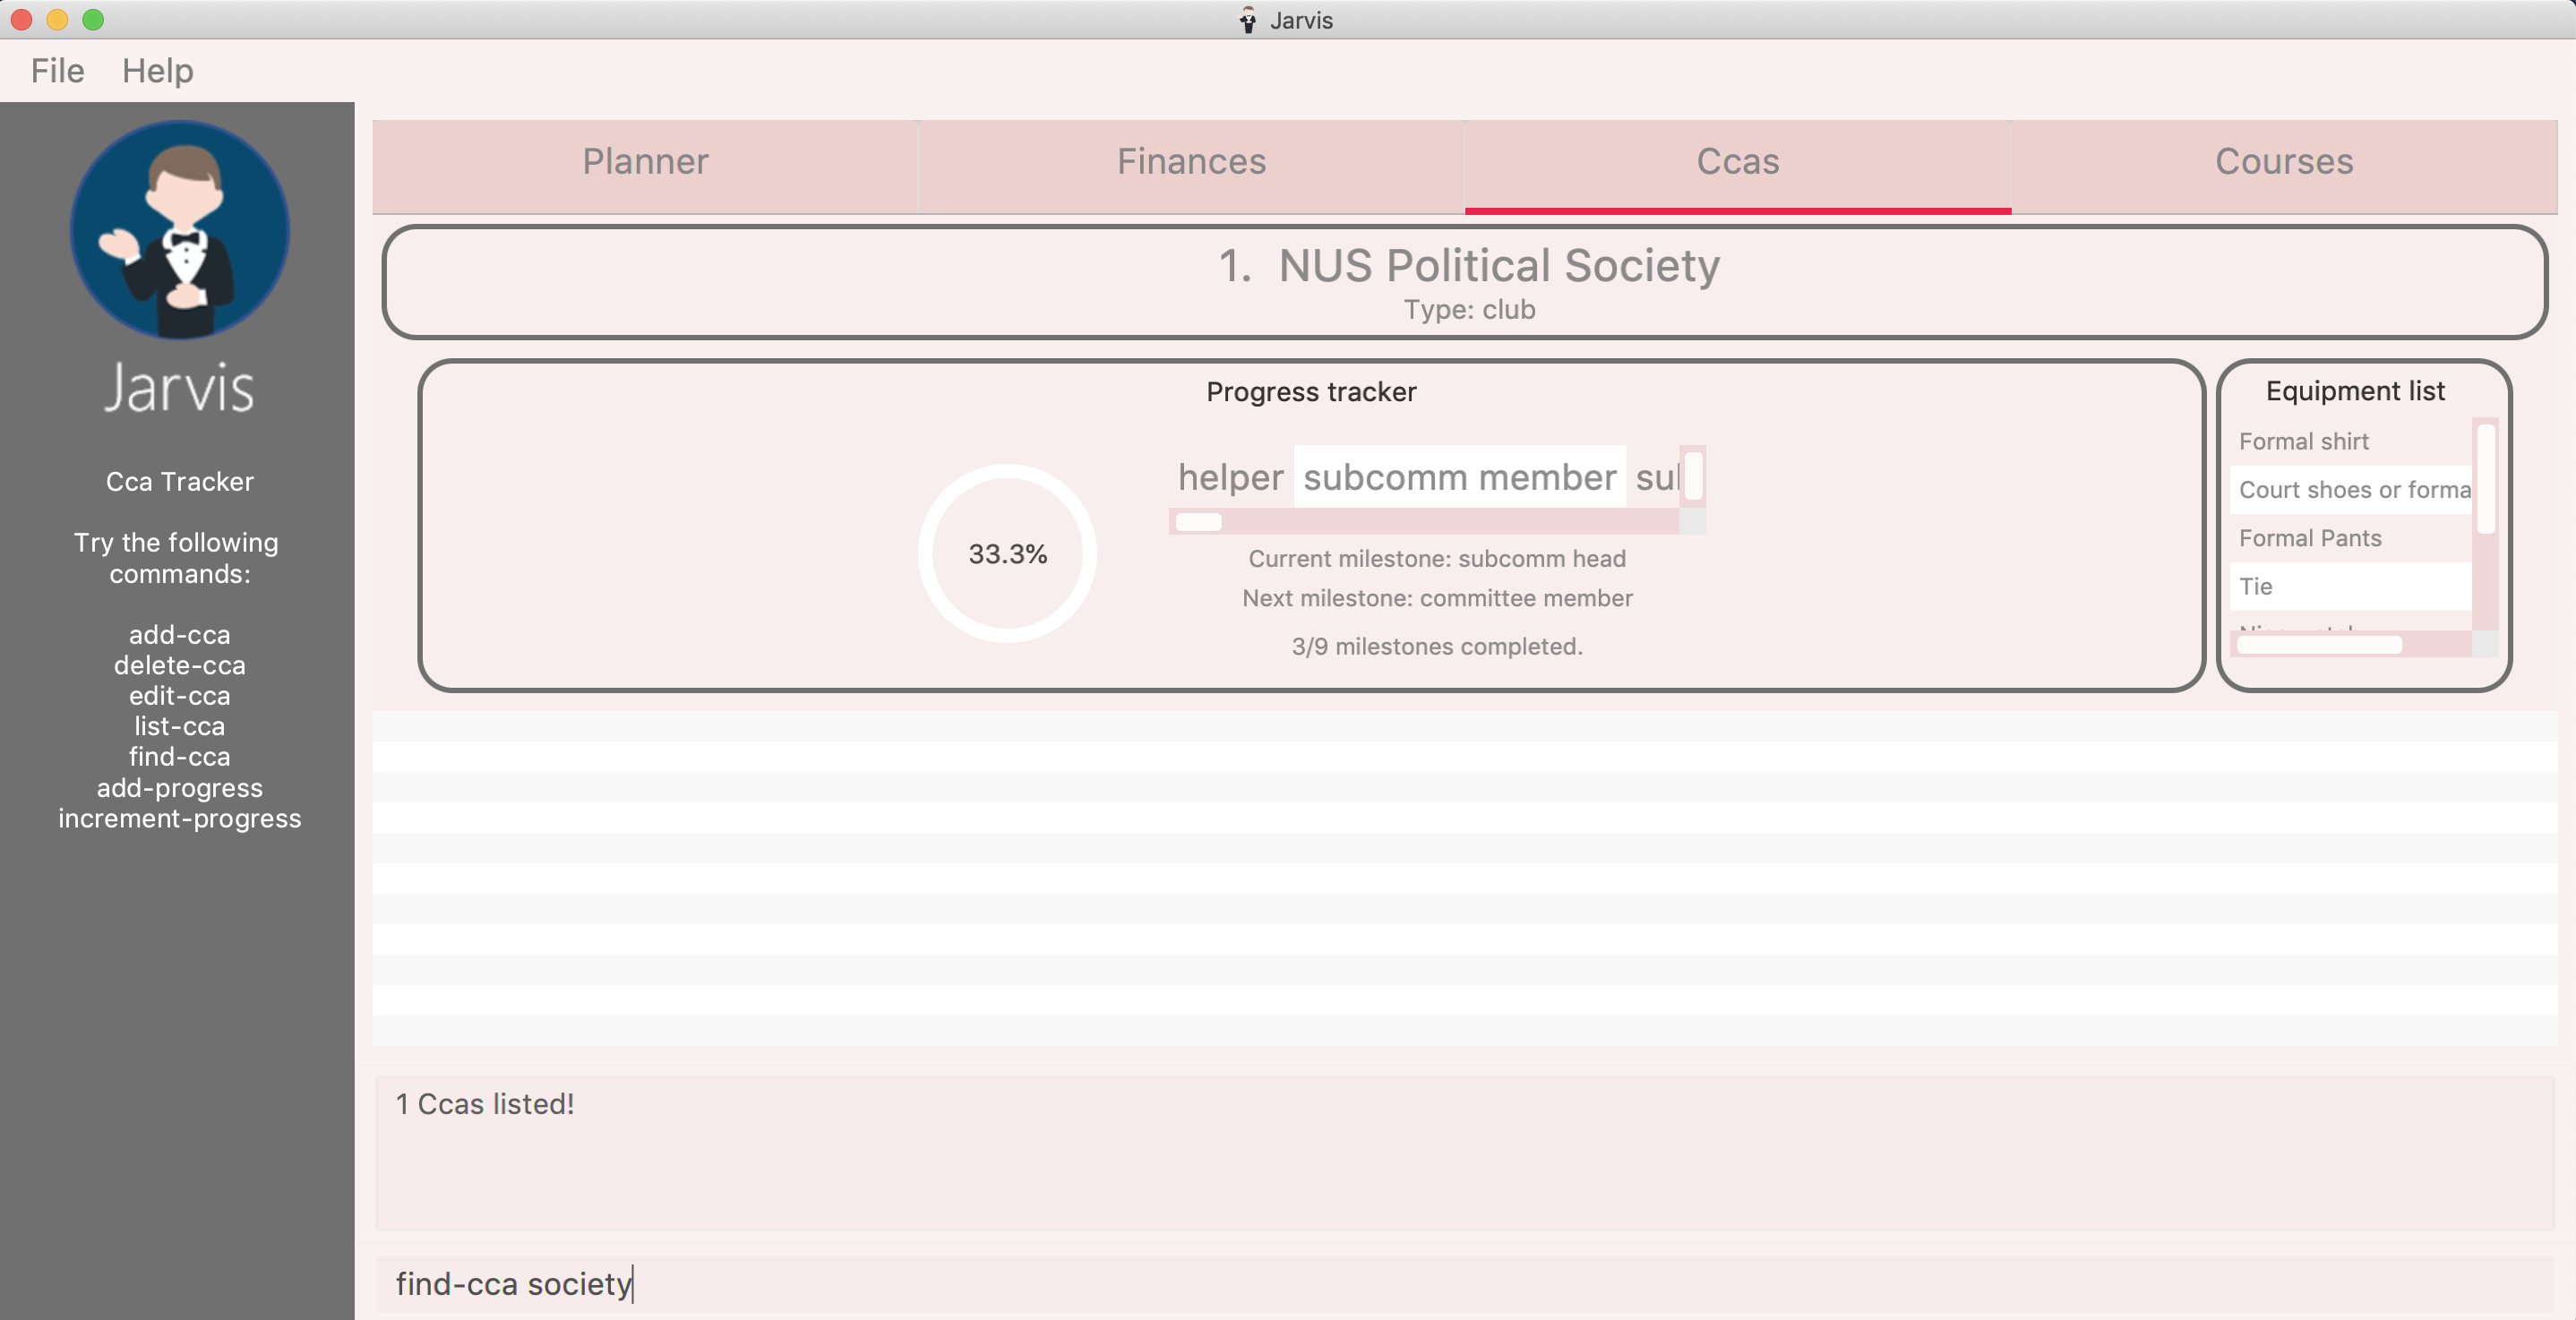
Format: find-cca KEYWORD…
Example
find-cca swimming
find-cca canoeing guitar
4.3.6. Add progress levels for a CCA: add-progress
Often, we strive to reach certain milestones in our CCAs. For example, in learning the piano, you might be aiming to
progress through the various grade levels available. With add-progress,
Jarvis can help you set and keep track of your progress towards each milestone in each of your CCAs.
Format: add-progress INDEX p/MILESTONE…
Example
add-progress 1 p/Grade 1 p/Grade 2 p/Grade 3 p/Grade 4 p/Grade 5 p/Grade 6 p/Grade 7 p/Grade 8 p/Diploma
add-progress 2 p/LCP p/Corporal p/Sergeant p/Staff Sergeant p/Warrant Officer p/Senior Warrant Officer
4.3.7. Increment progress level: increment-progress
Each time you have made progress towards any of your milestones, let Jarvis know! The progress bar for each CCA
provides a clear view of how much closer you are to their respective milestones.
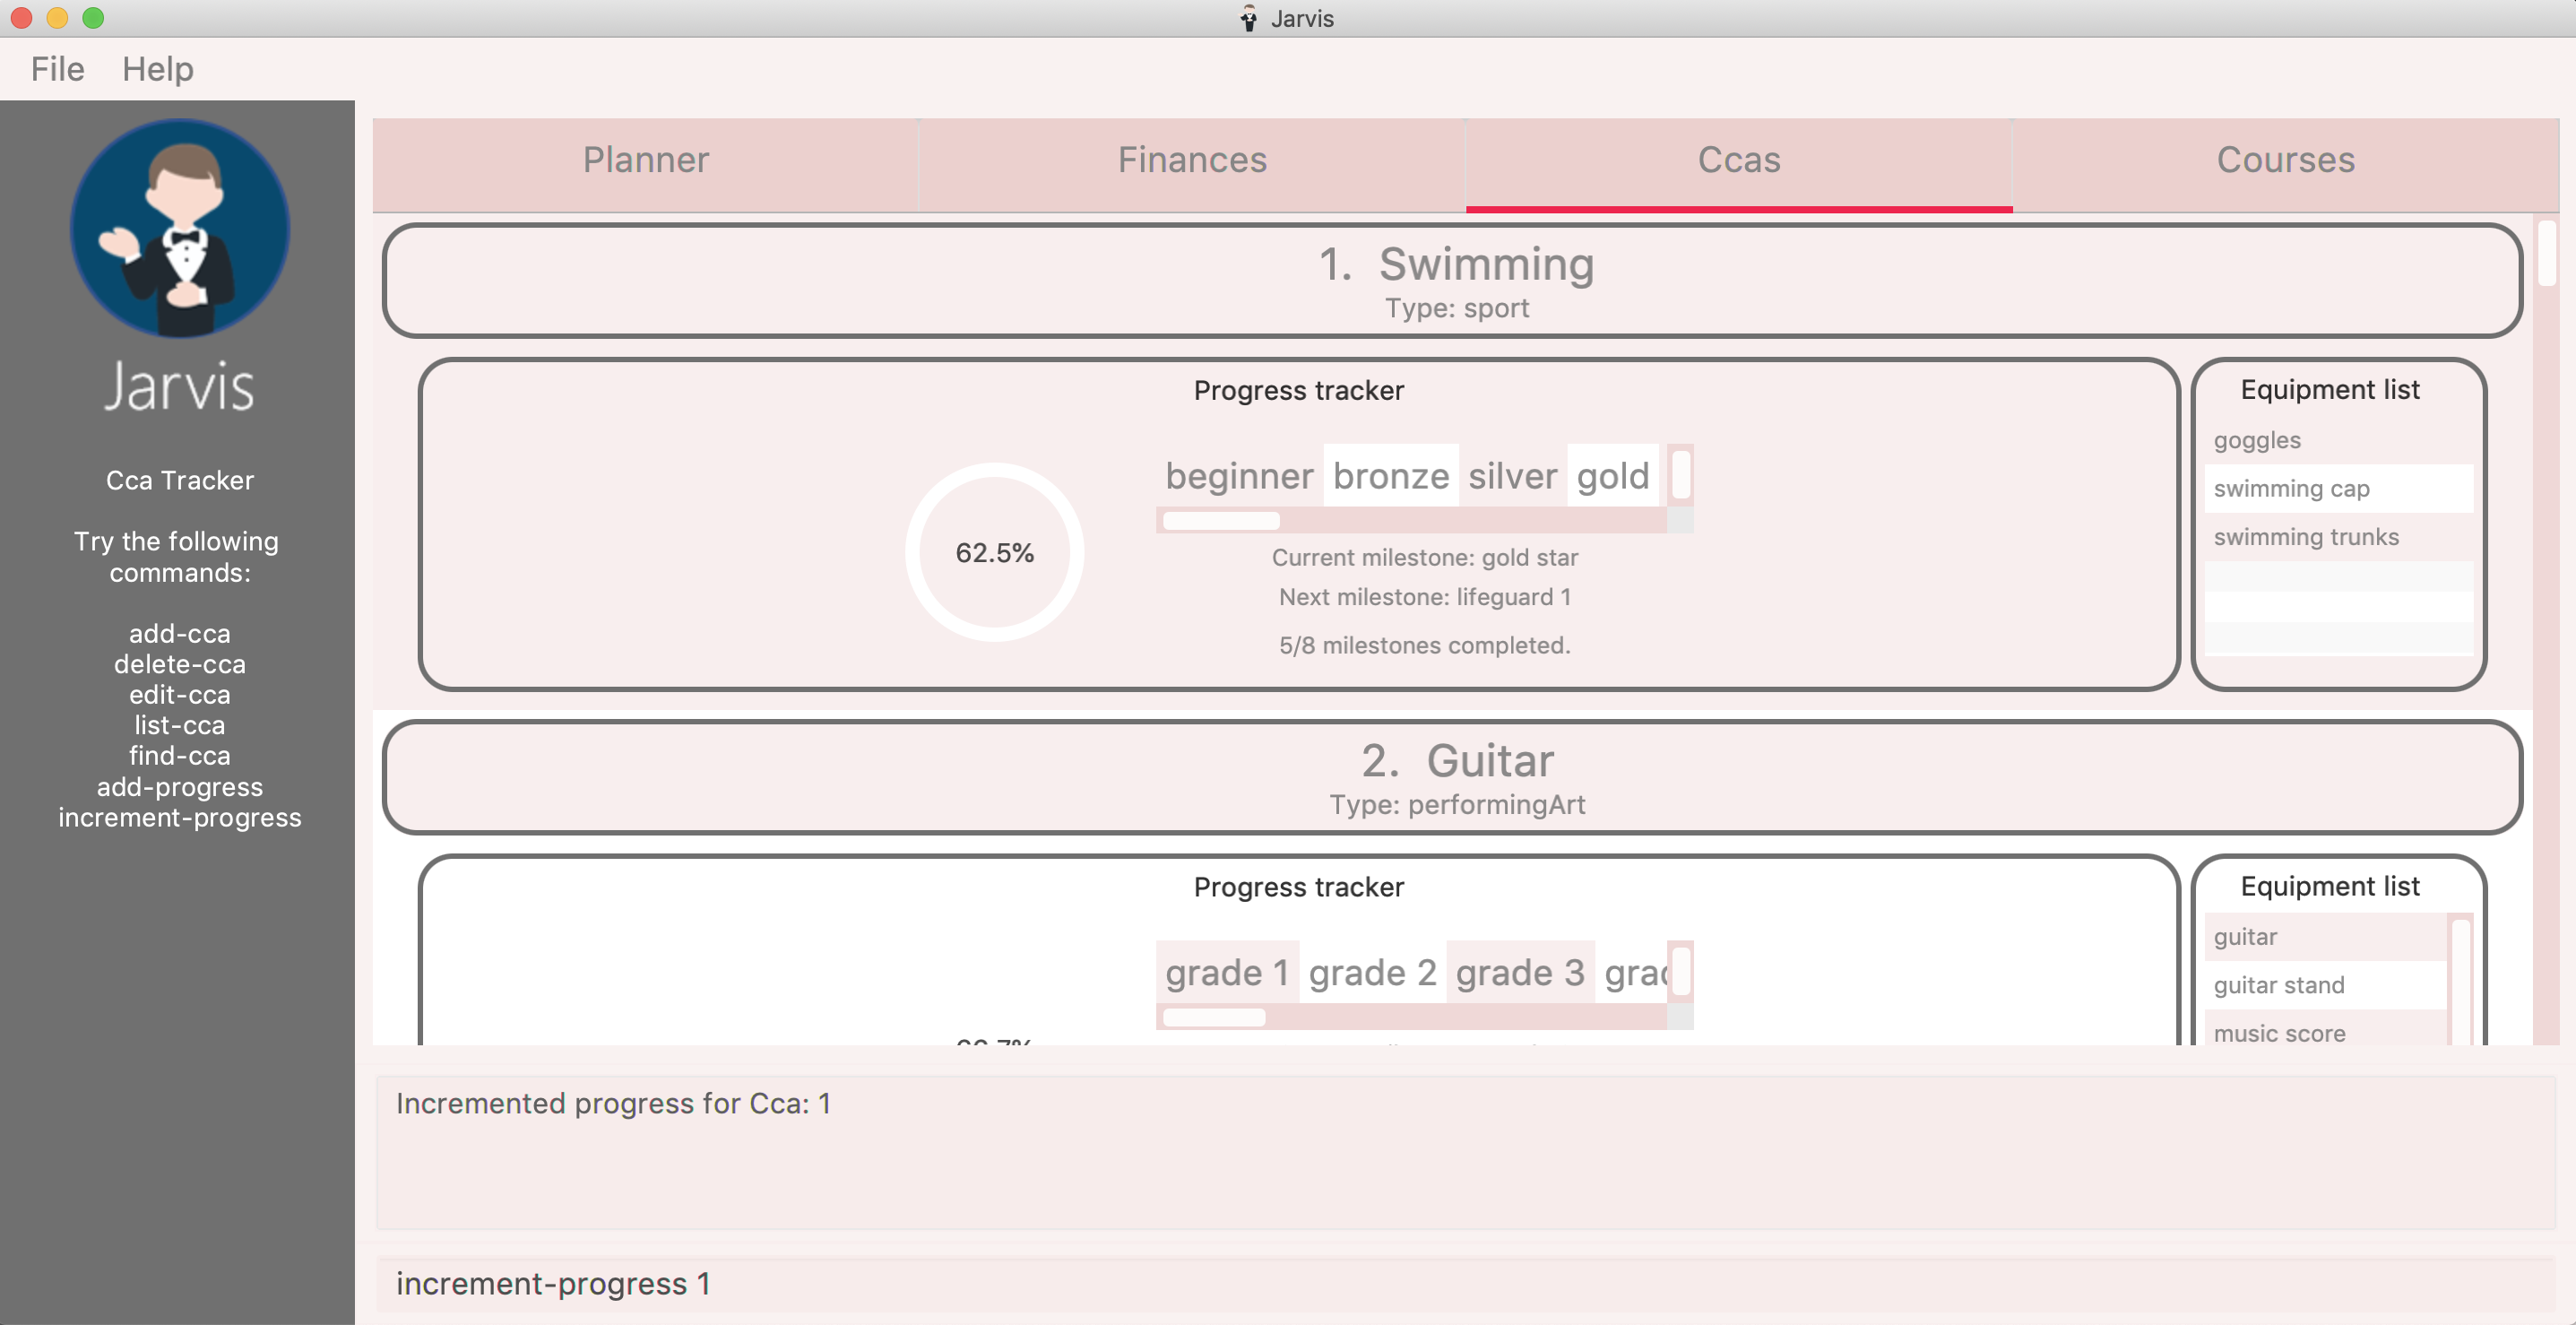
In Figure 11 above, using increment-progress on Swimming will raise the progress percentage from 50% to
62.5%.
Format: increment-progress INDEX
Example
increment-progress 1
Note that progress can only be incremented if add-progress has previously been executed on that particular Cca.
|
4.3.8. Add training date: add-cca [v2.0]
Need a reminder on Cca trainings? Add training dates to each Cca. Note that the training date is an optional parameter.
Format: add-cca n/NAME t/TYPE [e/EQUIPMENT]… [d/TRAINING DATE]…
4.4. Course Planner
Unable to keep track of what modules you have been taking? Need to quickly know what your CAP is? Want to know how far you are in determining your focus areas? Jarvis has a feature just for you! The Course Planner serves to solve these problems.
Thoroughly integrated with NUSMods (that we as NUS students often use to plan our timetables) you will be able to consolidate all the courses you have taken in NUS to date, as well as figure out what courses you could possible take in the future.
Let’s see how the Course Planner looks like:
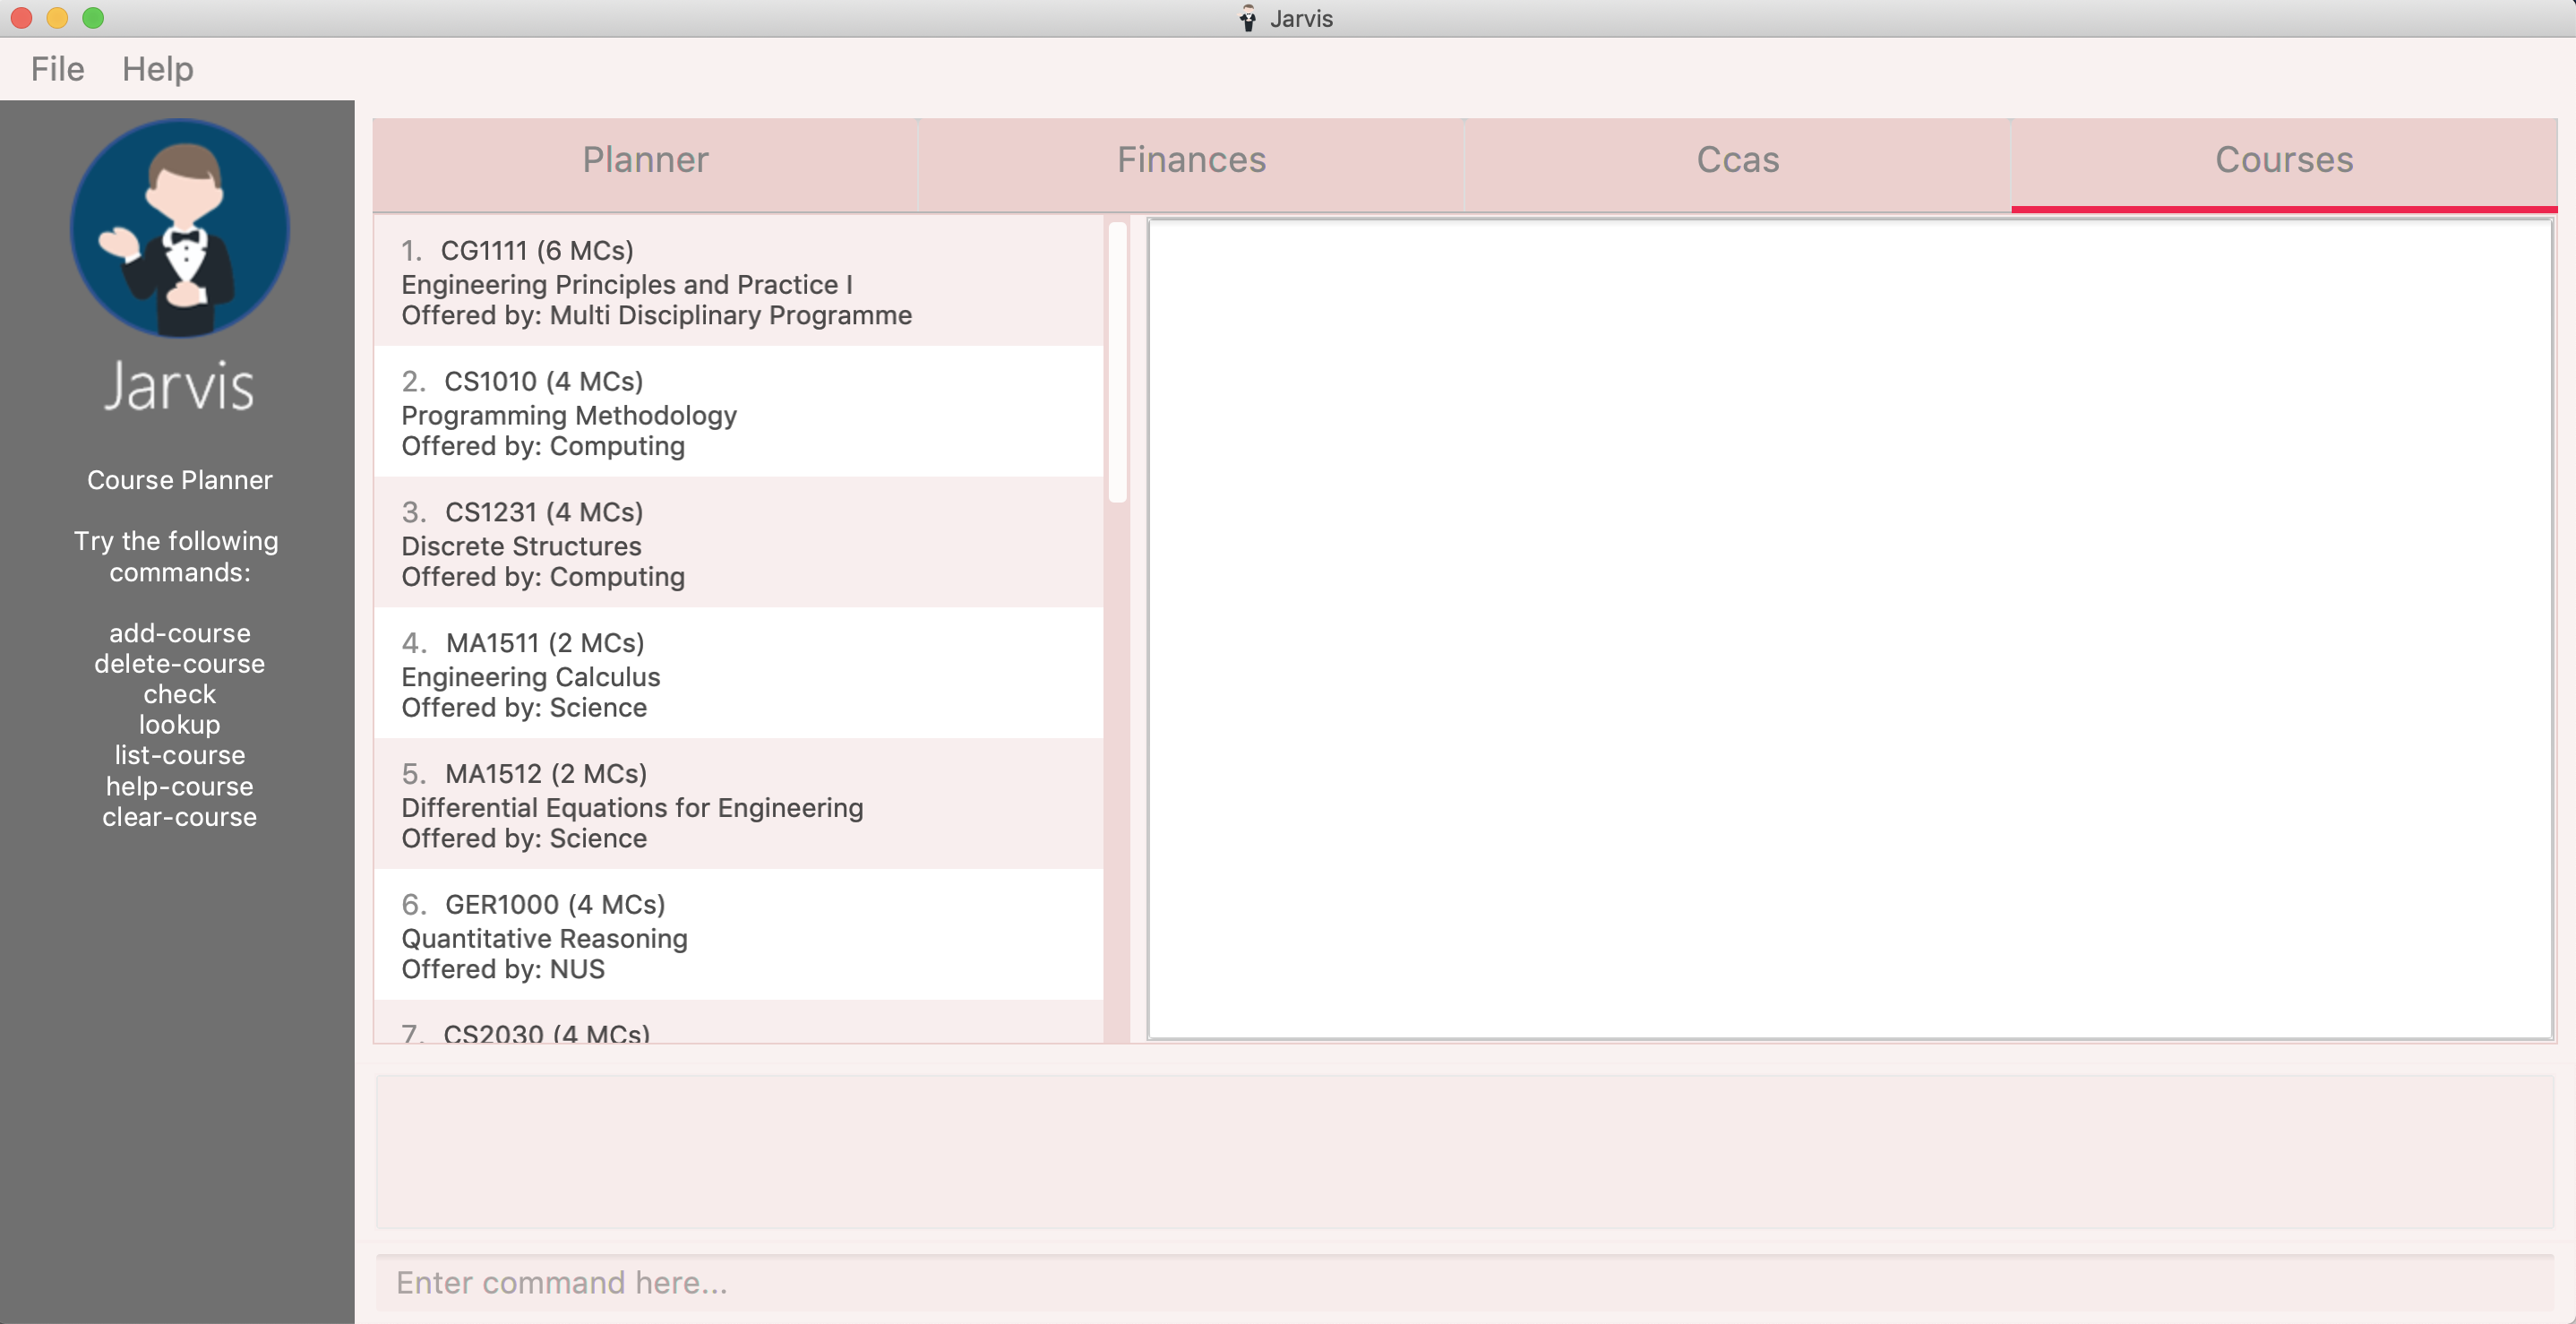
The default display for the Course Planner is a list of courses on the left and an empty Result Box on the right - as shown in Figure 12. This box will display different pieces of information depending on the commands entered.
Let’s see what the Course Planner can do:
4.4.1. Add a course: add-course
To get started, you can add specific course(s) to your list. Jarvis is able to add multiple courses at one go.
Format: add-course c/COURSECODE…
where COURSECODE is the course code of the NUS course you
wish to add.
Example
add-course c/CS1010
add-course c/CS1010 c/CS2030 c/CS2040
4.4.2. Add a course with grades: add-course [v2.0]
If you wish, you may add a course that has a grade attached to it. This is to facilitate Jarvis' understanding of the courses you have already taken. Jarvis will use such information in the calculation of your CAP (Cumulative Average Point).
Format: add-course c/COURSECODE g/GRADE [c/COURSECODE g/GRADE]…
where GRADE is any
valid NUS grade.
Example
add-course c/CS1010 g/B+
add-course c/CS2040 g/A+ c/CS2100 g/B- c/MA1521 g/B+
Every GRADE is tethered to the preceding COURSECODE, so the parameters to
this command must be entered in the specified order!
|
4.4.3. Delete a course: delete-course
You can easily delete a course from your list - either by the index of the course in the list, or by its course code.
Format: delete-course {c/COURSECODE | INDEX}
Example
delete-course c/CS1010
delete-course 2
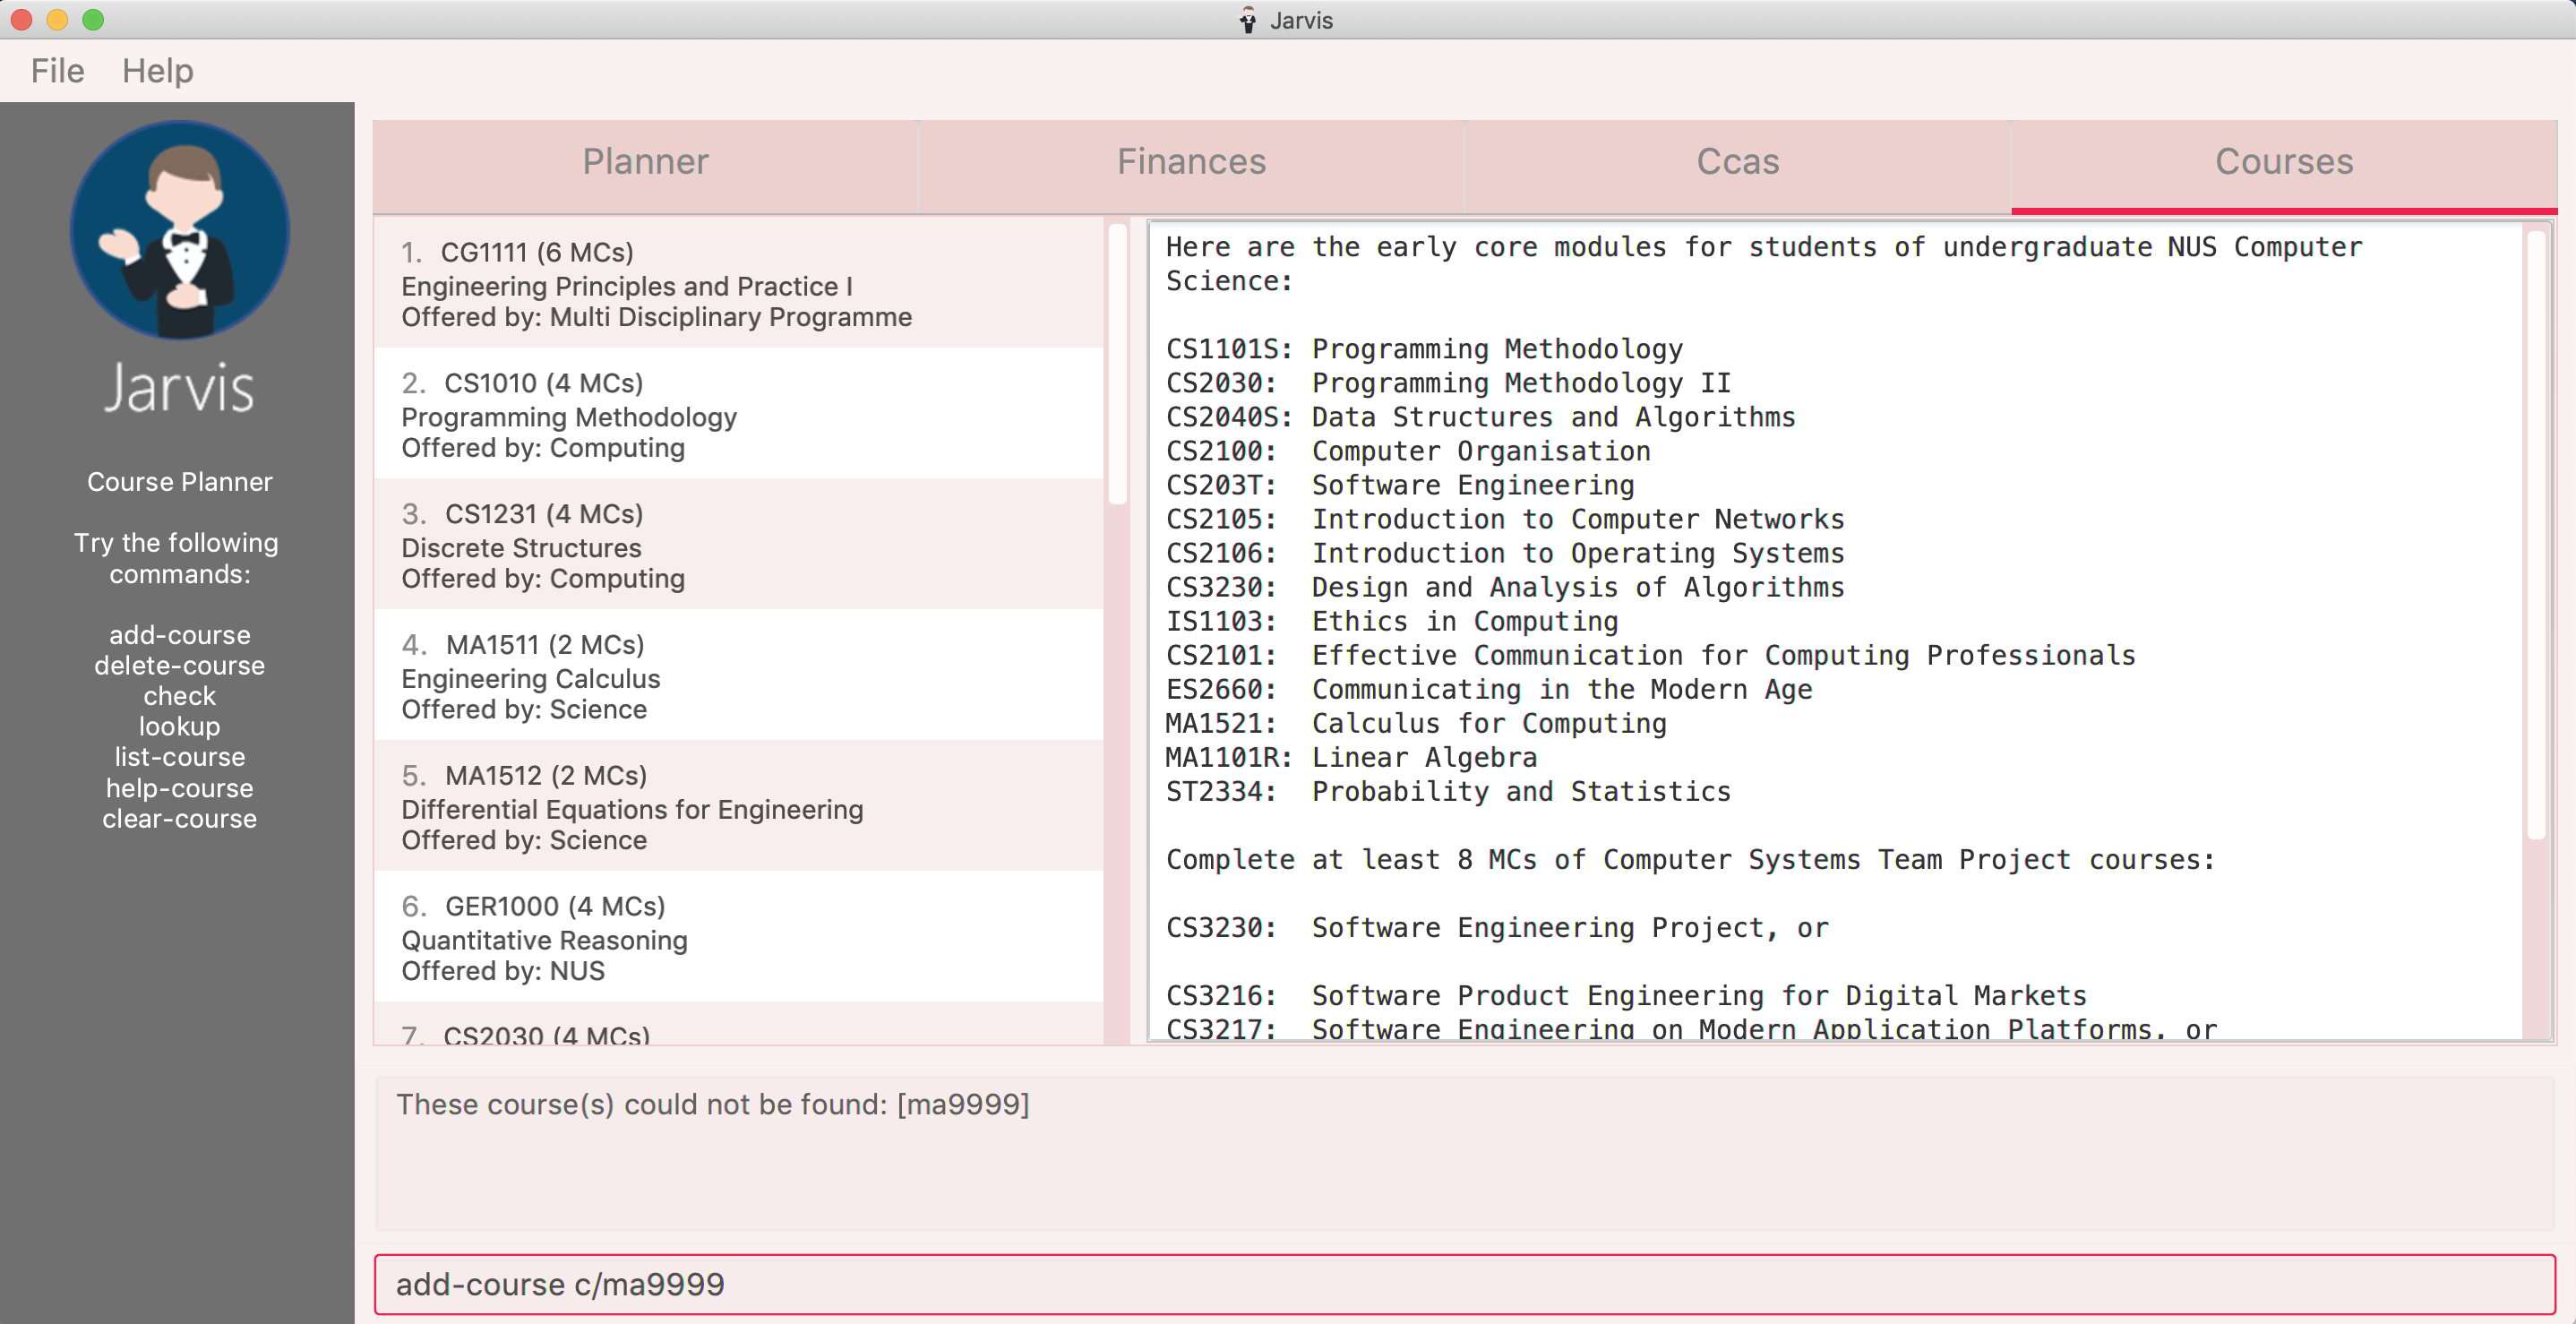
4.4.4. Look up a course’s information: lookup
You can also retrieve information about a specific course - such as course title, course code, number of credits and what the course is about. The information will be displayed in the result box on the right of the Course Planner, as shown below:
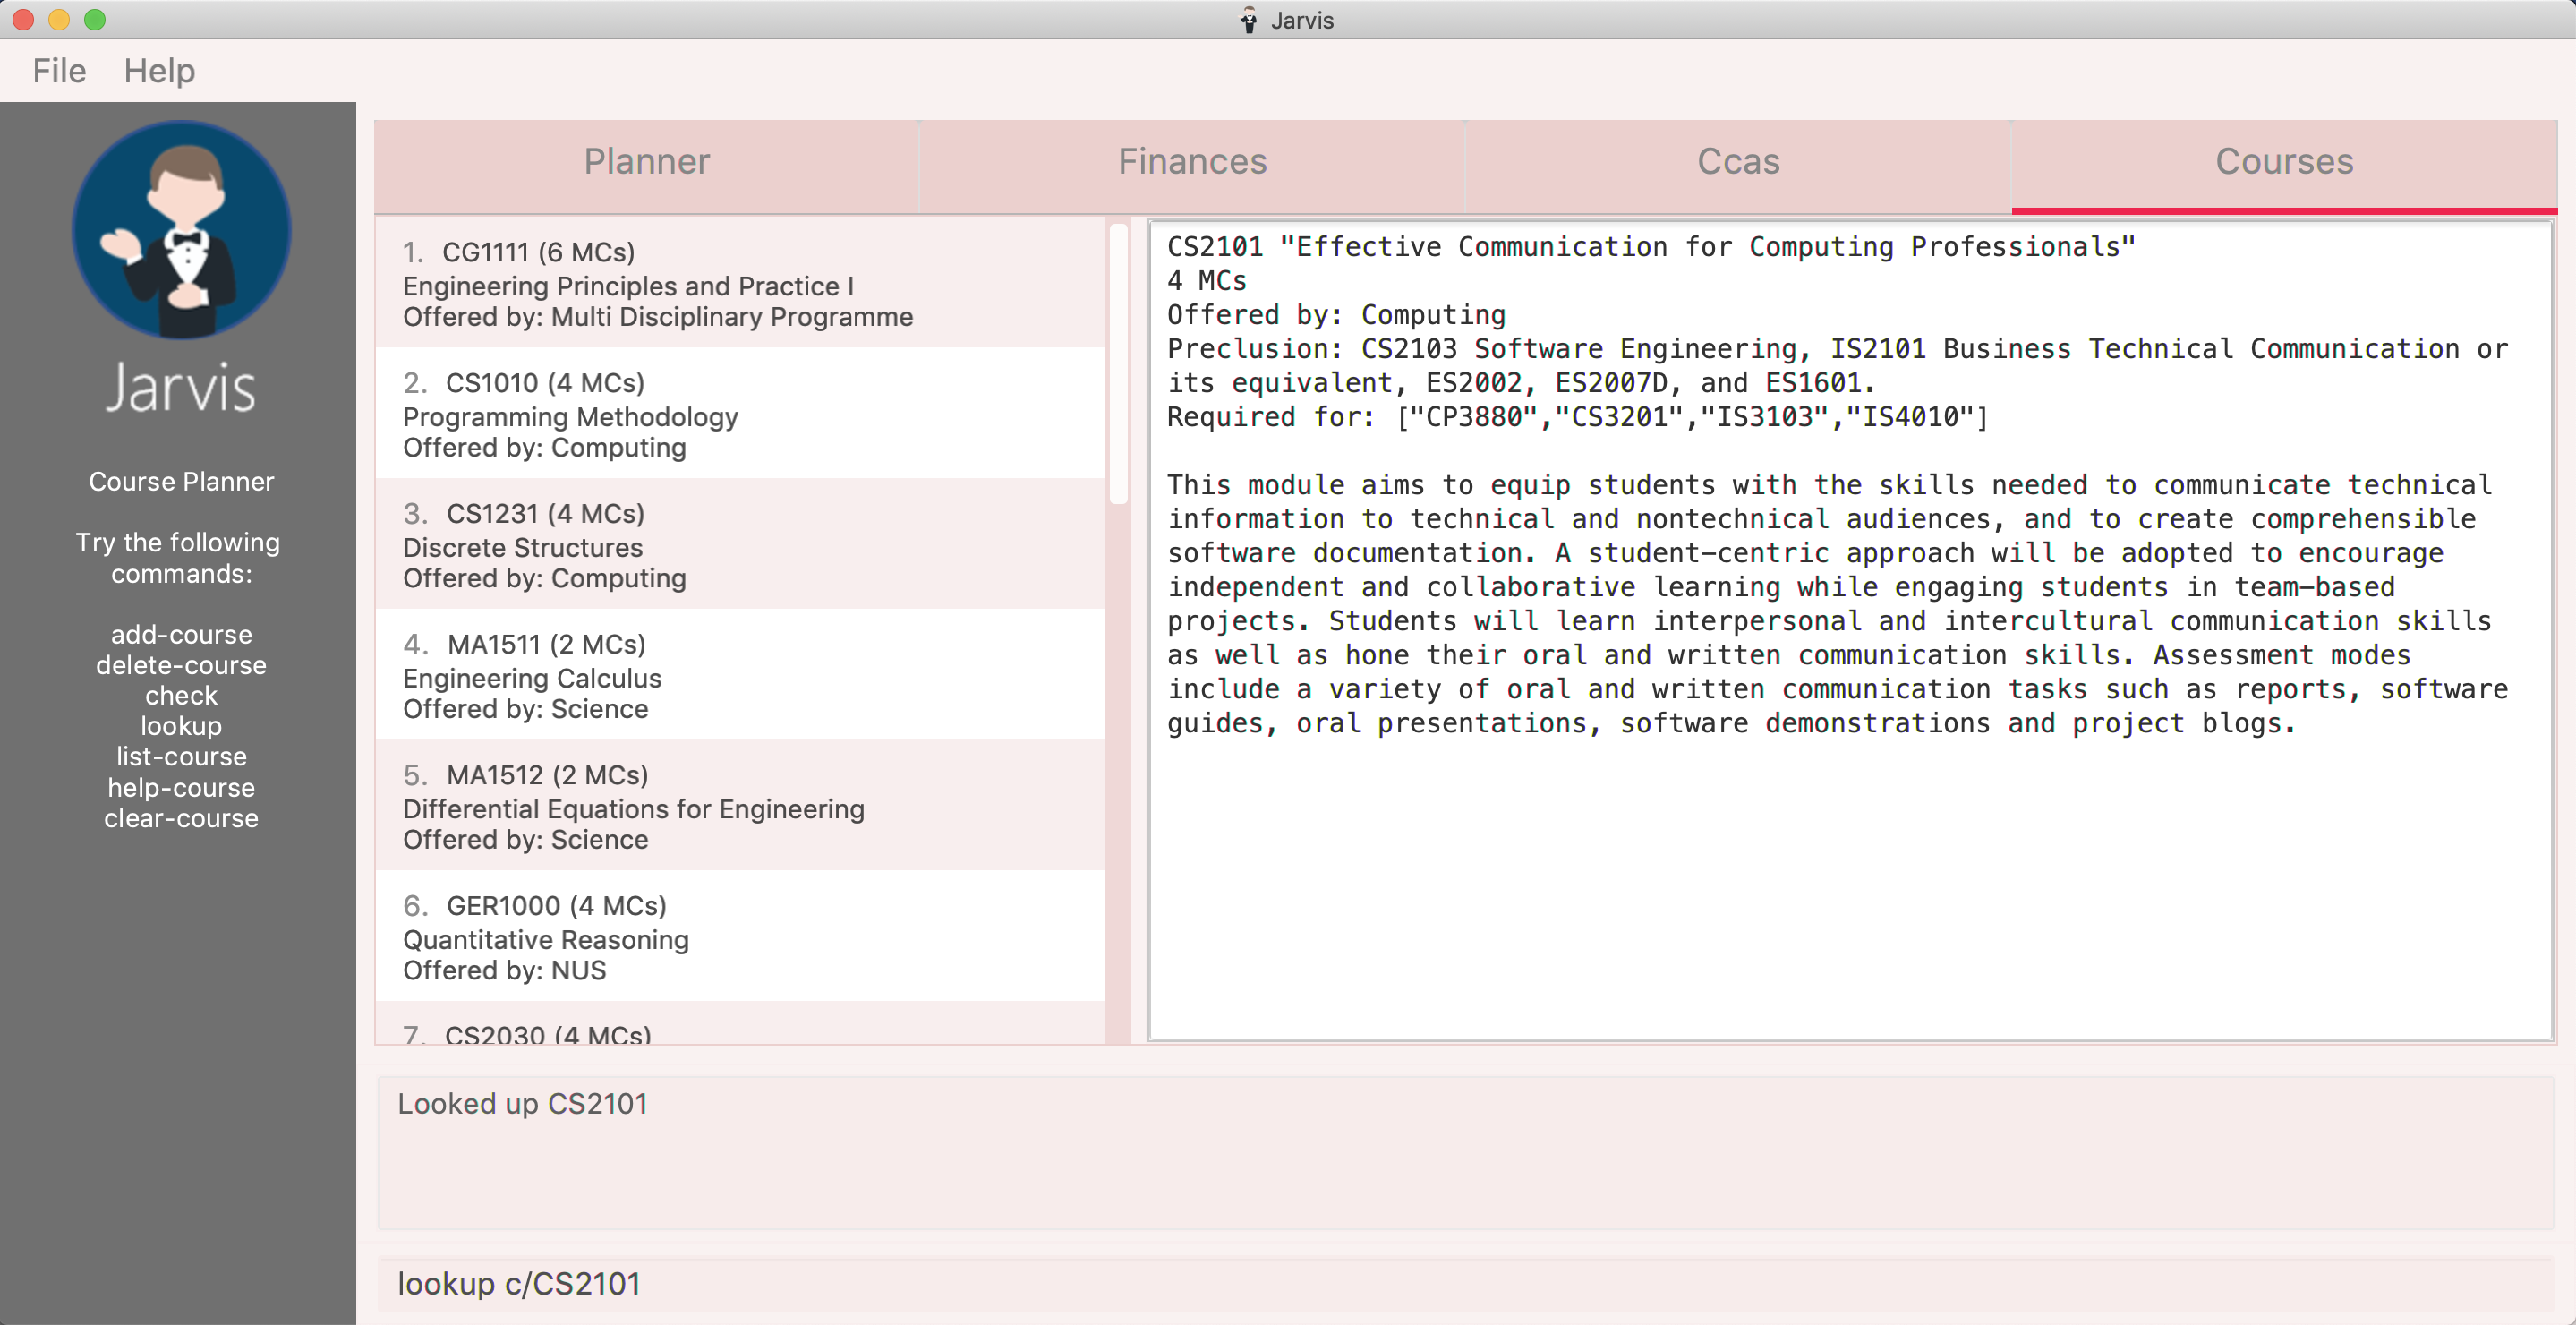
Any information you will want to know about any course is shown within the result box.
Format: lookup c/COURSECODE
Example
lookup c/CS1010
4.4.5. Check a course: check
If you are not sure if you can take a certain course next semester, this
feature will come in handy. Simply check the course in question. The result
is dependent on the courses you have added to your list, and Jarvis will
display a very helpful tree similar to NUSMods to show you what requirements
you need for each course.
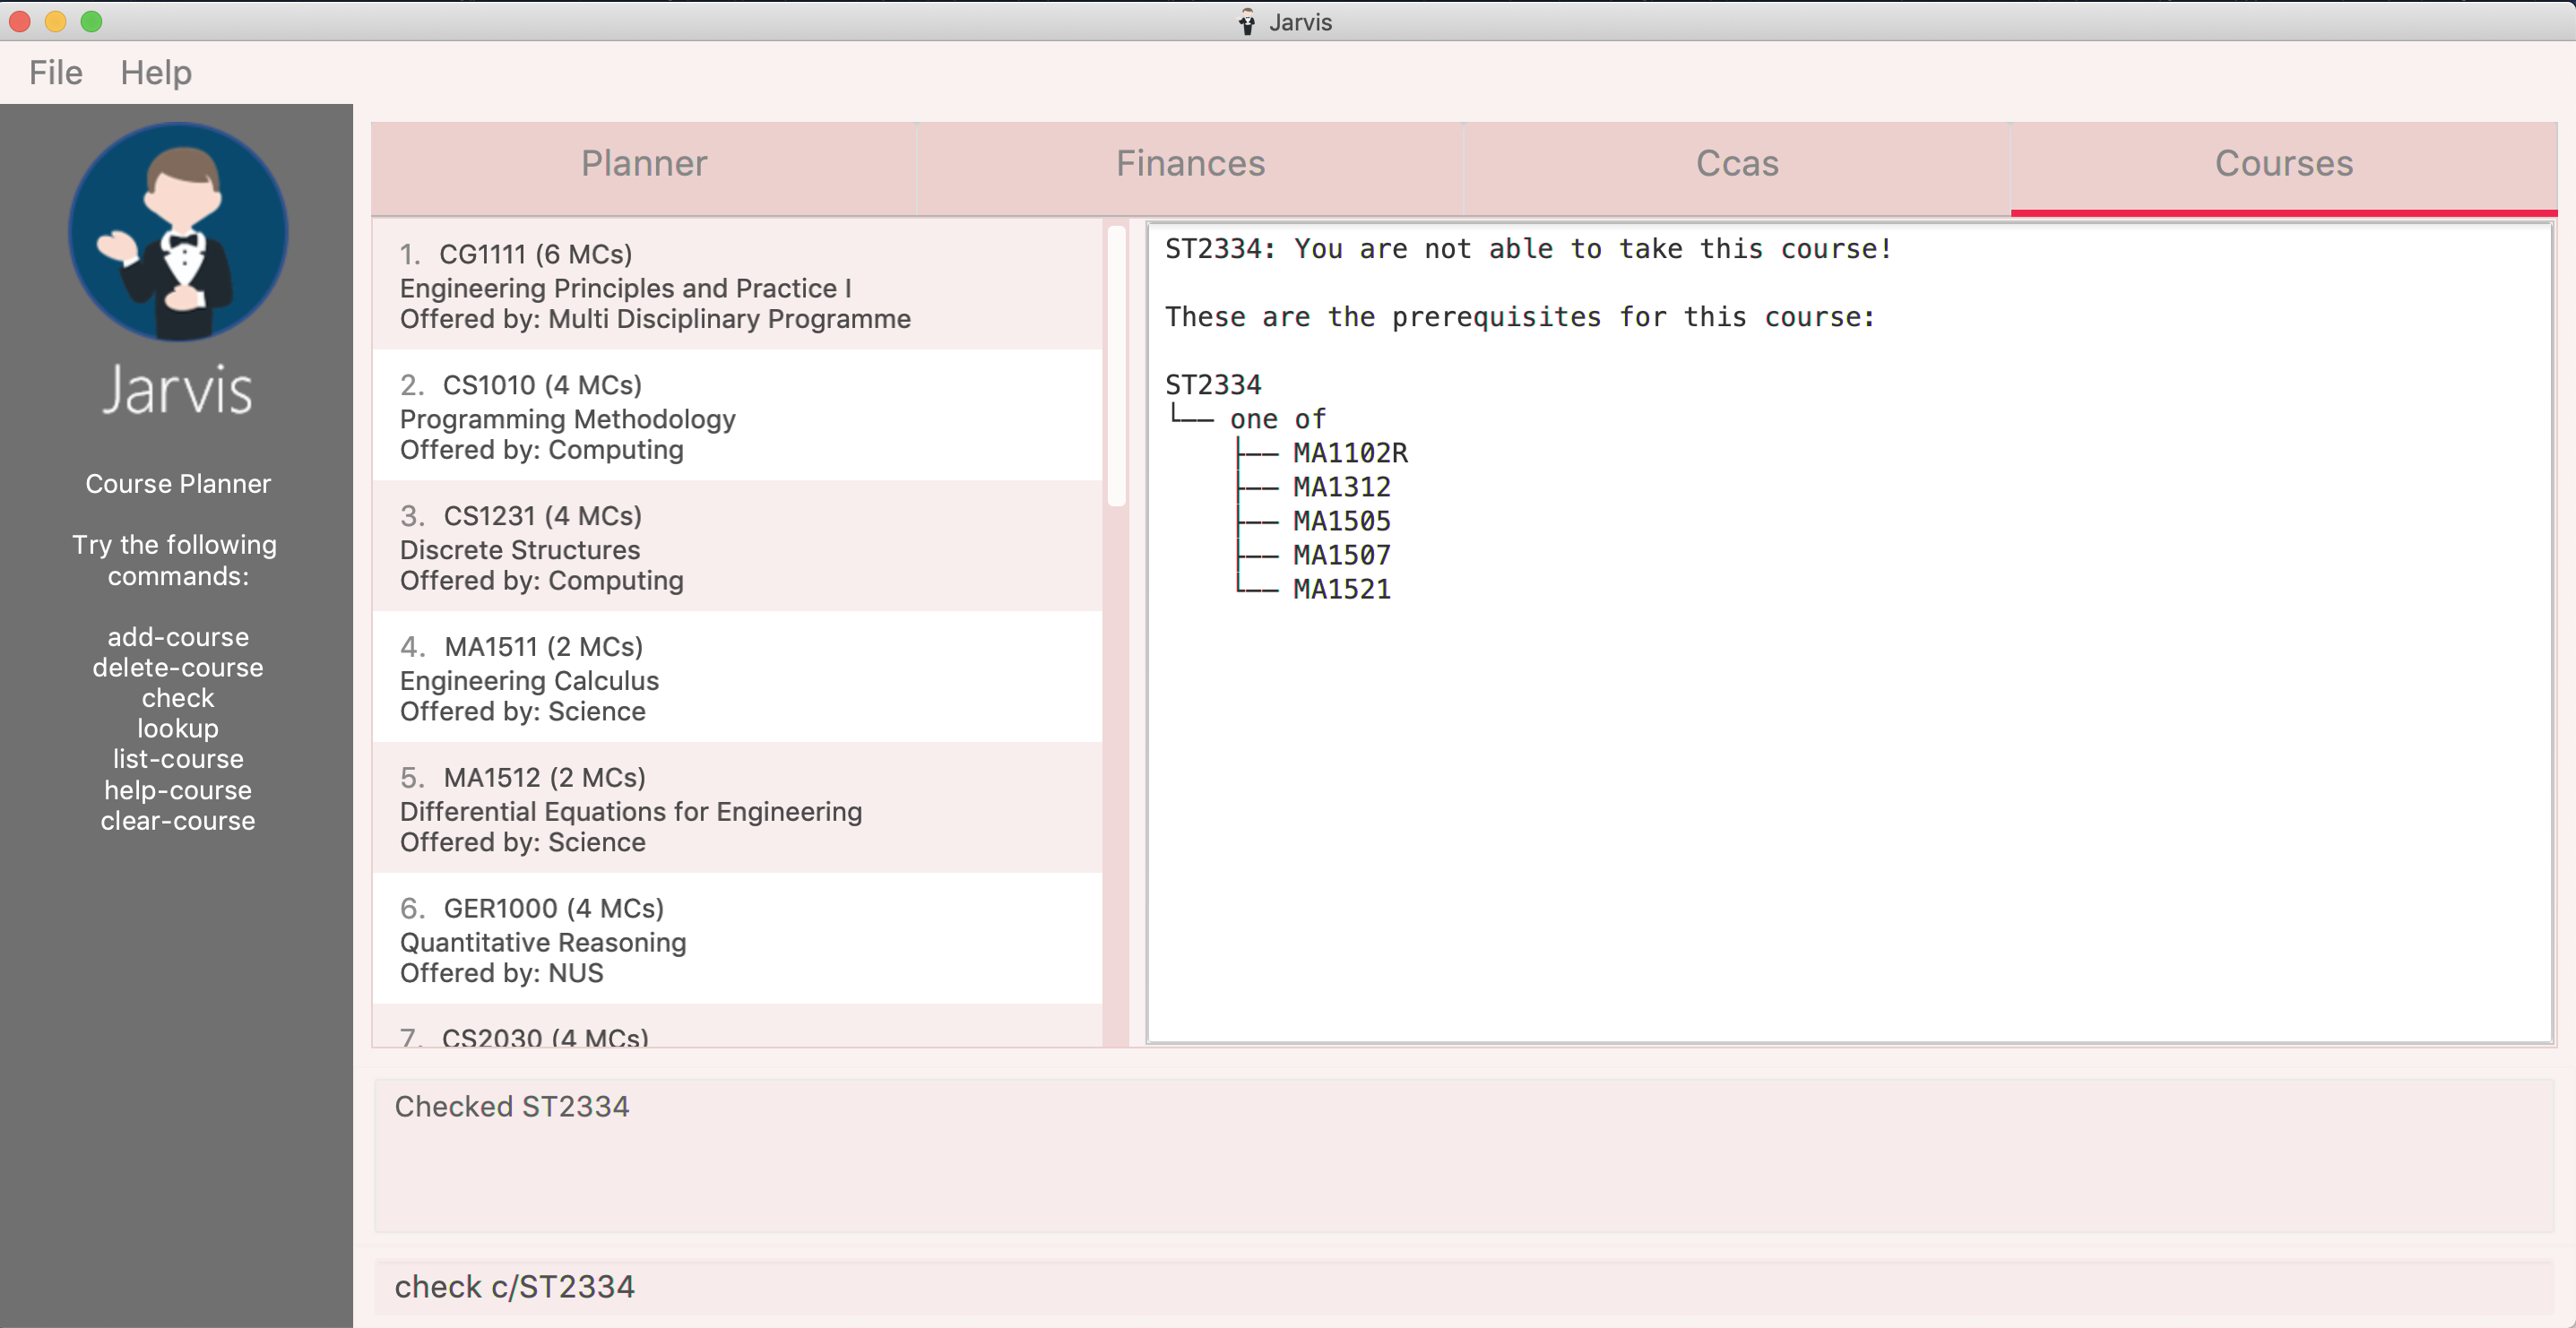
In this case, the user is unable to take the course ST23344 as he has not filled any of the requirements.
Format: check c/COURSECODE
Example
check c/CS1010
4.4.6. Check your CAP: cap [v2.0]
If you wish to check your current CAP (Cumulative Average Point), you can do
so with the command cap. Jarvis assumes that any course that does not have
a grade attached to it in your list have not, or are currently being taken
and will not be counted towards you CAP.
Information on the CAP system can be found here.
Format: cap
4.5. App History
"Oops! I have entered a command that has entered inaccurate information to the application, and I am not sure where to find the mistake or how to fix it!"
It’s great that Jarvis remembers your changes and allows you to easily undo your
commands!
"Wait! What if I am not sure if I want to undo the changes made by the command?"
Jarvis also enables you to redo any changes that you have undone! Therefore, you
can confidently undo and redo changes that you have made without worrying about
the inconvenience of remembering and re-entering commands all over again.
Only commands that make changes to the content of JARVIS can be undone and redone. Commands that
list items or finds items in Jarvis therefore cannot be undone or redone.
|
Jarvis remembers the last thousand commands that you have entered into the
application, even after you exit the application!
Jarvis also lets you undo and redo multiple commands in a single undo or redo
command! This means that you can undo and redo up to a thousand commands with
a single undo or redo command.
|
JARVIS undo and redo commands in a specific sequence:
Undo commands will undo command(s) starting from the latest command the user entered. Redo commands will redo command(s) starting from the latest command that was undone. |
If you are not sure of how many commands you have undone or redone, do not worry! Jarvis can tell you how many commands you have undone or redone before you make any further changes!
You can see how to undo and redo commands in JARVIS in the following sections below, which will cover two new commands:
-
undo [NUMBER] -
redo [NUMBER] -
list-history
[NUMBER] is an optional argument indicating the number of commands that you
want to undo/redo.
[NUMBER] should be a positive integer that is not larger than
the available number of commands that can be undone/redone (Don’t worry, JARVIS
will let you know if [NUMBER] is out of range).
If [NUMBER] parameter is not
supplied, then [NUMBER] is taken to be the value 1.
|
4.5.1. Undo command(s): undo
Format: undo [NUMBER]
where [NUMBER] is an optional argument indicating the number of commands that you
want to undo.
[NUMBER] should be a positive integer, no larger than
the available number of commands that can be undone. (Don’t worry, JARVIS
will let you know if [NUMBER] is out of range).
If [NUMBER] is not
supplied, then it is taken to be the default value of 1.
|
Example
-
undo— This command will undo the latest command entered by the user. It is equivalent to the commandundo 1 -
undo 5— This command will undo the 5 latest commands entered by the user, starting from the latest command.
4.5.2. Redo command(s): redo
Format: redo [NUMBER]
where [NUMBER] is an optional argument indicating the number of commands that you
want to redo.
[NUMBER] should be a positive integer, no larger than
the available number of commands that can be undone. (Don’t worry, JARVIS
will let you know if [NUMBER] is out of range).
If [NUMBER] is not
supplied, then it is taken to be the default value of 1.
|
Example
redo — This command will redo the latest command undone by the user.
It is equivalent to the command redo 1
redo 5 — This command will redo the 5 latest commands undone by the user,
starting from the latest command that was undone.
| If you have entered new commands after undoing previous commands, you will not be able to redo the old commands. |
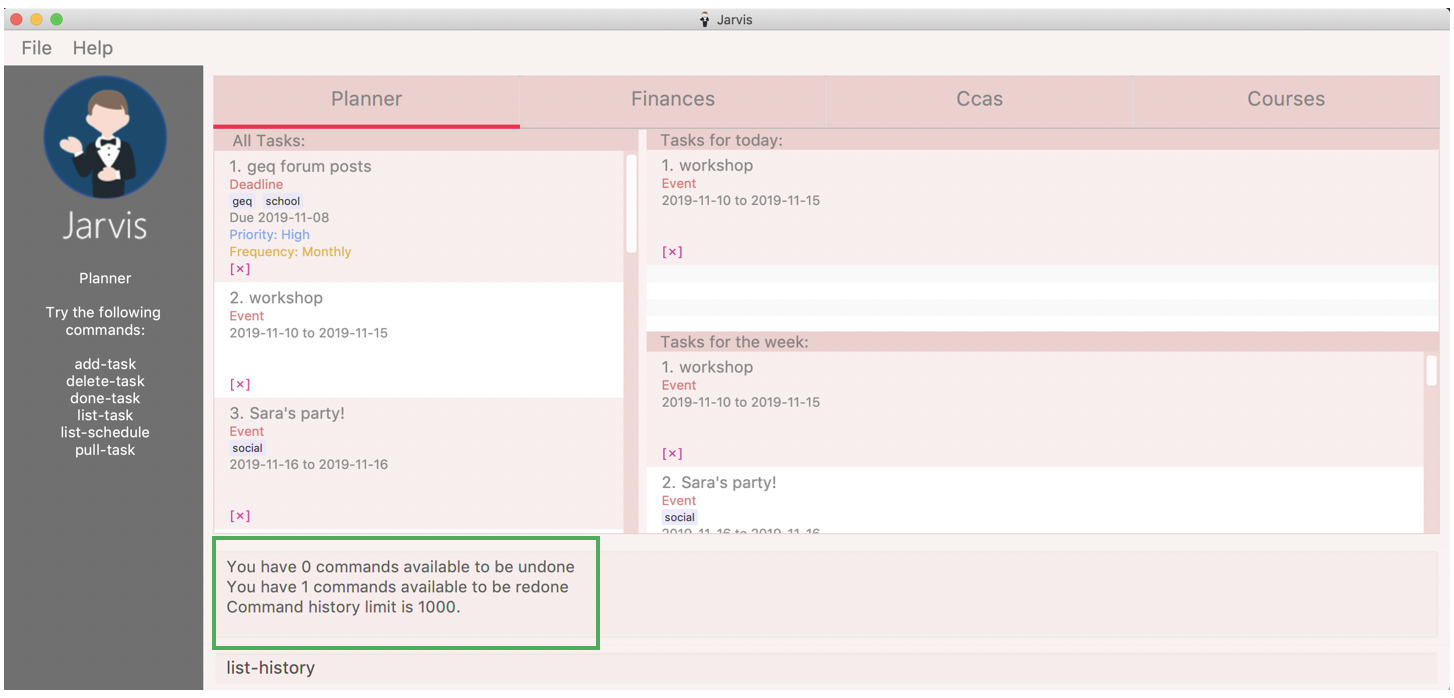
4.5.3. List the number of commands you can undo or redo: list-history
Jarvis can provide you with the maximum number of commands you can undo and redo - which will be shown
in the Command Result Box.
Format: list-history
Lists the number of available commands to be undone, number of available commands to be redone, and the limit of the maximum number of commands Jarvis can remember for you to support undo and redo commands.
4.5.4. Use case for undo, redo and list-history
Let’s say you would like to delete the first task in the Planner, highlighted by the
green box in Figure 19 below.
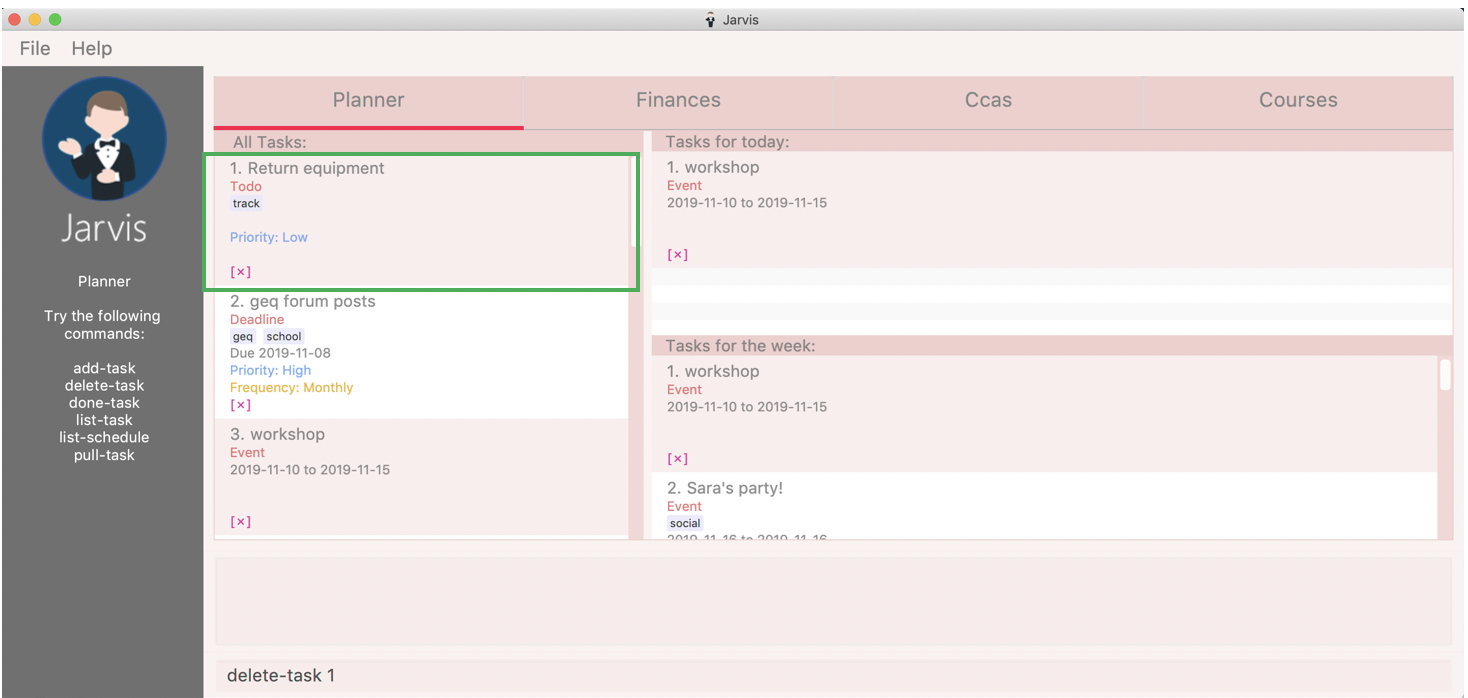
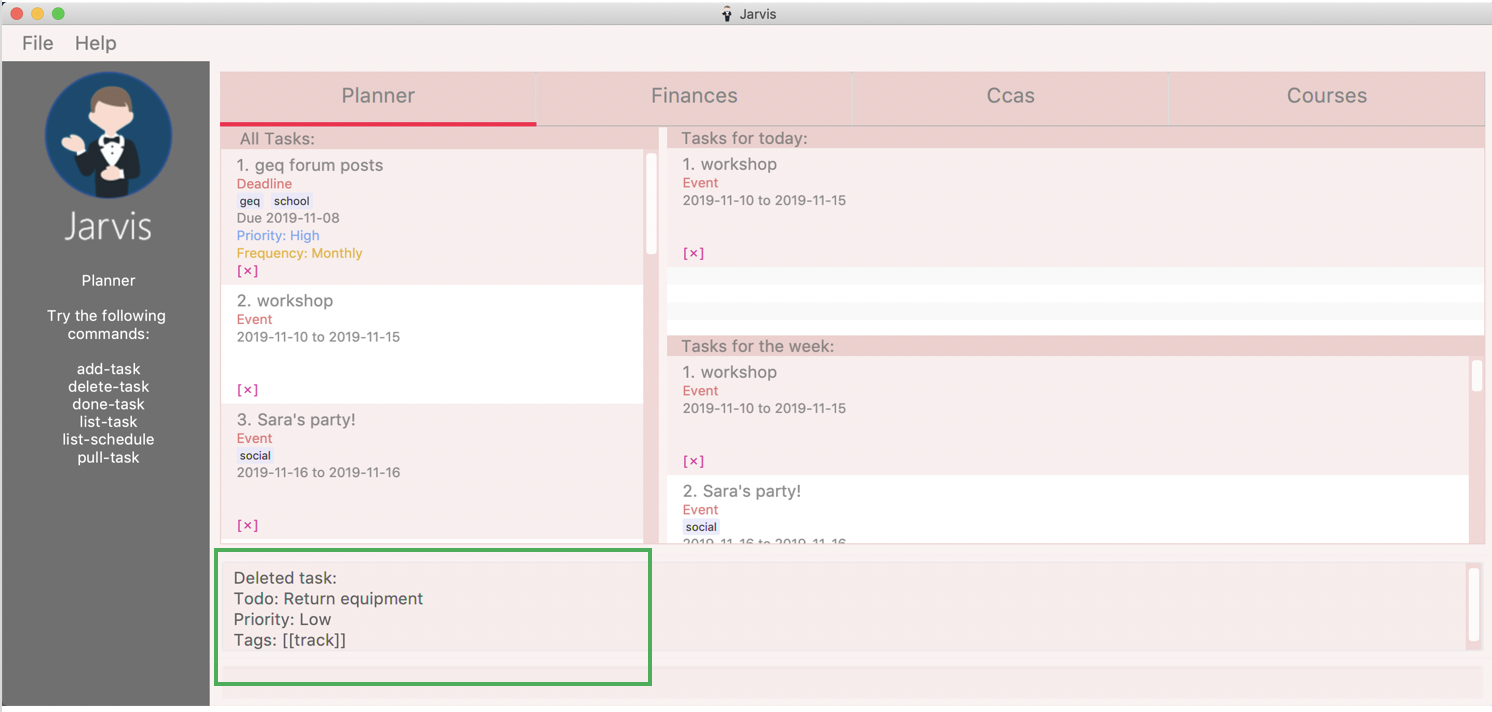
Deleting the task in Jarvis would then trigger the appropriate command result as seen in the figure below.
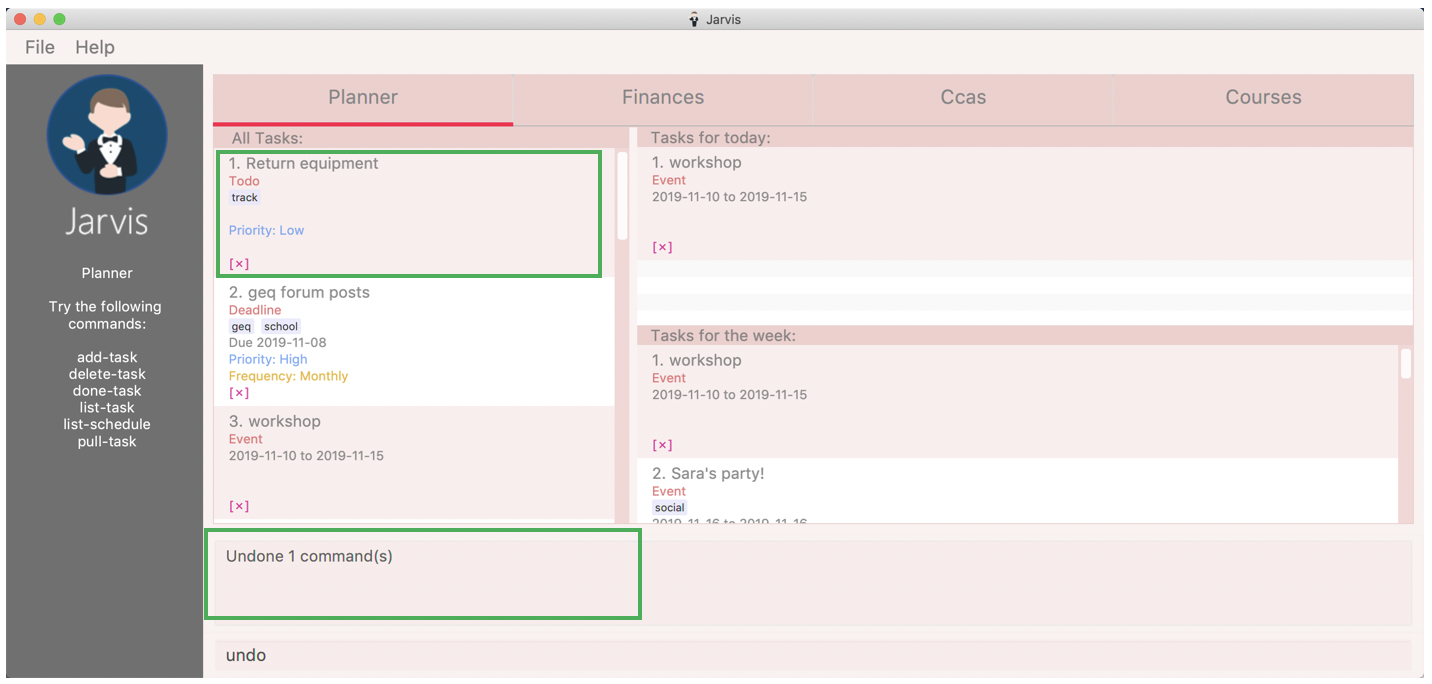
As shown in the picture below, entering the command undo, would revert the delete command that
you had entered earlier.
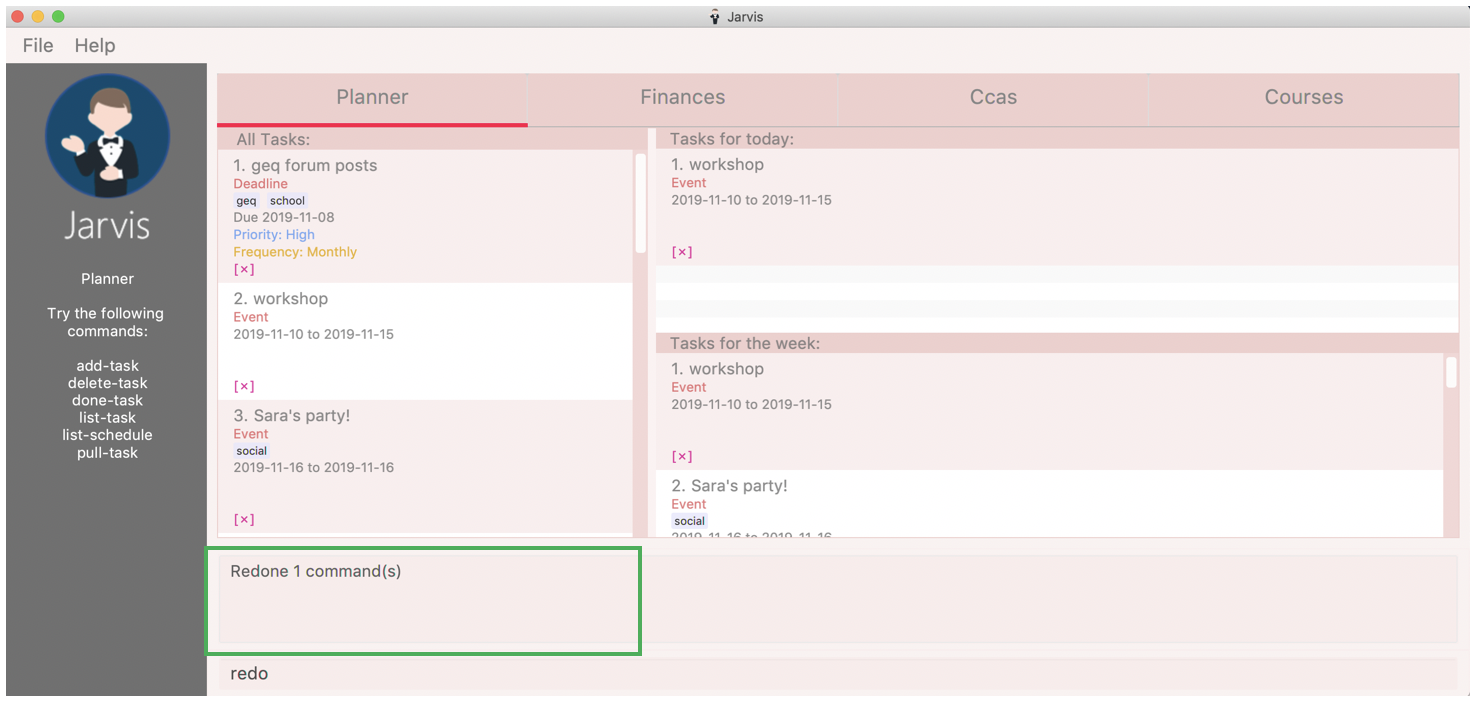
You can enter the command redo, re-applying the delete command on Jarvis
as shown in the picture below.
You can enter the command list-history, displaying the number
of commands that can be undone and redone.
5. FAQ
Q: How is the budget for monthly limit calculated?
A: Budget is calculated from the 1st to the last day of every month. The budget is split evenly across all days.
Q: Are official NUS CCAs integrated into the CCA Tracker?
A: Not in the current version, but you can look forward to it in v2.0!
Q: Am I able to manage my non-computing courses in the Course Planner?
A: As the information is obtained directly from NUSMods, you are able to add any official NUS module to the Course Planner, as long as it is available on NUSMods as well.
6. Command Summary
A convenient summary of all the commands you can use in Jarvis.
6.1. Task Planner
-
add-task t/todo des/TASK-DESCRIPTION [#TAG]… [p/PRIORITY f/FREQ] -
add-task t/event des/TASK-DESCRIPTION d/START-DATE//END-DATE [#TAG]… [p/PRIORITY f/FREQ] -
add-task t/deadline des/TASK-DESCRIPTION d/DUE-DATE [#TAG]… [p/PRIORITY f/FREQ] -
delete-task INDEX -
find-task KEYWORD… -
done-task INDEX -
pull-task { t/TYPE | #TAG | p/PRIORITY-LEVEL | f/FREQUENCY-LEVEL | d/DATE } -
list-task -
edit-task INDEX//NEW-DESCRIPTION…[v2.0] -
clear-task [#TAG]… [d/DATE][v2.0]
6.2. Finance Tracker
-
add-paid d/PURCHASE-DESCRIPTION a/AMOUNT -
delete-paid INDEX -
find-paid k/KEYWORD -
add-install d/INSTALLMENT-DESCRIPTION a/AMOUNT -
delete-install INDEX -
edit-install INDEX { d/INSTALLMENT-DESCRIPTION | a/AMOUNT | d/INSTALLMENT-DESCRIPTION a/AMOUNT } -
set-limit a/AMOUNT -
list-finances -
export {csv | txt | xlsx} f/FILENAME[v2.0]
6.3. Course Planner
-
add-course c/COURSECODE… -
delete-course {c/COURSECODE | INDEX} -
lookup c/COURSECODE -
check c/COURSECODE
6.4. Cca Tracker
-
add-cca n/NAME t/TYPE [e/EQUIPMENT]… -
delete-cca INDEX -
edit-cca INDEX { n/NAME | t/TYPE | e/EQUIPMENT… | p/MILESTONE… | l/PROGRESS-LEVEL } -
list-cca -
find-cca KEYWORD… -
add-progress INDEX p/MILESTONE… -
increment-progress INDEX -
add-cca n/NAME t/TYPE [e/EQUIPMENT]… [d/TRAINING DATE]…[v2.0]
6.5. Course Planner
-
add-course c/COURSECODE… -
delete-course {c/COURSECODE | INDEX} -
lookup c/COURSECODE -
check c/COURSECODE
6.6. App History
-
undo [NUMBER] -
redo [NUMBER] -
list-history